entry progress

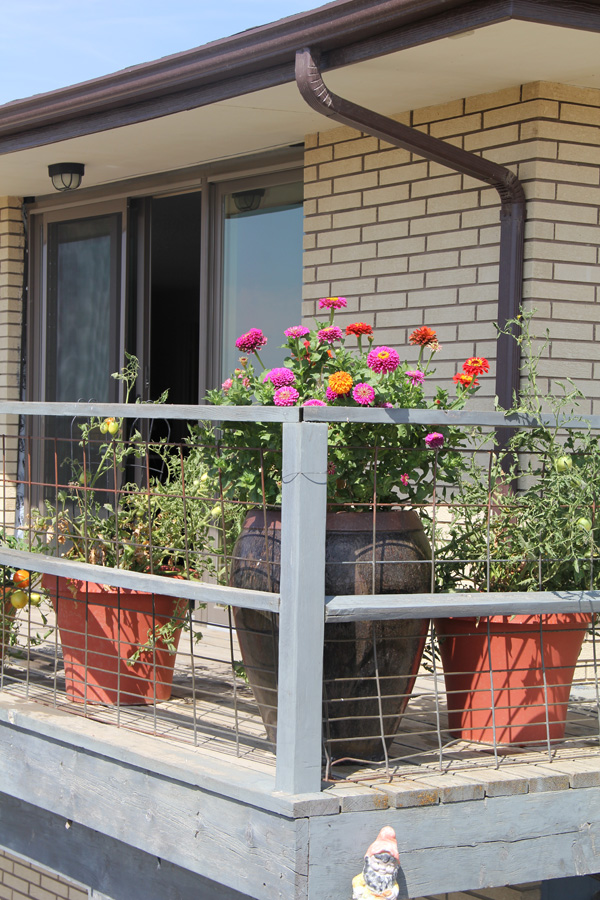
Hello and happy Thursday to you! Our girls finished up with their school year before the long weekend, so we decided to take the opportunity to get away. Last night we returned from a 6-day, 2000-mile road trip to the west coast! I would love to have all my photos downloaded to share, but before I spend the time to do that I need to get caught up on the unpacking and piles of laundry that await. I prepared this post before we left, so I will leave you with this for now and will be back next week with more. 

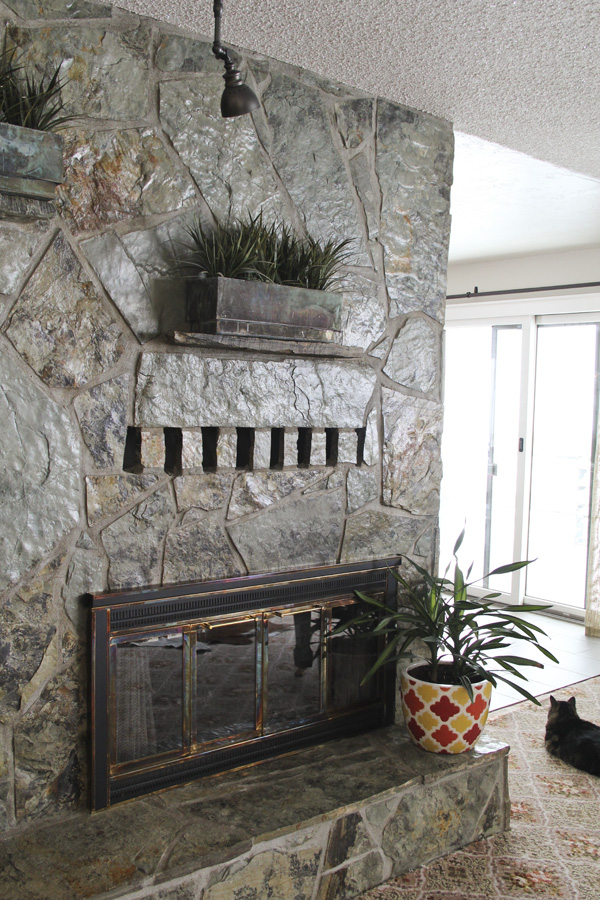
Remember what our entry way used to look like? It featured this slate planter. The dirt didn't exactly smell fresh and I was always afraid the cat would use it as a catbox. We were glad to get it out of there as there were a couple of rotten floor boards underneath. (We saved the rocks to use for a future outdoor project). 

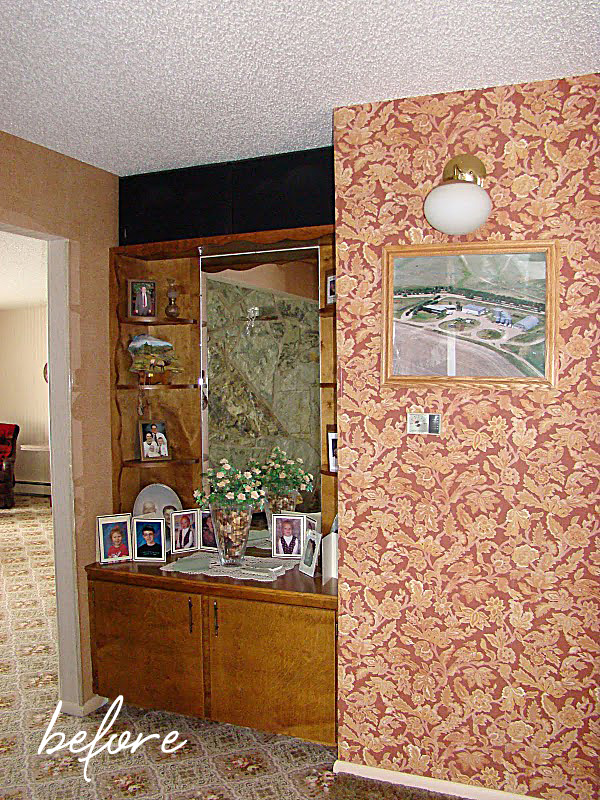
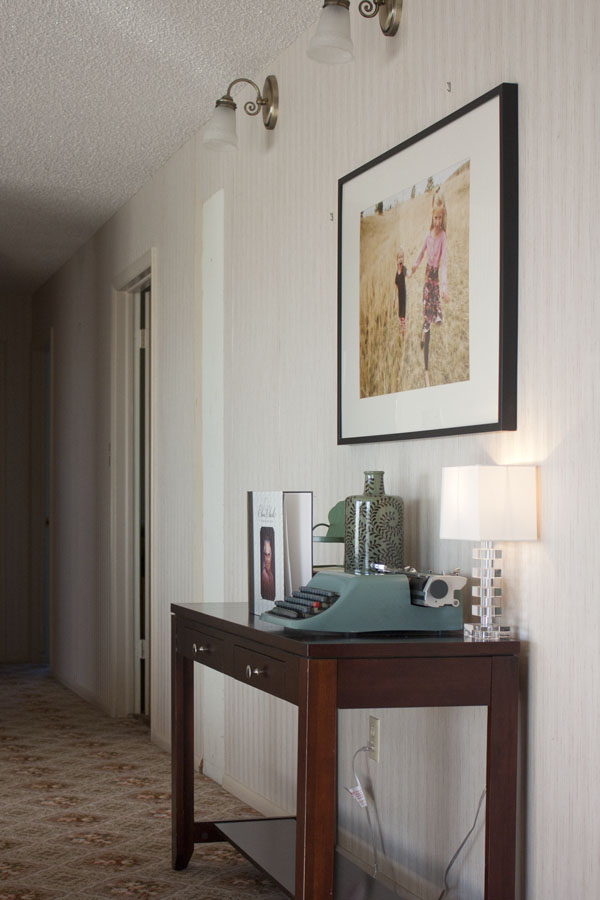
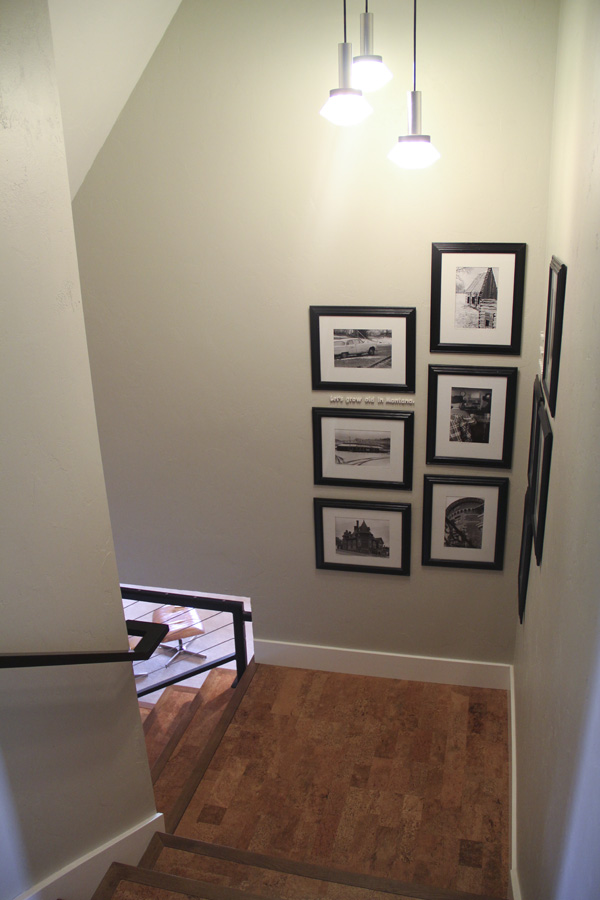
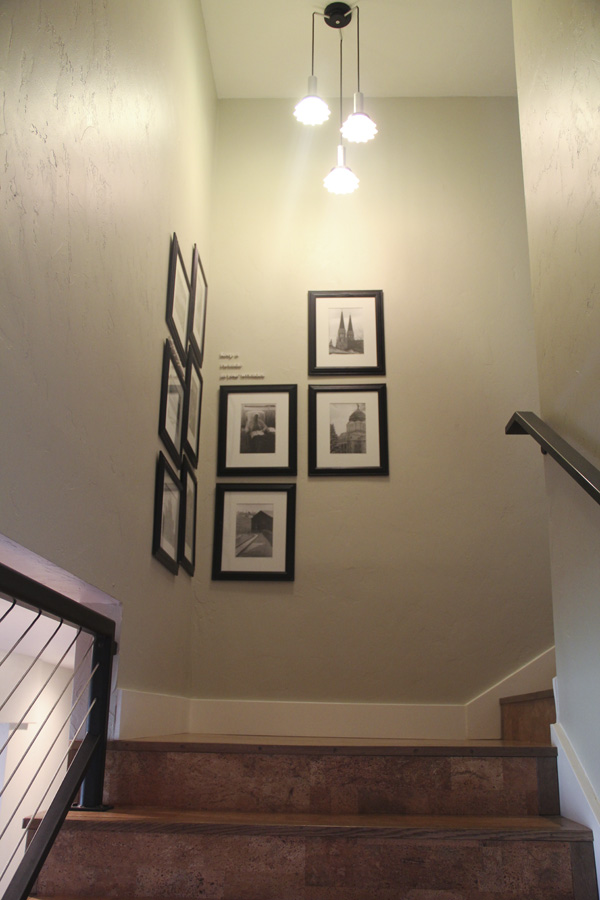
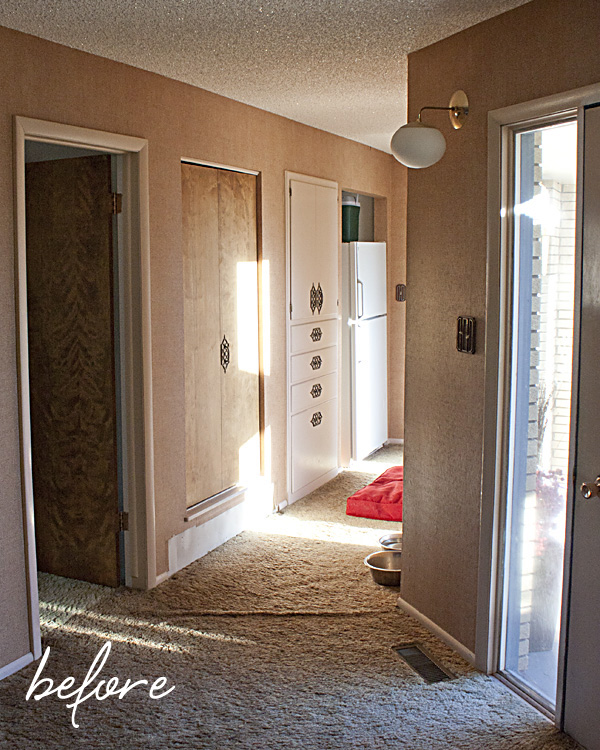
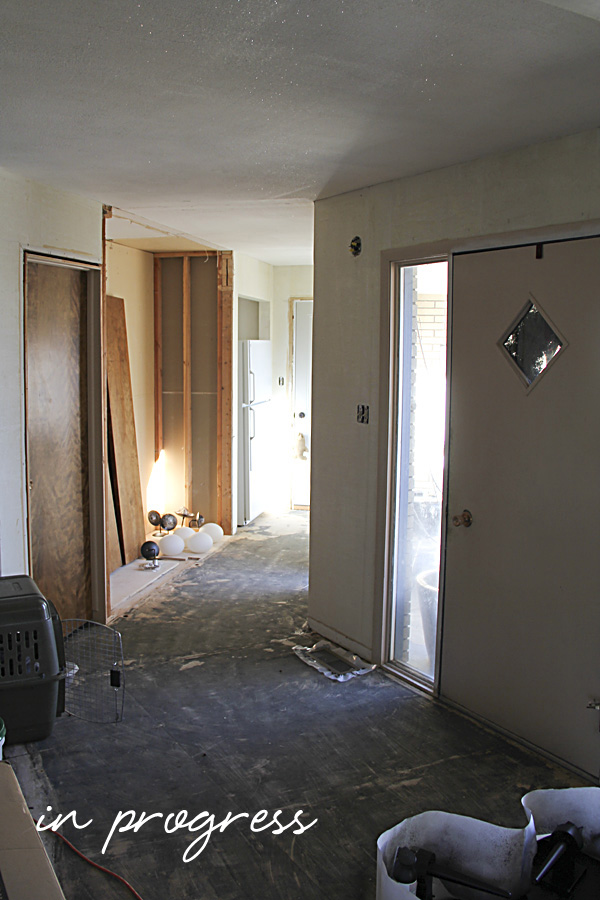
The hallway looked like this:

And now it looks like this:

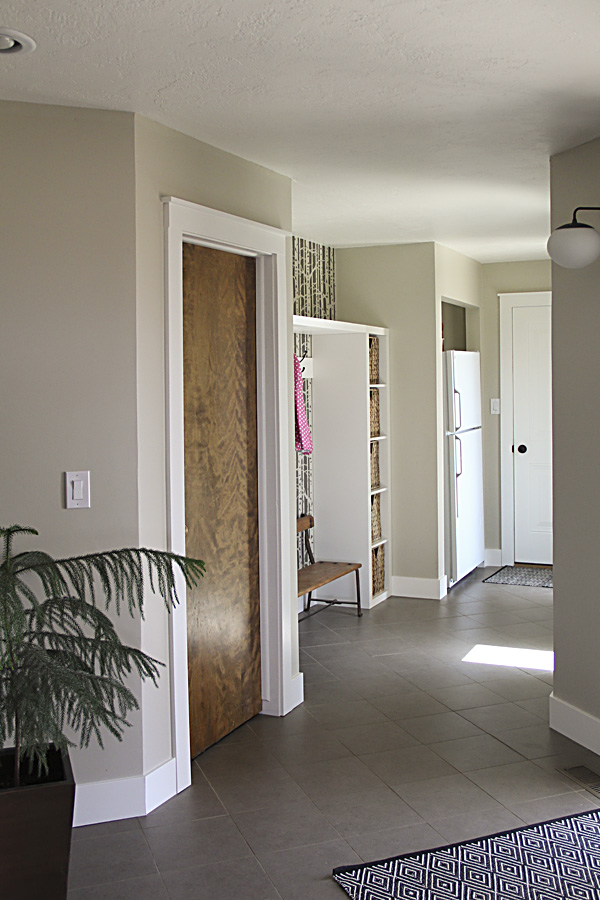
I've have been spending some time painting doors and trim recently, so it is nice to finally be able to show you the changes in this area! The biggest thing we did in the entry hall (besides replacing all the doors and windows) was to remove the closets and cupboards that were there before. Now we have a "landing strip" for our gear as we go in and out. Admittedly having this all out in the open isn't always fantastic. It does get stacked pretty deep with coats, backpacks, and shoes, but it sure beats the piles of stuff on the floor. Kids just won't take the time to put everything away in closets.

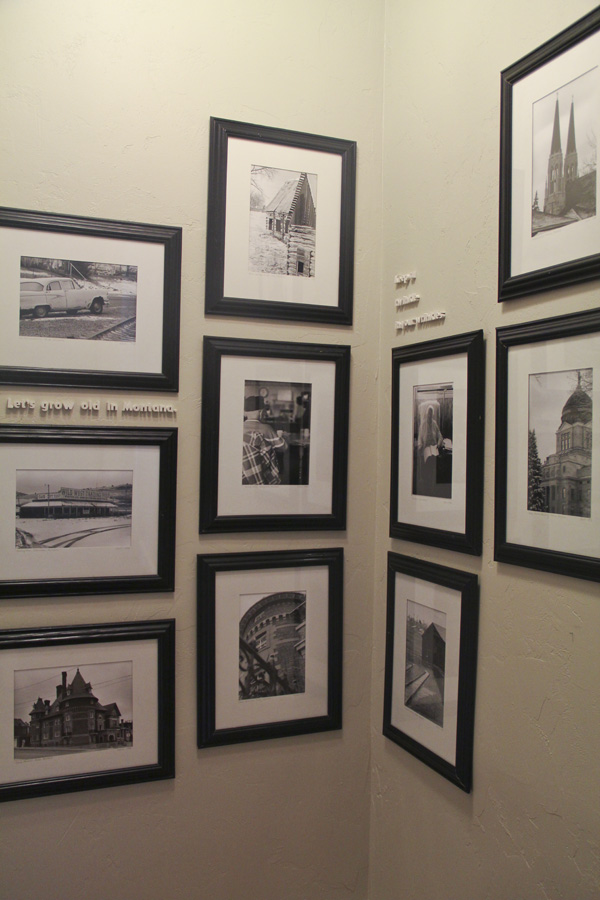
This is where I did the rest of the stenciling that I mentioned in my previous post. For shelving we actually purchased an IKEA Expedit unit. Everyone in the family has a basket to hold their sunglasses, gloves, etc. My dad built a shelf to go across the top. Then we simply added a strip of baseboard molding to attach the hooks to. We have purchased oak boards to build a bench, which I will stain to match our kitchen cabinets and shelves. The bench here isn't quite tall enough or wide enough, but it works as a place holder until we can build one. 

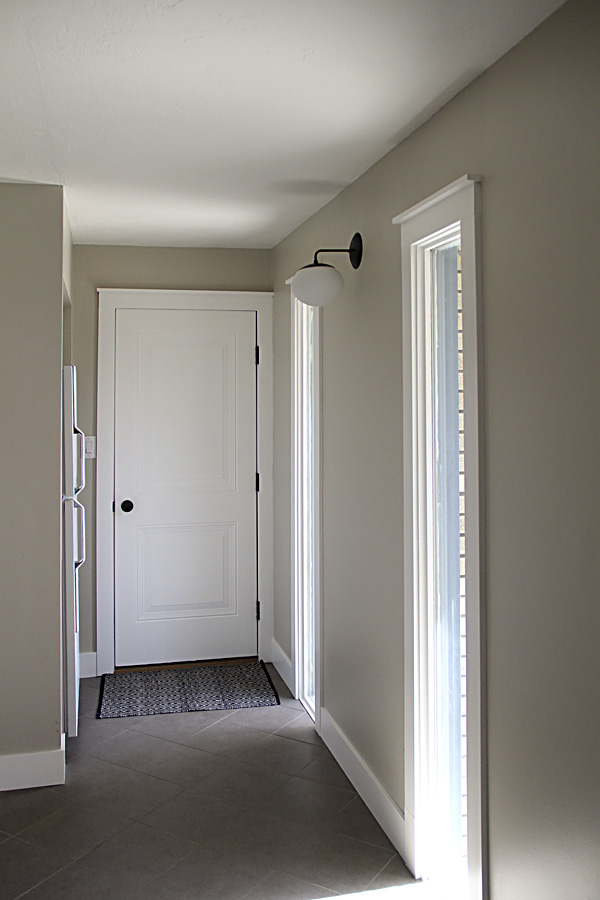
It is so nice to have freshly painted trim and doors and new windows. The fridge is a bit of an eye sore, but we love having an extra fridge and this is a pretty convenient place to have it. 

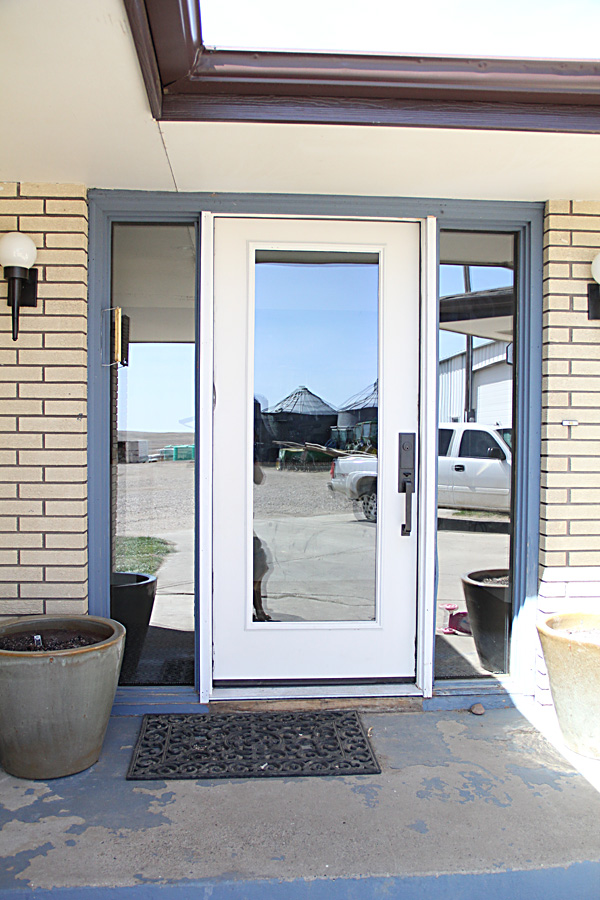
We replaced the front door quite awhile ago. This is what it looked like before, after we had started demo.

The old door wasn't in very good shape and didn't seal well. The side windows were even worse- they weren't even double-pane insulated glass. They were basically very scratched-up plexi glass held in place with wood stops, and had lots of dirt and condensation between the panes. We couldn't find a stock door/window unit to fit the space, so we ended up buying the door and glass separately. It meant we had to do quite a bit of trimming around them to make them look nice, but it is finally done. And painted!

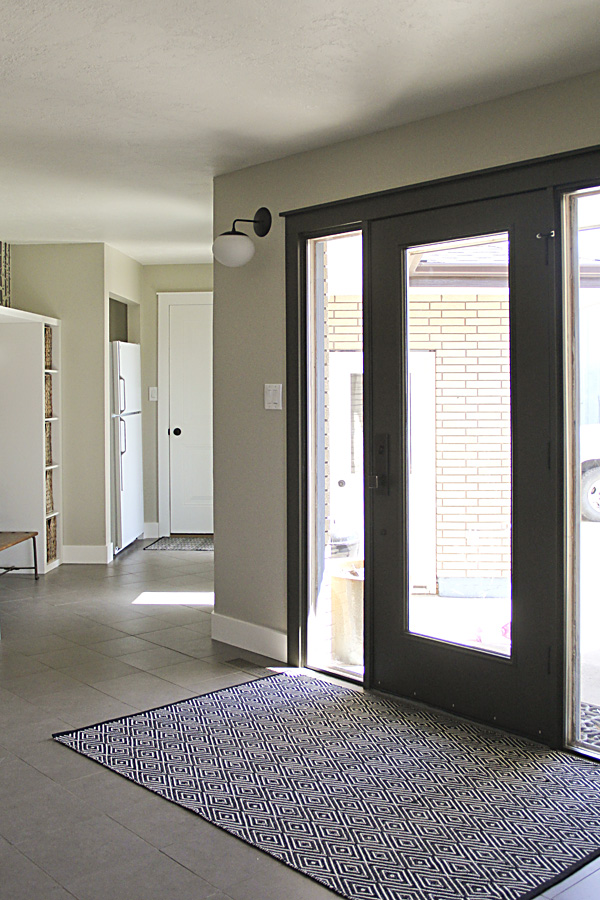
I wanted the front door to have weight and presence, even though it is mostly glass, so I painted it Behr Black Bean. It is an off-black with green undertone. A glass door like this certainly isn't for everyone, and it wouldn't be for me either if we lived in town, but out here we don't have to be too concerned about privacy. I like to have the light stream in and it is great to have the view out to where the guys are working. If I ever feel like I need more privacy I might explore the options of frosted window film.

While the inside looks finished, the outside—not so much. I have a lots of scraping and sanding to do before I paint it (and ALL the exterior trim) dark brown. 

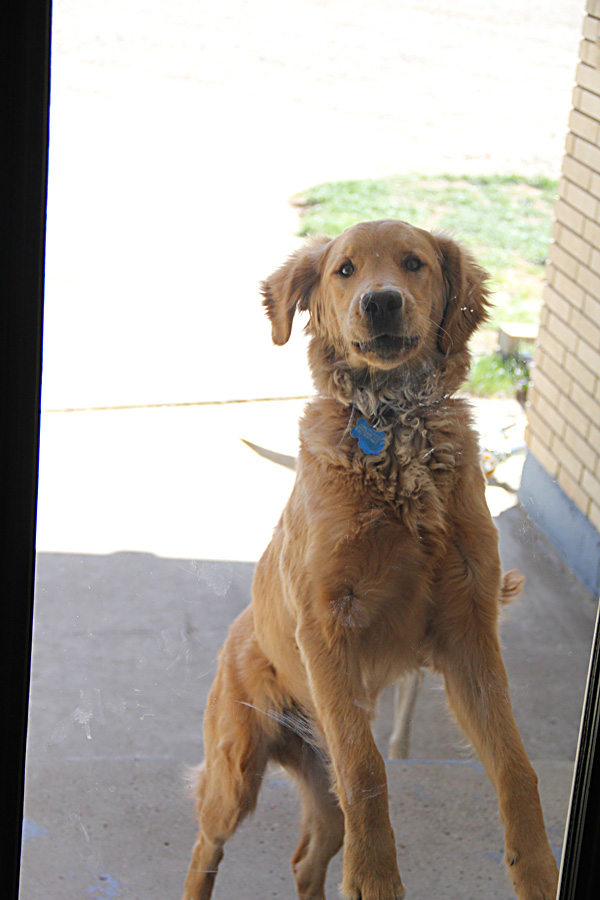
Now if I can just keep this little guy from jumping up and smearing all my glass.... :)

I have lived with my new entry rugs for awhile now, and I must say that I love them.

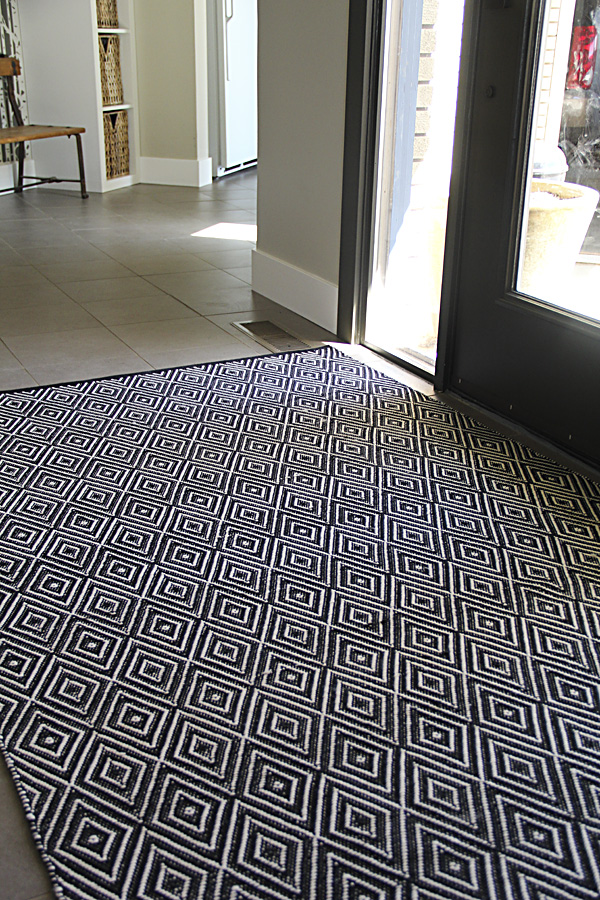
They are indoor/outdoor rugs from Dash & Albert (purchased from Wayfair, but they don't seem to have this pattern right now). They have a huge selection of patterns to choose from, and they are fantastic for an entry because they clean so easily. I usually just vacuum over them, but when I'm mopping I often run my mop over them as well. You can even take them outside and hose them off. 

Little by little... progress is made! It is so gratifying to look at before/after pictures like this and see how many things we have transformed! It's like playing the game "How many differences can you count?"


measuring up

I've seen various versions of Growth Chart rulers floating around Pinterest, including this cute one in the photo above from here. Most of them are done on a piece of wood that can be taken down and moved with you. Smart. 

But I had a built-in piece of wood that seemed perfect for the job, and after all, we don't plan to move. It needed a make-over anyway. The wood end cap on our fireplace was stained a lighter color and didn't match our new cabinet color.

A perfect spot for a growth chart!

I didn't take any in-process photos because I wasn't completely sure it would work out. And it certainly isn't perfect. I decided to do a reverse effect and let the wood show through where the numbers are. To do this I printed the numbers out on a full sheet of label stock and cut them out with an X-acto knife. I cut strips out of the same label sheet with a paper cutter, and then cut them to length. First I sanded the board really well, then I then carefully measured and stuck the labels to the board.

In case you are wondering, yes, it is accurate—at least to about 1/8", which is close enough for measuring height. I measured very carefully! :)

After my labels were in place, I painted 3 or 4 coats of chalkboard paint. This is where I erred. I should have primed in addition to the sanding. I had bubbles in my paint. This may or may not have happened anyway, I'm not sure, but it was very apparent afterwards when I rubbed chalk over it to season it. By then it was too late to sand and recoat because I had removed all of the stickers.

The other problem is that the stickers didn't come off very easily and paint bled under them in places. If you look closely my lines aren't perfect. But life is too short to worry about perfection. Good enough. 

After taking these photos I decided to clean all the chalk off, which makes the bubbles much less apparent. I still like the matte black finish, even if it doesn't function as a chalkboard. I mark the heights in pencil anyway because I don't want them to rub off. The pencil marks are a little hard to see on the dark color, but that's okay with me too because it stays looking clean.

I only wish I'd done this sooner! Abby is already 5'2" at 10 years old. Crazy. It will be interesting to see if the other two are even close. So far the tallest mark is at 6'3" (my brother). Any taller and my little dinner bell interferes with the measuring... but oh well, the dinner bell has been here forever and it will stay for nostalgia sake!

Beyond the growth chart is a little niche leading into the living room. It used to look like this:

Crazy, huh? We still plan to put a desk/command center here for me to use for cookbooks, my laptop, and school paraphernalia. I'd like to have my dad help custom build it to look something like this with little niches and closed storage, but he is a busy man and I might get impatient and find a solution I can piece together with stuff I can buy. Depends on which comes first—time or money. 

In the meantime, the wall was in rough shape from removing the mirror that was glued to the sheetrock, so I decided to stencil it using this stencil from Cutting Edge Stencils. The process was quite easy and it was less expensive than the Woods wallpaper I love. The main reason I bought the stencil was for an area in my entry that I will show you in an upcoming post. That area I painted with dark over light, but since I already had this spot painted dark gray, I stenciled light over dark and it turned out just fine. I used regular latex wall paint and a foam roller. I would definitely try this technique again—much easier than hanging wallpaper! 

living room additions

I feel like I haven't had much exciting blog material lately—not much in the way of house projects happening at the moment. But I did make a couple of purchases for our living room recently.

One was this wall lamp from Restoration Hardware. I needed a light for my piano, and their conveniently timed lighting sale allowed me to score one for 25% off. This is my second lighting purchase from RH. I buy very little from them because most things seem outrageously expensive. But comparatively their lighting is surprisingly affordable. Of course I've been able to catch a sale on both purchases, but still, a pleasant surprise. Am I the only one noticing that?

I also took advantage of a sale on blinds for the windows. Necessary but slightly painful (window treatments are insanely expensive!), so hopefully they will last for-ev-ah. 

My choice was a subtle but effective solar roller shade from myblinds by Hunter Douglass via Home Depot.


My windows don't get washed too often in the winter. The light was shining just right to show you just how dirty they are...

... but really I just wanted to show you the imprint of the poor rather-large bird (23" span) that hit our window. We weren't home when it happened and the bird was nowhere to be found when we got home (the dogs were in the back) so I assume it survived? Just glad our window didn't break.

Happy Valentine's Day!

painted yellow

Wow, yesterday was an exciting day around here! Our kitchen was featured on Apartment Therapy which sent the traffic here on our blog sky-rocketing. I admit to being a bit nervous about it since AT readers can be a tough crowd, but the comments were all extremely positive and gracious. It was fun to get all of that positive affirmation on a project we worked really hard on! I shared all the comments with dad and Tom also, and we were all floating a bit high on life. Thank you! 

Now I think every other person in the world owns one of these Bekvam step stools from IKEA (peaking around the corner, above right). They come unfinished and look pretty hot naked, if I do say so myself. However, after getting heavy use during our various remodels, ours was looking a little hammered and was wearing a coat of shoe grease and paint splatters. Since we use it often in the kitchen I decided to give it a little makeover so it would blend into the decor.

I picked a swatch of the shelf and bought a quart of paint: Behr Donegal Tweed. Great name, great color. When I got it home I was thrilled with how well it picked up the yellow in my curtains. I bought a flat finish that would have looked great as is, but for some reason I had pictured it more as a wash, so I watered it down and painted a very thin coat over the stool, then finished it off with a few coats of Poly-Acrylic finish. I think now I would have liked the flat finish of a solid coat of paint better, but I think this finish will wear better.

I then used a scrap of oak from a previous project and had Dad cut me a little shelf for my hallway. I used the same paint wash treatment and hung it up with some maps I'd once had mounted and laminated.

It makes the perfect ledge for my London and New York wooden cities in a bag (from Muji)!

It has taken me a long time to get things put up on the walls in this house (they all needed to be painted first!) but sometimes it is these finishing touches that are the most fun.

Now for this awesome Donegal Tweed color. I need to find something else to slather it on. Quick!  

kitchen sources

I promised a source list for our kitchen, so I'd better get on with it. As much for my own sake as anyone's. Let me know if I've missed anything that you might be curious about! (I've included more photos for reference. List at the bottom).

The basics:


Appliances: 


  • Refrigerator: Amana, Home Depot (Purchased in 2010 when we moved in—not replaced with remodel. If/when it dies I will consider getting one without water and ice through the door. It always looks messy.)
  • Double Wall Ovens: Kenmore Elite, Sears  (The great thing about Sears is their discounts. Wait for the right time and you can get a great deal. We got almost 1/2 off!)
  • Vent Hood: Cavalier, Overstock.com
  • Cooktop: Kitchenaid, Sears (exactly like the more expensive Jenn-Air model. And again, Sears discounts apply!)
  • Dishwasher: Maytag (not replaced; a basic model that works great and will live forever I think. If it dies we will replace it with a stainless model probably.)
  • Microwave: Sharp Microwave Drawer, Sears


Lighting:


Furniture and decor:


kitchen before and after

I can't believe we are nearing a year in our new kitchen. We love it as much as ever, of course. Last time I posted about it we still had a pretty large list of projects to check off: trim work and painting, installing the open shelves, buying and installing a pantry cabinet, buying and installing a light over the island, and more. Slowly through the year we checked most of those things off the the list and I've been waiting... waiting... to call the whole thing "done" so I could post final photos. There are actually still a few little items to complete which I will point out to you, but I finally decided—good enough!

So off we go.

Maybe I shouldn't even point it out, but one of things on our list to finish is the tile above the left window. We ran out of mastic adhesive the first time around, and it seems like a great effort to get it all out to do such a small section. We might get around to it when we tackle another tile job in a bathroom or laundry room. For now it almost passes as intentional.

The shelves and light are new since I last showed you!

The pantry cabinet is also new. It beats the metal shelf that I lived with for awhile. Actually, this cabinet was mostly paid for with a credit from the cabinet company. Their color samples misrepresented the color and our cabinets turned out lighter than expected. They offered to refinish the doors, but the ends and frames wouldn't have matched so we opted for a credit instead.

You also get a sneak peak of some stenciling I did beyond it. Just a teaser!

We finished off the crown above the cabinets (a bit tricky since the space was pretty small) and painted all the window trim. I also bought new inexpensive bar stools.

The sideboard and china cupboard in the dining room were original, but I refinished them. I would love to remove the kick base and add feet to it someday. I sewed the curtains myself, and I don't think I've shown them to you yet either! I layered them with some woven panels I already owned.

I removed the doors from the firebox (my dad originally made them for my Grandma, but they just didn't work with my scheme (sorry Dad). I am planning to paint the inside a dark gray color, but actually the white doesn't bother me so much either. We have a little more fireplace to do also—namely fixing the propane valve so we can actually use it (!) and patching some mortar.


Here is an up-close look at the open shelves. I. love. them. Not only was it a good solution to a difficult space (there is a support beam above them that would have made an upper cabinet almost impossible), it keeps the kitchen very open and gives us really easy access to our every-day dishes. Right across from the dishwasher, no less. The supports are long steel bars that go through the shelves and into the studs in the wall. We predrilled holes for them before we tiled. (By "we" I mean my dad.) We used oak planks seamed together to make a solid wood shelf. I then stained and finished them as close as possible to the cabinet color. We added some hooks to the bottom to hang mugs.

Here is one last view:

I'll be back soon with more photos and a source list. Until then, if you want to learn more about our kitchen journey, you can follow the posts below:

What's wrong with my kitchen, anyway?
kitchen layout plans

ordering cabinets
kitchen finishes
What.A.Mess.
more demolition
kitchen lighting options
lighting options :: round 2
getting rid of the gunk
best laid plans
progress report—tile, cabinets, and stress
progress report—cabinets installed
we're cookin' now!
dining room hutch—before and after
kitchen backsplash and hood
kitchen organization

finally lounging

I am super excited to share today's post with you. I wrote about this chair only about... 6 months ago. In September I had a surge of productivity when I took the chair apart and completed the wood re-finishing. Then the pieces banged around in my storage room while I waited for my mom to have time to help me with the upholstery. On a cold and snowy Saturday a couple of weeks ago I was antsy to tackle a project. I left the kids with Tom for the day and plowed through the snow to my mom's house where I could tackle this project once and for all—without distraction, under the watchful eye of my mom and using her more advanced sewing machine. I'd like to say that was the end of the story, but it took a few more days before I could finally call it finished. I'm nothing if not persistent, though, so I can finally show you the finished product!

The back:

There she is! And I'm pretty proud of it despite its imperfections.

I must say this was no small challenge for me. It took time to disassemble, remove hundreds of staples, and carefully label and bag each piece of hardware. I took photos along the way to help me with reassembly—something I was glad for when I finally got around to it 6 months later. It was another time investment to refinish (sanding very carefully so as not to damage the thin veneer, then applying the stain and 3 coats of Poly acrylic finish, sanding between every coat). I spent another long day sewing hoping so much to finish it in one day. That night I gave up in frustration, feeling like I would never get it right. (I am, after all, a complete novice in re-upholstery). I spent a little time researching other redos online and discovered I might have been the only person crazy enough to attempt sewing the welting directly to the cushions before attaching them to the wood. Most people stapled their cushion fabric, then glued or stapled the welting separately. Easier, for sure, but my way was the way it was constructed originally. The problem was that the old leather was stretched out and made an imperfect pattern. Easing and gathering the stiff vinyl around the edges was really challenging. The result is very imperfect and there are plenty of puckers, but I think in the long run the construction will be stronger. 

A few days later with fresh and rested eyes I spent one more long afternoon stapling hundreds more staples into the flimsy wood frames (rather exhausting) and then screwing each piece back together. Even that part of the job took longer than expected, but it was so very exciting to watch it come back together!


Had this been an original Eames lounge and not a knock-off, I would have been inclined to use real leather. As it was, the only $$ I had into this project were for a few small supplies: buttons, welting, needles, and upholstery thread. The chair was free (my Grandpa's chair, cast off to the back recesses of the storage room in our house), and the vinyl was something my mom and dad had on hand and donated for the cause. 


I intended to make my own buttons, but it didn't take long to figure out the stiff vinyl and cheap button frames from the fabric store would have made a lousy combination. At the last minute we took the vinyl to an upholstery shop and had buttons made for us. It cost all of $5. Obviously well worth it! 

After seeing how inexpensive and easy the buttons were, Tom thought I was crazy for not exploring the option of professional upholstery to begin with. Maybe it would have been affordable—inside 2 or 3 hundred bucks perhaps. And the result certainly would have been better. However, despite the number of hours it took me (a lot), I still am glad I attempted it myself. It might not be logical, but it gives me a feeling of accomplishment and leaves me with something to be proud of.


You might enjoy seeing a few photos of the process, although, I didn't take any of the sewing and reassembly. My hands were too busy to pick up the camera!

Taking it apart (Each piece was built with an inner and outer bent plywood shell):

The back of the ottoman with the outer shell removed, showing how the cushions were stapled onto the fabric:

The leather removed:

And the cushion foam and inner plywood shell. (I reused all the old foam):

All the pieces lined up:

Checking to see if I had enough vinyl. This was before I removed all the welting. I then laid each piece flat, taped it to the vinyl, and cut around them. Each piece of welting had to be cut to the exact same length, so after they were removed I stretched them out and re-cut new strips.

The pieces laid out in the garage for re-finishing:

Now that it is done, I've heard a few say "This was always my favorite chair" or "I forgot how comfortable this chair was!" (Rumor has it the knock-offs are actually more comfortable than the real ones. This one reclines—the originals only swivel.) As such, I sort of want to move it upstairs to a place we can enjoy it often. For now, it resides downstairs.

The bright white vinyl isn't totally ideal with my living room furniture, however. And it looks pretty hot downstairs with my hounds tooth sofa:


So for now we are trekking downstairs for a change of scenery during our evening lounging.

Living room changes

 I have promised you photos of our living room changes, and I admit it feels like a chore to get these all uploaded. I should be cleaning my house today in preparation for my in-laws coming. And then when I downloaded the photos I took I was really disappointed. It was a really bright day, and without any window treatments on the windows, I couldn't control the light. The photos are washed out and too bright. Alas, they will have to do for now. The photos may not do the room justice, but I'm telling you—I absolutely love how it turned out and I love to spend time in there. 

I also should have labeled the photos "before" and "after", but hopefully you don't find it too hard to tell them apart! Ha! :) 

Here we go. This is the view you see when you enter our house and look into the living room. Before:

And after!

You can see a lot of the changes right here. New light fixtures, no more popcorn ceiling, new trim, fresh paint on the walls, and of course, new wood floors.

A little about the wood we chose: It is a pre finished, solid wood (Hickory) and wide plank (about 8"). It has some hand scraping and saw marks, and is finished in a color that is not too dark and not too light. I wanted something that wouldn't show every speck of dust. It was an in-stock deal and we got it for less than a third of retail price. Good thing—we have a ton of square footage.

When you look further into the living room, this is the view you see. This is before we moved in:

Before we moved in my dad had the heat system replaced and all the baseboard registers were removed. It left some unsightly holes in the flooring and wallpaper, but we just lived with that for a long time. Next photo is with our own furniture:

And now, after:

I had removed the wallpaper on the back wall quite a while ago in order to paint and install the wall unit that is there now. So I knew what I was getting myself into when it came to removing the rest. It was nice to have one less wall to do when we tackled it this time!

I still need to get window treatments and am going to opt for a woven solar blind that fits inside the frame for a clean look. I am waiting for a sale.

Above the window, my dad built a new light bar out of oak, and I stained and finished it. We added one more light. I just spray painted the old simple ceramic fixtures and added matching bulbs. My intention was to get a fixture like this:

from Schoolhouse Electric

...or even just the cages, but after buying 5 of them it would be pricey. And I actually think the cheap option looks just fine.

Under the valance/cornice we removed, the old light bar looked like this:

The box was made out of sheetrock and was cracked in several places. The lights weren't spaced evenly. The box was necessary to hide the wiring, because there is a header beam above the window. I love how the new wood bar looks.

On the other side of the room, there used to be a shelf unit that jutted out into the room and hid the passage into the hallway. While I was growing up, my Grandma had a fish tank on this shelf.

We removed the shelf right away, which left an interesting hole in the wallpaper and trim. It is hard to tell in this photo, but the wall was pretty shabby looking. The light fixtures and wallpaper don't really match the 70's era of the house, and they were added later (80's or 90's?) when my Grandma was apparently in the mood for more Victorian decor. It was the era of pastel colors and lace curtains.

Now this view looks like this:

Clearly I need some art on this big blank wall! I'll work on that. I replaced the light fixture in the hall with one I found at the Habitat for Humanity ReStore for $6. At some point we hope to replace all the upstairs doors to match the basement doors (white.)

Light fixtures are always the subject of huge debate for some reason, and the living room was no exception. We were thrilled when we came across these from Restoration Hardware. They were reasonably priced to start and there was a 20% off deal. When all four of us liked it (Tom, myself, and my parents- which almost never happens), we jumped on them. I really like how the brass accents tie into the fireplace. They are made to use with Edison bulbs—and look fantastic with them—but unfortunately don't put out a ton of light. We might try them with different bulbs eventually, or just invest in a few lamps.

Another light on my wish list is a light for my piano. I had planned to look for a floor lamp that arches over, but I don't love them. Then I found this option (also from Restoration Hardware) which would mount to the wall and swing over the piano:

I haven't gotten it yet. Need to save my pennies. Another view of the big blank wall:

I chose to paint the one wall an accent color—Behr Dusty Mountain. It is a dark gray with green undertones and ties into the fireplace really well. The rest of the paint is the same I've used all over the house: Behr Sandstone Cliff (walls) and Behr Powdered Snow (trim and ceiling). I like to use a common theme to tie the entire house together, and then use accent colors that play well with the base colors.

And the sitting area:

I need to get a rug. The cowhide will stay also—its a big room. I need a 9 x 12 and would love a nice thick wool pile. That is going to cost $$$, so while I save for the perfect rug, I plan to shampoo a chunk of the carpet we removed and get it bound. It is hard to put something old back in the new room, but we desperately need a rug to anchor the furniture and keep it from sliding everywhere. A rug will also help with sound absorption, however I haven't felt it has been overly echo-y or anything.

Our living room furniture was new when we bought our house in Utah. It wasn't expensive and definitely isn't my dream sofa, but it has held up well and serves the purpose. Down the road when we are well past all of our renovations, then maybe I'll allow myself to think about saving for a dream sofa.

Looking toward the dining room, this is what it looked like before we moved in:

Before, with our own furniture:

And after:

In this picture you can see better the difference in the brass finish on the fireplace. For awhile there was a lovely line on the ceiling where the popcorn ended (scraped in the dining room and not in the kitchen). I love having it look clean and seamless now! You can also see my dining room curtains. I don't think I've shown those to you yet. I promise better photos when I take kitchen after photos.

You will ask about the sign on the fireplace. It was hanging in our shop, and at the recommendation of a design-savvy friend, I decided to bring it in and clean the bird poop off of it. (I know, gross!) I think my artistic uncle must have made it. It is carved out of plywood and looks a bit kitsch, but I think its great. (We no longer have cattle on the ranch, but my Grandpa ran them for a number of years.) I kind of like the casualness of propping it up on the fireplace, but people are always asking where I'm going to hang it. I suppose it looks unfinished there? I'm not sure I want it as the focal point on the big wall. I was planning a gallery of family photos there. What do you think?

So there it is! Now the balance of our upstairs is swinging to the "mostly done" side, and it really feels like us! I hope you enjoyed the tour.


Fireplace makeover

Sometimes when we show people the changes we are making in our house we get the question "So what are you going to do with the fireplace?" As though since we are updating everything, why wouldn't we update one of the most obviously dated features in the house? However, as this fireplace is a huge focal point and architectural element in our home, removing it would not only be a major project, it would be disloyal to the original intent and integrity of the home. So it will stay.

And we actually really love it. The slate is from a Montana quarry and is called Montana picture rock. The colors are gorgeous (I have always been a fan of greens in decor) and many of the rocks feature leaf fossil patterns. It is a work of art. So one of my goals has been to make the fireplace feel like it fits in with the rest of the decor, while still transitioning it to the modern environment I'm aiming for. 

The photo above is an old one, before we started any renovations. I think the changes we have made have enhanced the fireplace—but those photos will come later!

Today I want to tell you about those fireplace doors. What to do?

Remove the doors? Unsafe for kids. Put in an insert? Actually, it would be two- one on each side. Expensive.

In a previous post I discussed my intent to spray paint the brass bits black. This is still a valid option, but someone left a comment and suggested I try darkening the brass. I decided it was worth a try.

The lacquered brass doesn't polish up well. Lacquer becomes scratched and mucky over time. In order to age the brass you have to remove the lacquer. It actually comes off pretty easily! One recommendation is using ammonia. I didn't try this but opted instead for something I had in my cupboard: fingernail polish remover.

(Note: in the photo above you can see the valve that turns on the propane for the fireplace. Unfortunately, this valve has leaked for a long time and the fireplace has gone unused. We recently drilled through the mortar to try to fix the valve, but our attempt failed. At this point I'm not sure what we are going to do—maybe hire a pro to fix the valve?) 

While most of the laquer came off easily, some was more stubborn and would find (after I started darkening) that I had missed spots. I used a toothbrush and scrubbed vigorously to remove as much as I could. 

To tarnish the brass, I purchased this brass darkening solution. Some methods recommend using liver of sulfur, but after reading that when heated liver of sulfur produces a poisonous gas, I decided that was NOT the product to use on a fireplace. Ha. This product did the trick easily. 

Here is the fireplace with half of it done:

The directions actually say to immerse the metal into a bath of solution to soak, but I simply used a cotton swab and continuously rubbed it over an area for a minute or so until I saw it begin to darken. 

All done! I know brass isn't everyone's favorite thing, but I like the tarnished brass much better than the lacquered brass. It blends into the rock better where the polished lacquered brass stood out. The purple/coppery tones of the tarnish are beautiful, and having it all shined up doesn't hurt either!

I promise living room photos soon—must clean and take photos first!

Thanksgiving recap and catching up

It's probably time for me to do something about this blog neglect situation. I didn't intend to leave you hanging for—what, nearly two months (gulp!) but I guess life has gotten away from me and I have found it difficult to take the time to write about it. 

Now I'll offer up my excuses. Since I last posted, we (among other things):

-celebrated several more birthdays, including Tom's and Abby's . . . associated sleepovers and cake baking.

-took a family trip to California.

-made Halloween costumes and did the typical Halloween festivities yada yada.

-hosted Thanksgiving at our house.

-and last but mostly to blame, worked on house projects.


What this means is this:

I have lots of material to blog about! :)  Now, if I can just sit down and get that first post written I will be on a roll. It might take a post a day until Christmas to get caught up. No commitments, though. 

Catching up seems daunting, so I will start with the most current events. Auntie Amy knitted new hats for each of the girls (above). Aren't they adorable? And here is Eva enjoying her baby cousin Brandon. She just loves babies.


My whole family was together for Thanksgiving weekend, and we hosted at our house. It was probably a crazy thing to do because we were finishing up projects, moving furniture, and cleaning house until 2:30 AM the night before. But ah, was it ever fun to cook Thanksgiving dinner in our new kitchen! And it is so good to have a deadline to work for, despite the craziness. 

Speaking of kitchens, I have been dying to finish up the last of the projects in ours so I can take some real photos and post before and after pictures of the project. But first I wanted to finish every. last. detail. And we did pretty good.

This is what we accomplished this month on the kitchen:


  • Order a new pantry cabinet and install it (actually, this happened awhile ago, but I don't think I've posted about it.)
  • Build the wood shelves (Dad) and stain and finish them (me). L-O-V-E them. 
  • Caulk and paint all the window trim.
  • Hang the curtains that I finished sewing ages ago.
  • Install, caulk, and paint the crown moulding above the cabinets.
  • Install soft-close hinges on our cupboard doors (we meant to order them this way, but some came without. Love this feature). 
  • Install mug hooks on new shelves.
  • Order and install a light fixture over the island (finally)! An issue of debate finally settled. 
  • Make over the fireplace doors (more on this later).
  • Paint the beam and other touchup.
  • Replace outlets and switches.


Still to do:


  • Tile an area above the window that didn't get done before because we ran out of the adhesive we used. Oops.
  • Makeover firebox.
  • Paint stool
  • Fix the propane leak in the fireplace. We haven't been able to use our fireplace because the valve leaks. We drilled through the mortar to attempt to fix it, but it is still leaking. 
  • Patch mortar
  • Cut the kickbase off of the sideboard/buffet and add feet. (My dad is going to help build some strong feet to bear the weight of this heavy piece. Someday.)


I would like to get the first three things done before I post pictures. The rest might be a while.

We've been busy, right? There's more.

Here is our list for the hallway:


  • Install new vertical windows
  • Install new front door
  • Install new side light windows (they arrive this week!) 
  • Paint front door and side garage door. (I bought the paint.)
  • Install trim (almost there)
  • Caulk and paint trim.
  • Buy new entry rugs that can handle all the ranch dirt that tracks in and out of here.
  • Make shelf and bench for mudroom/coat hook area. 
  • Stencil wall of coat hook area.
  • Hang hooks in coat hook area.
  • Hang artwork in hall.


Still more. Here is the list for the Living Room:


  • Remove wallpaper.
  • Remove those old dusty curtains.
  • Remove carpet. (Yes, we did!)
  • Scrape popcorn ceilings.
  • Retexture ceilings.
  • Paint ceilings.
  • Spackle, sand, and smooth walls.
  • Prime and paint walls.
  • Install hardwood floors (Yes, we did that too! Grin!)
  • Redo light bar (under old cornice/valance). Build, sand, stain, finish, and install. Paint light fixtures.
  • Order and install new sconces.
  • Install new hallway light.
  • Retrim everything.
  • Caulk and paint trim. (almost there)
  • Replace outlets and switches. (almost there)
  • Order new window treatments. Probably solar blinds.
  • Get a light for piano. I'd like a floor lamp that arches over the piano.
  • Get an area rug. We might bind some of the old carpet for now. Maybe. It's hard to put something old back into a new space.
  • Build desk and cupboard for desk niche. 
  • Stencil wall behind desk niche.
  • Replace doors upstairs so they are all white and match the trim. Someday.


Whew. Tired yet? We certainly were after pushing to get all of this done before Thanksgiving. And I'm still trying to catch up on the laundry and house cleaning that gets neglected while I'm working on projects.

One big reason for pushing so hard (besides the fact we were hosting Thanksgiving) was because now we are going to take a break (on our house, anyway). My parents have helped us extensively on house projects, so now we are going to attempt to help them in return with one of their projects. They just purchased a 4-plex in town as an investment, and one unit is going to be gutted and redone. They would like to finish it before the new year. Yes, we are all glutton for punishment! :)

After that, if all goes well, I would like to work on our house again until spring farm work calls. Besides finishing the above list, with any luck we'll tackle the laundry room, guest bathroom, and girls rooms. I'll spare you those lists for now. Until then, I will have plenty to show you with the projects I mentioned above. 

And that's all I have for today. Ha :) It is good to be back.

(P.S. I have an issue with compound words. When I run spell check that is all it picks out. A string of incorrect compound words. Sorry, but I'm leaving them! Forgive me.)


new wood floors

Even though our fall farm work isn't done (we haven't even started seeding yet—waiting for rain), I've been getting the itch to start some house projects again. On a whim Mom and I decided to stop at a flooring store the other day. I've been dying to ditch the old blue carpet in the girl's bedrooms and my mom has been dreaming of new wood floors for her living room. And of course, I'm always keeping an eye out for wood for my own living room floors, though I wasn't sure we would get around to tackling that this year.

Nevertheless, it was the latter that presented itself. Right inside the door of the flooring store was an in-stock (less than a 1/3 of retail price) deal on some solid, 8" wide plank solid wood that we both loved. The wood is a rustic hickory. I like things clean and modern and I love very dark wood floors, but I also wanted a floor that wouldn't show every little scratch and spec of dust. This color seemed just right. 

We brought home a sample and it passed my dad's scrutiny (the ultimate test). My mom ruled it out for her house though because the planks felt too wide for her smaller space, but it looked great in our living room against the fireplace. On top of that, we recently received insurance payments for the hail damage on our roof and gutters. The guys opted to do those repairs themselves, so we have that money to spend on flooring instead and, well, the deal was just too good to pass up.

So, its a bit surreal and I'm quite giddy to be getting new living room floors soon!

Over 900 square feet arrived at the store this afternoon and is ready for us to pick up. It is enough for our living room, den, and master bedroom. It will likely sit around for quite a while before we have time to lay it. It will be even longer before we can move a couple of walls in our master area and lay that section of flooring—maybe even another full year—but we wanted to purchase the flooring all in one batch so it would match. 

Before we can lay the floor we need to strip the wallpaper, scrape the popcorn cielings, retexture the ceilings, and paint. I plan to save a section of the old wool floral carpet and have it bound into an area rug to use in one of the girl's rooms. (It has sentimental value, and it's in great shape for being over 40 years old!)

The white wood sample (above right) was an option I was considering for the girl's bedrooms, though I am still looking for a less expensive alternative.

I've had my heart set on white wood floors in those bedrooms (I would of course put down nice area rugs for softness). Eva's room is north facing and a little short on light, and I know white floors would brighten the space so much. My ideal option is prefinished white-stained oak. However, for cost effectiveness I would settle for unfinished oak and stain it myself. Even less expensive would be unfinished pine, painted white. (White stained pine would probably yellow too much). I like this option but my dad does not. Tom just thinks we should do carpet, but I want a light color. Light carpet is not a good idea at my house. I've even considered Pergo laminate floors.

What would you do?

On another note, I've been considering what to do with our living room fireplace. The rock on the fireplace surround is absolutely staying. It's a huge fireplace, and we really love the green and rust colors of the slate. It is called "Montana Picture Rock" and was quarried from the nearby Rocky Mountains. Some of the rocks have leaf fossil prints in them. 

It is the actual fireplace portion I'm concerned about. Our long term plan has been to have gas inserts installed. However, it is double-sided, so insert(s) would be spendy. Lately I have been reconsidering. We don't need the fireplace for heat (unless the power goes out). We mainly want it for ambiance. It currently has gas log inside, but we haven't been able to use it because the propane valve (outside the fireplace) has a leak. That needs to be fixed anyway, so I'm thinking we should get that working and just use the gas log, leaving the current doors in place.

While I don't hate the brass trimmed doors, they certainly aren't pristine. Nor are they modern. I think brass is starting to come back into trend, though. My question is, should I paint the brass parts black? Or leave them?

lounge chair update

Remember this guy?

Sorry, no after pictures in this post.

Since I posted about this nearly 2 months ago it has mostly sat untouched. But not entirely. I managed to disassemble it:

I have the wood pieces laid out in the garage. They are stripped and partially sanded, almost ready for staining.

Mom and I separated the cording from the upholstery pieces and laid them out to be cut.

We have the pieces cut for the ottoman and will make sure the vinyl we have is going to work before cutting the rest. Hopefully, now that harvest is behind us, we can dust this project off and make some more progress.

My new favorite flowers

Last spring, Sarah's Kindergarten class made Mother's Days cards and included a packet of seeds. I threw those seeds in a pot along with some other class plantings and didn't think much about it.

I was pleasantly surprised when these Zinnea seeds bloomed, and I've dubbed them my new favorite flower.

1. They grow really tall—over a foot—and fill a pot nicely.

2. The blooms are large, artistic, and stunning.

3. The colors are bright and happy.

4. And very best of all (maybe because I planted them from seed in late spring?) they bloomed in August, when the grass and fields and other blooms are turning brown.

I will definitely be looking for Zinnea seeds every year!

Feng Shui Friday—kitchen organization

To find out how you can join the Feng Shui Friday challenge, click here.

Happy Friday to you all. Today I have a little kitchen organizing tip to share. You know that drawer that holds all of your containers for leftovers? We all have one. My mom's cupboard is full of containers in a million different shapes and sizes. I used to give her a hard time about saving old cool whip and butter dishes. No offense, Mom :) Does you Mom/Grandma do this?

As for me, I can't stand the mish-mash, so I buy Gladware or Ziplock containers in uniform sizes that stack neatly. I also have a set of glass dishes for leftovers that need reheated. These nest nicely together. Still, the drawer would drive me nuts because of the various sizes of lids floating around. This is how I fixed the problem:


I used two inexpensive tension rods to hold my lids in place! These are only a few dollars a piece—and effective!

While we are on the subject of kitchen organization, I thought I would share a little bit more about the organization in my new kitchen. I realize not everyone has the benefit of designing their kitchen from scratch, and most of us must make the most of what we have. But since I was fortunate enough to have the opportunity to create what I wanted, I put a LOT of thought into the storage and organization.

I designed my kitchen around "zones"; prep, baking, cooking, cleaning, etc. I weighed this even more heavily than the infamous work triangle. Then, before coming up with a cabinet plan, I listed every item in my kitchen according to which zone it should be stored in, and what kind of storage it would be best suited to.

What I ended up with was lots and lots of drawers:

Do you have any idea how great drawers are? My old kitchen (in Utah) had mostly cupboards in the lower half. When I moved here to the farm, this kitchen (even before) had lots of drawers. Eureka! I didn't know what I was missing before! No more crouching with my buried in the back of a cabinet to find what I need. If you ever design a kitchen, plan on putting in as many drawers as possible. Trust me.

Choosing wall ovens and a separate cooktop allowed me to locate two wide, deep drawers beneath the cooktop for storing my pots and pans. I absolutely love this.


I even keep my glass and metal bakeware in deep drawers. I do have a corner lazy susan cabinet, and this is where I store my taller items like my stock pot, slow cooker, and blender. Besides the sink cabinets, this is my only lower cabinet.

I utilized these great containers from Ikea to corral kid dishes and sippy cups. They keep moisture off the bottom of the drawers (plastic never seems to dry completely in the dishwasher). Storing the kid dishes in a drawer keeps them at their reach. The drawers are tall enough to store stacks of cups and bowls and sippy cups standing up.


The top drawers of course are much shallower, but wide, making them ideal for my utinsels. 

I was determined to keep as much off the counter as possible, so I purchased this in-drawer knife block. You can often buy these sorts of inserts directly from the cabinet companies, but they also charge up the wazoo for them, so I bought this after-market online for much less. This drawer is right next to my prep sink and super handy. I'm not a fan of pull-out wooden cutting boards. They seem unsanitary... just me?

Another after-market insert I purchased was a spice rack that we trimmed to fit this drawer perfectly. I already had the spice jars that I used in a rack in an upper cupboard previously. Isn't this pretty? The uniformity makes my heart sing! I do love those narrow vertical pull out spice racks, but in the end I didn't want to chop up the long run of drawers. 

Other organization trends I passed on:

A pull-out trash drawer. When I brought up this cabinet option to Tom he said "sounds like an expensive trash can to me". We opted for a stainless lidded trash can instead. I do think locating one next to my prep sink would have been awesome, but in the end I couldn't sacrifice the storage needed for other things.

Vertical cookie sheet/pan storage. These are pretty slick as well, but I have a small drawer below my double ovens that does the trick.

Still one of my favorite organization solutions in the kitchen is the backsplash behind the cooktop:

You can usually buy these to match your cooktop exactly from the range manufacturers, but we purchased ours (on sale) from Pottery Barn for less than half the price. The shelf holds oil cruets, salt, and pepper for easy access. I also LOVE the hook rail that keeps two sets of measuring cups and spoons within easy reach. I could stack them up for a cleaner look, but I love being able to grab just the size I need without having to disturb the rest of the stack. The backsplash is easy to wipe and is magnetic. It came with some cute clothespin clips that I use to hold the recipe I am working on.

I hope you found some useful suggestions for your own kitchen. Working in an organized kitchen is a pleasure—it even makes unloading the dishwasher fun. I'm not kidding! Where I'm not doing so well:

The pantry! But great news—we brought home my new pantry cabinet today! I am already working hard on ideas to make this rather small pantry space function like a dream. Hopefully I'll be back to share my progress soon.

Do you have any fabulous organization ideas of your own to share? What kitchen organization utilities do you feel are most worth splurging on? Is the pull-out trash we opted out of your favorite thing ever? Do tell.

master bedroom potential

Sharing a few photos of our Master Suite today. Such as it is. 

This project is slated at the bottom of the list—mostly because people don't get invited in. We can shut the door. But not a day goes by that I don't dream about what I can do in this space. Besides the obvious cosmetic changes, knocking down a few walls to accommodate a larger bathroom and closet is tops on the agenda.


A fireplace would be lovely—this room doesn't heat as well in the winter. A double-sided one—right between the bedroom and bathroom. No?

And relocating the bedroom entry is non-negotiable. Right now it opens up right to the front door. If we forget to shut the door and have an unannounced visitor it would be quite embarrassing to get busted sleeping in.


The tiny shower and vanity and obvious lack of storage will test my design abilities. (The bathroom photos were taken before my Grandpa moved out. I promise we don't own that arsenal of prescriptions.)

Here is a simple sketch of a floor plan idea, though nothing is set in stone. That bathroom space is quite awkward! I'm not sure how to create the space I desire without borrowing from the current office space (and adjoining dark room). The plan also includes a possible powder room off the front door. Convenient for harvest help and hand washing before meals.

What would you do? Move this up on the priority list or save it for later—after the more public spaces are finished?

lounge chair

I pulled this relic out of our storage room the other day and gave it a good dusting off. Isn't it a gem?

Actually, it is in such rough shape that it was tucked into the back corner of the storage room and left behind and forgotten about. But I've been secretly planning to get my hands on it for years. For you design-y friends of mine, no, it is unfortunately not an authentic Eames lounge chair. It is a Plycraft copy. But even the vintage Plycraft furniture still has quite a bit of value. 

Paying someone to restore this would cost quite a bit, and could exceed the resale value of this chair. But it has sentimental value to me (it belonged to my grandparents) and it is darn comfortable, so I am going to attempt the restoration myself.

Trouble is, it needs new upholstery. 


Since I have zero experience in that department, I'm going to enlist the help of my mom. Especially when it comes to the piping around the edge. Mom has some white vinyl that she is willing to donate to the cause. Not that I have anything against the existing color, but I do think it would look sharp in white.

The wood needs to be refinished also, which will be a delicate process since the veneer is quite thin.

Wish me luck! I'm not making any promises on the time frame, but I'll keep you posted.

staircase art

I recently tackled a project that cost me nothing other than a bit of time.

In my college Photography 101 class I did a project that involved shooting (and developing) a series of photos. I did my project on "Old Montana" and had fun shooting relics and landmark buildings as we drove across the state on a road trip.


The photos aren't anything to brag about, but they are meaningful to us and worthy at least of the cheap frames I bought for them a long time ago.

To make the collage a little more interesting, I added a couple of quotes that related to the "old Montana" theme. The letters came from an interesting novelty item I thrifted awhile ago. It is a box of letters used for old-time movie titling, complete with adhesive and a black felt background. The box sits on my craft room shelf, and even though I thought it had artistic merit on its own, I thought it would be fun to actually do something with the letters.

I tacked the letters up with glue dots, so they can be easily changed if I tire of the phases.


I'm happy with how my little vignette turned out!

all stitched up

Hi there! And how are you on this fine Monday in June? (June? What?)

At our house, we finished up school (Friday before Memorial Day) and summer is officially in full swing. The sudden lack of schedule has sent me into a bit of a tailspin, really. I'm not sure how to function. The upside is that now that I don't have the daily bus runs and calendar of after-school activities, so I'm feeling a bit more able to tackle projects.

World's most inconsistent blogger here. I set myself a goal to blog 3 days a week (for the few of you who take the time to come here, I'd like to actually give you something interesting to read), but frankly, last week I just didn't have the motivation to blog. I seem to go in spurts. Sometimes I want to blog and share, and other times I just want to get to work creating things to blog and share. The two don't seem to happen simultaneously very well. But I digress.

Projects... last I wrote I showed you these lovely fabrics I had just begging to made into something beautiful:


I'm happy to report that might sewing machine was dusted off and put to work. I asked you to guess what they were for. Don't you just love guessing games? Ha. I don't.

But if you guessed "window treatments", you were right. Here's a peek.

Unfortunately I'm not quite ready to give you a true reveal because I still need to tackle the caulking and painting of the window trim before I hang the new panels. The curtains are for the windows in our kitchen/dining room. Tom finally found a few spare minutes to put the trim up last week, and now he is handing the baton to me. I confess painting trim isn't my favorite job.

As for the other fabric, I had other plans. I've had the fabric for a long time, intended for reupholstering a chair I acquired for free in the mother-of-all-storage-unit finds on Craig's list. This is what it looked like before:

It's a pretty cute little Danish number that beige blah fabric did not do justice too. It was stapled on sloppily and the seat wasn't attached for lack of proper screws, I suppose. 

I stapled the new fabric on, then used the old fabric and some ribbon trim to finish off the underside—you know, in case the little mouse under my chair cares.

Now the chair has a sunny new disposition.

Easiest project ever. Not sure why the fabric sat unused for so long. I had a bit left over so I made some little curtains for the playhouse under the stairs. A perfect accessory for puppet shows and the like.

More projects are in the works, so check back soon!

sewing project

I have two large and lovely rolls of fabric at home, just begging for me to get my sewing machine out and dust it off. Both are Robert Allen prints that I scored at 50% off, but their coordination is an accident and I wasn't intending to use them together. Any guesses what I'm making?

basement playroom

Hello there! I'm back on this beautiful Monday to share another basement project. There may be a million things I could add to the kids playroom under the stairs before I call it finished. It will probably change as fast as the kids grow and their interests evolve. The latest addition was a fun and inexpensive improvement.


I used to store the kids' dress-ups in an expandable bucket of sorts. The trouble was, when they wanted to wear something, they dumped the entire bucket out to find what they were looking for. 

We have quite a lot of dress-ups because Sarah especially was into dressing up for a long time. I've saved most of their Halloween costumes and dance outfits for dress-ups also. Now the older two have mostly outgrown it, but Eva is just getting started. 

I found some cute velvet child-size hangers on sale for cheap recently, so I snatched up a bunch and bought a tension rod to hang in this shallow space under the stairs. It looks so much more organized, and it is much easier for the girls to find what they are looking for. Best of all, it is removable/movable.


Eva adores her playroom (another tight space and difficult room to take pictures of)!

That means my old strategy of storing Legos up here to keep them out of her reach is no longer effective. Oh well! :)