Peeling off layers

And the demo begins.

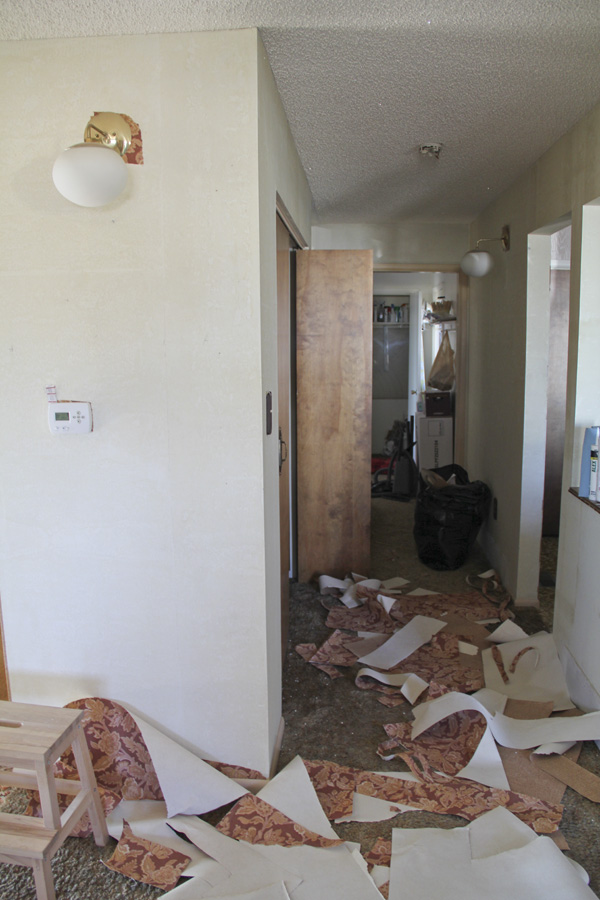
I had the urge to peel off the wallpaper in the hallway. So I did.

It already feels better. Except this type of paper left a layer of adhesive on the walls that will take serious elbow grease to scrub off.

I am also moving out of my kitchen into our temporary kitchen (the laundry room), which looks like this:

Not kidding. Think we're crazy?

household chemical disposal

This is exciting stuff, my friends. This is what you come to my blog for, right?

Stage 1 of this kitchen remodel is to empty the kitchen and set up a temporary kitchen somewhere else in the house. Our temporary kitchen is going to be our laundry room. We are planning to replace the sink and faucet and add a countertop over the washer and dryer to make the space more usable. There is plenty of storage in the laundry room, but much of it was filled with old things that belonged to my Grandparents. Cleaning it out was a job I was putting off. 

After cleaning out the cupboards I was left with 2 trash bags, one donation box, 3 vacuum cleaners and parts, a bunch of old fabric (some of which I donated, and some of which I kept for my girls to be creative with—more on that it a minute). And this:

Piles of old household cleaners and chemicals. I kept a few usable things, but lets face it. I just don't need 15 bottles of various types of wood polish, 3 bottles of oven cleaner (mine is self clean), 5 different kinds of laundry soap (none of which are for high-efficiency washers), sketchy unlabeled cleaner bottles, etc. What I really need is room in my cupboards.

I set about trying to find out how to dispose of this. I got the major runaround and called about 8 people. The 5th or 6th person in Great Falls directed me to call a neighboring city even, and finally someone in Helena told me they would take it, but it would have to be solidified first. So, I have to dump every. single. bottle. out into kitty litter, double bag it all, and haul it to Helena. Or box it up and stuff it in a old barn somewhere and forget about it. Ha. 

Have any of you dealt with this challenge before? I have 2 boxes from the laundry room, one box from the garage, and another cupboard to clean out still. And who knows what is lurking in the shop. They don't make this easy. 

(On a happier note, we found a few fun things in my Grandma's old fabric drawer—some old retro-looking double knit fabrics, already cut into squares for a quilt, and another quilt front made out of old men's suiting. The suit quilt had no backing (it actually looks like the backing was removed and the front was just dry-cleaned, maybe with the intent of adding a new backing). The suit squares also had a few holes in them (moth-eaten?) but could be easily patched with no backing on the quilt. 

I would love to know the story behind this quilt. Was it made of my Grandpa's old suits? In any case, I may need to take up quilting and finish it. It would make an adorable quilt for a boy's room. (So in other words, since there are no little boys in this house I'll have to find a another recipient to appreciate it :)

I went shopping

My shopping forays to Great Falls are usually packed with necessary errands like grocery shopping and house project supply shopping. I rarely take the time to shop for fun things anymore, but this week I made an exception. I indulged in a quick visit to a downtown shop that had caught my eye awhile back—it is called Once Again Vintage. 

This shop is filled with mid-century era vintage house wares and clothing, so I will definitely be going back. This time I was charmed by a couple of pillows that just had to come home with me.

The owner sews them out of vintage upholstery fabric. My couches are fighting over these beauties.

Arrogant Mr. Hounds Tooth thinks every girl looks good on his arm (and he's right).

But Mr. Dark and Debonair in our living room upstairs has been feeling a bit drab lately and feels it is his turn to flirt with these Pretty Pops of Color. I tend to agree. But I might have to pay a visit back to Once Again and pick up a few more pillows, just to keep things fair.

the doors are in

Lest you think our holidays were full of gluttony, let me show you what happened between the over-eating, game-playing, and nap-taking (because I won't lie—there was plenty of that too).

Things have been getting lively around here! First of all, our garage door is in!

It is even operational! I am loving not having to get out of my car to heft the door open. I realize it looks a little bit odd right now with the 2-tone trim. I will probably wait until spring and warm days to paint exterior trim.

The days have been unseasonably warm for January, however. It is really weird. I'm not complaining, as it allowed us to get 3 of our 5 new side doors in.

These doors came primed and will need to painted brown along with the trim. Our garage is sealed up so much better now (the doors actually latch), which I'm sure we will appreciate with the typical Montana winter weather finally arrives.

I must take the opportunity to mention the visit we had from some special Utah friends who braved the 10 hour trip to come see us over New Year's weekend. I am kicking myself for not getting any photos of them to remember their visit by! Anyway, I'll tell you how well we treat our friends. Chris happens to be a Project Manager and professional door installer. We just happened to be working on doors while he was here so he willingly pitched in and helped install those doors in record time! We're sorry we put you to work, Chris, but we sure appreciated your help. And your visit! Love you two!

Probably the biggest improvement was the door between the garage and the house. Before it was just a hollow-core indoor door. Now it is solid and well-insulated.

I have a funny story to share about this door. This morning things got a bit quiet, so I went to see what Eva was up to and found a pencil in her hand. (Her left hand. We might have a lefty on our hands!) I didn't find her work of art though until I went to take a photo of this door:

My reaction was more amusement than annoyance, which would not have been the case if my 6-year-old had been the culprit. She has a reputation for this. But I had to laugh that Eva couldn't resist this white canvas. Fortunately the door has to be painted still, and the marks came off fairly easy with a Magic Eraser.

I have one more thing to share. If you scroll back up to the garage door photo, you might see a stack of something inside those windows. That is the pallets of tile and supplies we picked up yesterday! Yes, things are getting lively. If I can get the guys to actually stay home in between farm seminars and grain hauling, we might have more progress to share soon! Now, if you'll excuse me, I have kitchen cabinets and laundry room closets to clear out.

kitchen finishes

Since we have finally made a decision on kitchen cabinets, I'm excited to show you what I am planning design-wise. If you want to read more about the cabinet shopping process, you can find that here. But if you want to skip to the good stuff, read on.

Now I'm aware opinions vary widely on finishes. If it isn't your thing, that's okay. But I do hope to land on a modern but fairly classic, timeless design.

All white kitchens are all the rage of course, and I love their light, bright spaces. I also love the warmth and texture of wood. So I am going to mix them. White on top for lots of brightness, and dark on the bottom for warmth and texture. Here are a few favorite kitchen photos I've collected:

I do so love this kitchen. It doesn't have dark lower cabinets, but so many elements I love. 

from Living Etc. via Desire to Inspire

Jessica Helgerson


The common theme is lots of contrast. As for my own kitchen:


1. Tile floors. Don't try to talk me out of this one. They are already ordered! :) I have lived with and loved tile floors and aside from the occasional broken dish, have never had a complaint. I plan to use a grout color that is either slightly lighter or slightly darker than the tile that will hide dirt well. This flooring will go in my entry, hallways, laundry room, and dining room as well as the kitchen.

2. This is the slate fireplace that everything must blend (and not compete) with.

3. The lower cabinets will be quarter-sawn oak in a dark walnut color. The style is a simple shaker.

4-7. The countertops are up for debate. All four choices shown are granite, though I haven't completely ruled out the alternatives. I have found granite incredibly easy to live with—durable, heat resistant, and easy to maintain. The options shown above are:


  • 4) Lennon granite: I like some parts of it better than others so I would want to hand-pick my slabs. It is busy enough that I don't want my entire kitchen done in this. Maybe just the island?
  • 5) Absolute Black Honed granite: I like the honed finish better than shiny, but it would still show smears and fingerprints. It is a classic choice, but I wonder if it provides too little contrast with the lower cabinets.
  • 6) Black Cambria leathered granite: Slightly bumpy but I do LOVE the overall natural look of leathered granite. I also like that it reads more as gray. 
  • 7) Pearl Green leathered granite: I'm not sure if I can get this option because I spotted it online, not in a shop. It might be pricey. The green undertones could look fabulous with our fireplace, and this color resembles soapstone, another material I love but have ruled out because of it's expense and tendency to scratch. 


Needless to say, we have lots of shopping around to do before settling on a countertop.

8. The few upper cabinets are the same style as the lower but painted a soft white. This keeps the upper part of the kitchen light and bright.

9. My backsplash choice will likely be white subway tile—that is if I can find one that is a soft enough white to go with my cabinets. I was thinking white grout, but seeing the example here I think I might enjoy a little contrast from a light gray grout.

10. I would like my light fixtures to bring contrast with a black finish. I do like the industrial look of these pendants, but I am still shopping around. I am undecided on cabinet hardware color. Stainless would coordinate with my appliances and contrast with the lower cabinets, while black would look smashing on the white cabinets and coordinate with my fixtures. What do you think? I'm leaning toward black. (I don't want to mix hardware finishes.)

11. Last but not least, my appliances, sinks, and faucets will all be stainless.

I would love to hear what you think! I will keep you updated as I shop around and make more decisions, but don't plan on seeing much until after the new year. I think I am going to step away from the computer for awhile and put off my kitchen-obsessing and decision-making until after the holidays. Except for maybe an occasional holiday-related post, you probably won't see me around the blog much for the next couple of weeks. So I will take this opportunity to wish you all a very Merry Christmas!

ordering cabinets

Guess what? We've made a decision and we are ordering kitchen cabinets today! I'm so excited and relieved to be moving forward on this piece of the puzzle.

Before I get to the finishes, I'll tell you a little about the cabinet shopping process. Brace yourself—this could be a long story.

The first guy (we'll call him Dude) I happened upon by accident as we were shopping for doors. I didn't know this place had a cabinet shop, but they told us their cabinet guy loved to visit the actual kitchens and help make the plan from scratch, so we made an appointment for him to come visit when the door guy came to make his measurements. When the Dude called me on the phone to schedule, the first thing he said to me was "I've been doing kitchens for 20 years and I'm really good." O.K. then. Well.

During his visit he did some measuring and came up with a preliminary design. We discussed a few things at the time, and then later I visited the cabinet shop with my mom to revise it some more. It was apparent to both of us then that he was a bit stubborn and didn't listen all that well. And he insisted he needed to make another visit to our house to measure again. (What? We live 55 miles out! Why didn't he measure correctly the first time?)

Instead I offered to measure for him, and I sent a nice little detailed drawing to him. The next time I heard from him he said "I got your measurements and its not gonna work." He told me that he really needed to come out again. But the next week he reported that he needed to spend a week at the hospital (?) and cancelled our appointment. Legitimate excuse, of course. But I took the opportunity to spend time making my own drawings so I could shop around.

My next appointment was with Mr. Big Box Store. I made an appointment with him, and when I arrived for my appointment he told me he was in the middle of a big expensive kitchen order and didn't really have time to meet with me. Humph. I had traveled 55 miles to be there, so I insisted we meet as planned, and he did go ahead and draw up a plan with me. His price was good but not significantly cheaper. I found out later it was the last day of a 10% off promotion that he didn't feel the need to tell me about.

My 3rd appointment was with a gentleman I'll just call Nice Guy at a local shop. Our appointment went smoothly, he helped me refine a few details on my plan, and educated me in the process. I left with a written quote (unlike with the other two) and a detailed plan. 

Seems like an obvious decision, right?

A twist—the Dude advertised a 20% off promotion. That is too significant to ignore. So I waited for Dude to call me, then gave up and finally called him. Then I waited several more days for him to finally meet with me. I was tired of waiting by then but I waited several more days to get his final price. Which was good. Very good.

Meanwhile, Mr. Big Box called and said they would be having a 15% off promotion. He also Big Box would chew up any Small Box and would beat any price. Sorry, Dude, but I want to keep Small Box in business. For one, I already knew the Dude would beat his price significantly, and he had better cabinets. For another, Mr. Big Box informed me he had lost our plan. Two hours with him unsaved and down the tube. I wasn't about to spend 2 more hours with him, so I ruled Mr. Big Box out.

When I got tired of waiting for the Dude to set his final price, I decided to take what I knew back to Nice Guy to see if he would drop his price at all. He did... just a little...but not enough. The Dude still beat his price by over $2000. So now you see, this made the decision very difficult. What would you do?

Ultimately, we have made the decision to go Mr. Nice Guy. For timely service (confidence that he will get our order right) and better style and color options. In the end there were too many compromises with the Dude and this is a piece of the kitchen where regrets are NOT GOOD. Not to mention the fact that the Dude insisted on measuring again before he would order. Who knows how long that would take.

So, in summary, shopping around is exhausting and you might as well go to Mr. Nice Guy in the first place. If you are in the market for some cabinets and would like me to dish the dirt on who these people really are, I send you a private message.

So sorry if I lost you back there. The fun stuff is up next!

kitchen layout plans

When it came to deciding on a kitchen layout, I just couldn't leave it to the kitchen designers. (I'm a control freak!) When meeting with cabinet people I needed to have good solid measurements anyway, so decided to make my own drawings. I even went as far as to decide what I would put in every drawer and cupboard. I met with 3 different kitchen designers to price cabinets and all three told me I made their job much easier!

It wasn't without a lot of time and effort, however. I made my drawings in Google SketchUp (free!) and it took me a solid day of watching tutorial videos to figure out how to do it. It is fun and sometimes a little frustrating! My drawings aren't perfect—when downloading cabinets (from the 3-D warehouse where you can find just about anything) I couldn't always find the perfect cabinet sizes (most notably the oven cabinet is too short in my drawing). I'm also missing a few details. But you'll get the gist. 

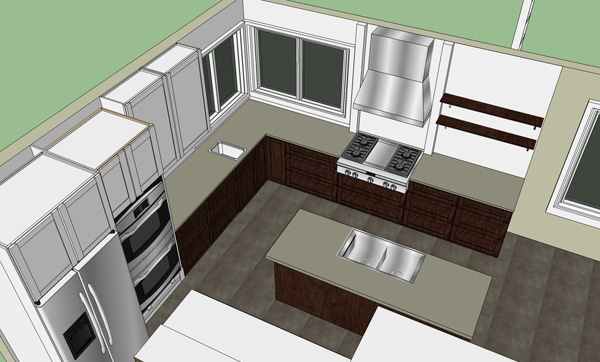
Here is the overhead view:

First of all, I didn't detail the dining room and living room with window and furniture. But here you can see we are planning to tile the kitchen and dining room and hallways, and eventually lay wood in the living room. The main layout change you can see here is that we are removing the peninsula and adding an island, mainly to get rid of the corner sink.

The main sink and dishwasher will move into the island, which is perfect for access to our dining room table. We are sliding the refrigerator over a bit to the left to accommodate double ovens. Near where the old sink was we will put a prep sink. Replacing the current electric range will be a 36" gas rangetop with griddle. We won't have any upper cabinets along that wall. Instead we will have an chimney hood and open shelving for just the everyday dishes (which is right across from the dishwasher). The lower cabinets will house lots of deep drawers.

This is looking into the kitchen to the east. Having no upper cabinets and soffit on the east wall will open up this space so much!

Before, similar view:

Looking to the north, before:

And the north view, as planned:

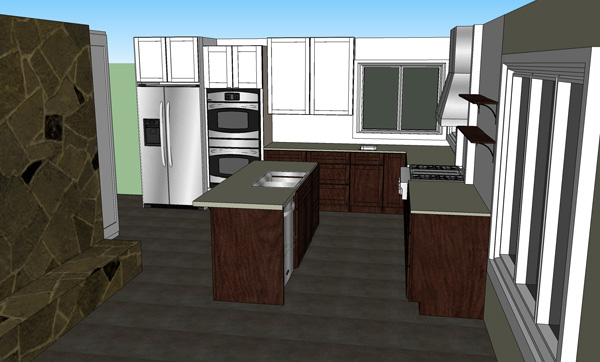
Removing the peninsula and upper cabinets will also open things up. This view shows one challenge with our layout. To have the ideal amount of space between the island and perimeter cabinets (42 inches) we are little short between the island and the fireplace. This angle makes it look a little smaller than it really is, so I'll show you another view:

We have 2'8" between the island overhang and the fireplace ledge (the size of a standard doorway) and visually a bit more since it is open above the fireplace ledge and under the counter overhang. We figured that we can live with this arrangement, or, if worse comes to worse, eventually tear out the fireplace ledge to open things up. (My dad is not keen on that idea, however).

Also, the island overhang is only 6", not really enough for bar stools. I wanted to have extra counter behind my sink, however. The upper cabinets beyond the island will all be the same height and will have a simple crown molding along the top so they will go clear to the ceiling. Of course, there is really a ceiling, not blue sky! :)

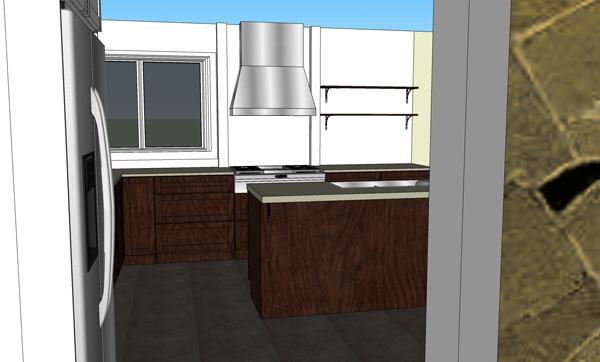
If I had a ceiling in my actual drawing, however, I couldn't show you this view to the south:

This shows you how close the sink and dishwasher is to the dining area.

Looking to the west:

This corner, where the desk is currently, will house a shallow pantry (so I can see everything! I'm always losing things in the back of my 24" depth pantry cupboard.) It probably won't look exactly like this because we are going to custom build it. I'm looking for some creative ideas, unique doors, etc. Any thoughts?

Beyond it is the area where I am going to put a desk. We are going to reuse the old desk, add a new door, and custom build the upper cabinet to match. These I will paint a different color (undecided) so we won't have to worry about matching finishes exactly to the kitchen.

Desk and niche areas, before:


There you have it. I must say, it is intimidating to show you something I have put a ton of thought into and open it up for critique at this point. I'm scared that you will find something terrible I didn't consider. But, I think I can handle it. Critique away!


What's wrong with my kitchen, anyway?

So by now you have probably heard about our upcoming kitchen remodel, and you may have asked the question, "What is wrong with the kitchen you have?" Well, nothing, really, as long as you love original 70's decor and stepping over each other a bit while cooking. But listen. There is no question this kitchen needs a few updates. So if we are going to dig in, we are going to fix a few things. This kitchen sees a lot of action, especially during busy summers, holidays, and harvest time, so making it efficient and a pleasant place to spend a lot of time is a priority for us.

(the kitchen today)

Okay, but really. What is wrong with this kitchen?

Let's start with the very worst:

Yes, that is carpet in the kitchen. And I probably don't need to say any more. Admittedly, it doesn't look so bad in this photo. But trust me. It is dirty, grimy, and old. And a really bad idea in a kitchen. How it doesn't have spaghetti sauce stains in it, I have no idea. We shampooed a big soy sauce stain out of it when we first moved here. Rumor has it my Grandma liked warm floors because she liked to walk around in her bare feet. I feel gross if my bare feet touch this floor. And I am even more grossed out that my baby girl learned to crawl on this floor.

Next, the cabinets. Orangy stain and ornate hardware aren't my cup of tea. I prefer a clean, modern style.

The floral wallpaper border is rather dated. (I already removed the matching floral valances.)

The white laminate countertops aren't so offensive, but they have seen better days. 


OK, fine. Then why not paint the cabinets, replace the flooring, update the countertops and remove that wallpaper already?

I have been tempted to tear into that wallpaper on more than one occasion and do some quick and cheap updates like this. The truth is, that solution only glosses over the functionality issues. 

For instance:

The corner sink. Great in concept, poor in execution. I've seen corner sinks that work okay, but it is never ideal for more than one person working at the sink. And in this case it is even worse because the dishwasher is right next to the sink. That means, when the dishwasher door is down, there is barely room for you to stand and load the dishwasher. When you need to open the sink cupboard to get dishwasher soap or turn on the disposal, you must close the dishwasher door first. This arrangement could definitely be improved.

Funny story: My dad thought we should build the cabinets for this kitchen. It seemed to take some convincing to talk him out of it. I wasn't so much afraid of the quality as I was the amount of work, but I do think there are some advantages to having a "factory finish". Well, the other night we were talking about things my Grandma would have done differently if she'd have had the final say (as opposed to my Grandpa.) "Like what?", we asked. After some thought my dad said, "Well, for one, Grandma didn't want the contractor to build the cabinets. She wanted to buy them". We all stopped for a minute and then cracked up as the irony of that sunk in. Maybe my Grandma will finally get what she really wanted in the first place... ?

(I should mention that these cabinets are not built as traditional individual units and could not be easily reconfigured.)

As you can see above, the cabinets do have some quality issues. The wood isn't the best quality and the doors are thin.

The doors have started to look a little uneven and skewed.

The cabinets are all hung below a soffit (which has can lighting—very nice). However, my Grandma was petite. I am not. To me, the soffit is wasted space. 

The soffit also causes some of the cabinets to hang very low. For example, the corner cabinet in the photo above is very hard to work around and I have to scoot my mixer out a ways to be able to lift it up.

The appliances aren't original and the black is not terrible at all. Something I've longed for, however—is double ovens. This kitchen can use that kind of capacity. And something else—I didn't mind a glass top electric stove until I started using it for awhile. But over time I got frustrated with the slow response when turning things down to a simmer. I was always boiling things over. And then another problem surfaced. When I boiled things over the liquid would cause the pot to slide all over, and then I would have to try to clean it up by wiping a scorching hot burner. I'm not knocking your electric stove if you love it. But we don't get along as well as I did with my gas stove in Utah.

There is one more pet peeve I could cover:

We have this desk area in the corner of the kitchen.

It is mostly open storage and always cluttered, possibly because of a lack of effective storage. It currently holds my cookbooks, a few photos, Christmas cards from the early birds, a charging station, a CB radio (for farm communication—some of our land is out of cell phone service), a bulletin board for school calendars and such (that I never bothered to actually hang on the wall), and usually a pile of mail. All this means I don't actually use this area as a desk. Instead my laptop sits on the kitchen counter (as seen in the first photo in this post.)

And right around the corner, we have this little niche that is not as useful as it could be:

See where I'm going with this?

I don't want you to come away from this thinking I am whining and ungrateful. That is not the case. But I think sharing the issues will help you understand our thought process behind our new design. 

Tomorrow I will share more of that with you—the new kitchen layout. Until then, I'm curious. What would you do if this kitchen was yours? Live with it? Update it cosmetically and live with the rest? Or rearrange? Obviously budget factors in to these decisions, and we are very budget conscious—no spending 50 grand on this renovation. We are doing some pretty exhaustive comparison shopping (20% off cabinets!) and have some creative ideas for reusing materials, which I will share with you another day. We are going to DIY quite a few things as well (laying tile, building a pantry cabinet, installing our cabinets, and doing our own electrical and plumbing work-thanks to my dad's expertise.)  With any luck we will have a new kitchen before the spring farm work kicks in! 
Today I am . . .

. . . ashamed I've neglected my blog for nearly two weeks. That might not seem like a big deal to you, but to me it is important to give you a reason to keep visiting!

. . . excited that my new garage door arrived yesterday and soon I won't have to open and close it manually.

. . . anxious for the rest of the doors we ordered to come in. And not-so-anxious to paint those doors and trim. But very interested in seeing what those doors will do for reducing our heat bill!

. . . proud to have finished a nagging item on my to-do list—staining the basement bathroom cabinets.

. . . grateful to have a living room large enough to use as a work space (after giving up on the cramped, dark storage room and moving to the garage, then giving up on the dirty, cold, and dark garage and finally finishing the job in the house in front of the big living room window.)

. . . very relieved we didn't have to deconstruct the cabinets to get them into the bathroom. We were worried for bit. We tried every angle we could think of and finally gave up, saying "Dad better be smarter than we are or we have a problem." Well, of course Dad is smarter than we are, and he proved it by suggesting an angle we hadn't thought of. Fortunately, it worked. Barely.


The picture above left is of Tom trying to take the door off on the neighboring room in hopes it would give us enough clearance. Above right is one of the cabinets in place. Please forgive the poor picture quality. I'll take better photos once we do a little touch-up, install the backsplash, and accessorize. This cabinet seemed a bit imposing after living with it wide open, but I have a few ideas to remedy that. 

Moving on.

. . . happy that I have decided to keep going as a Stampin' Up! demonstrator as I just held another successful stamp class. I forget how much fun it is to stamp until I spend an afternoon creating. These are the cards we made (Mom made the one on the left):

. . . hoping I can get my Christmas cards together soon. Feeling so behind!

. . . looking forward to the girls' Christmas program tonight. Abby is the narrator!

. . . overwhelmed with the process of preparing for a kitchen remodel. So many details. I'm going make next week kitchen week on the blog and will start sharing our plans. 

. . . thankful for so many blessings.

Thanks for visiting and not giving up on me!

landscaping project update

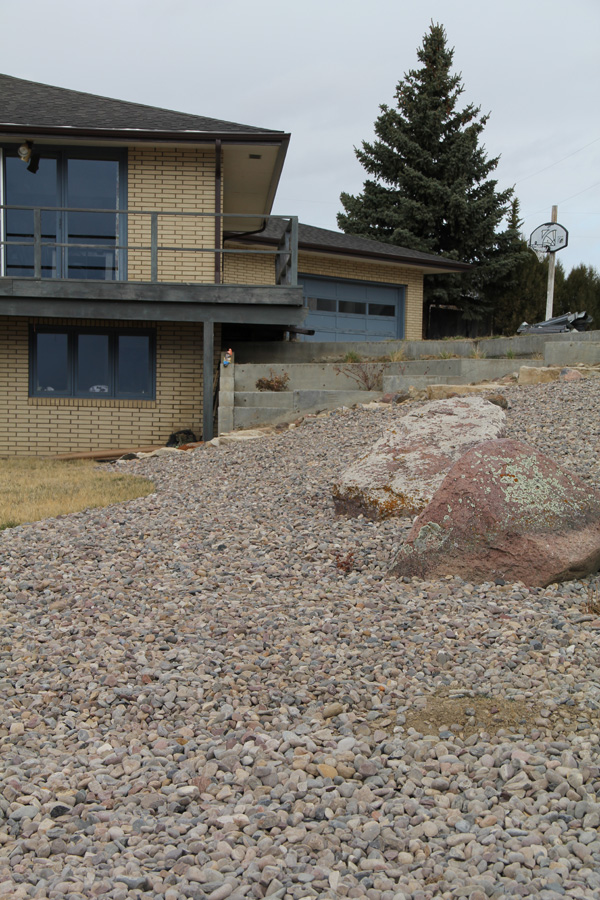
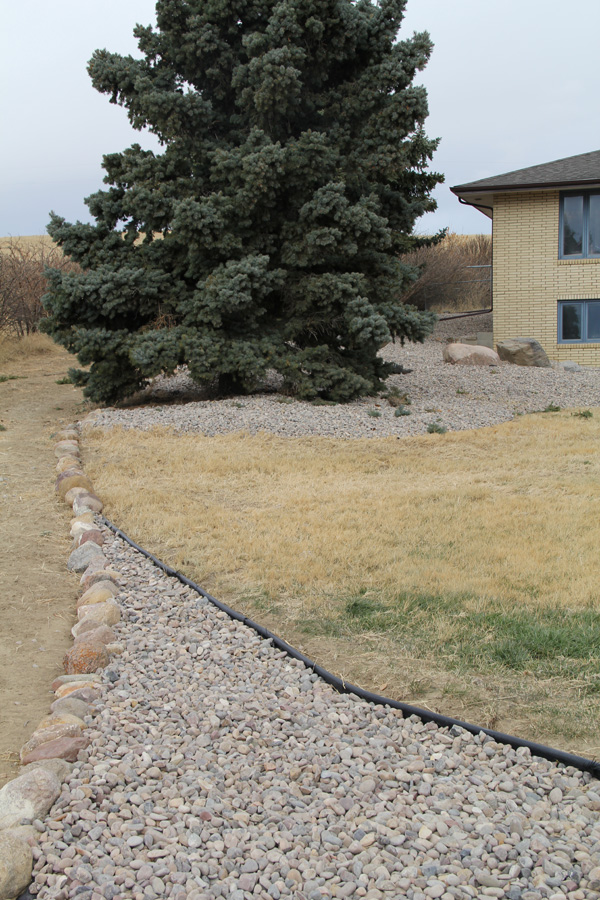
I started to type "landscaping project finished" into the heading and then decided that wasn't quite accurate. We are far from finished. But we did complete our landscaping goals for this year. As you know, we tackled the lower yard this summer and spent a LOT of time raking gravel—four truck loads to be exact. (My uncle helped with this job one day and said it should be prison work. Yeah, he's probably right. But it was also really good for the muscles in my upper body. Does anyone want to arm wrestle?)

It is hard to give an accurate "after" picture of this project. I took these photos before snow started falling last week, but winter had already shriveled all the plants I planted. You will have to use your imagination to see what will hopefully eventually look like intentional, natural landscaping. Right now it just looks like a sea of gray, boring gravel.

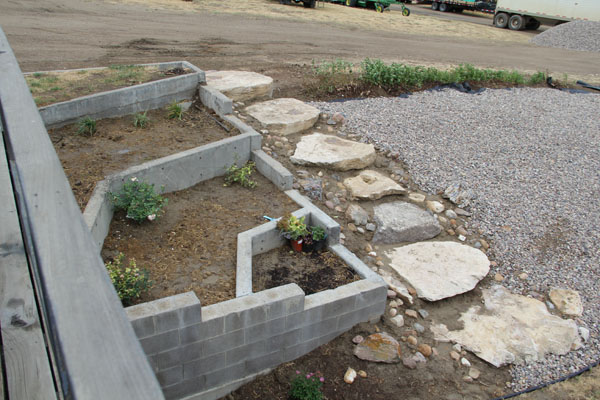
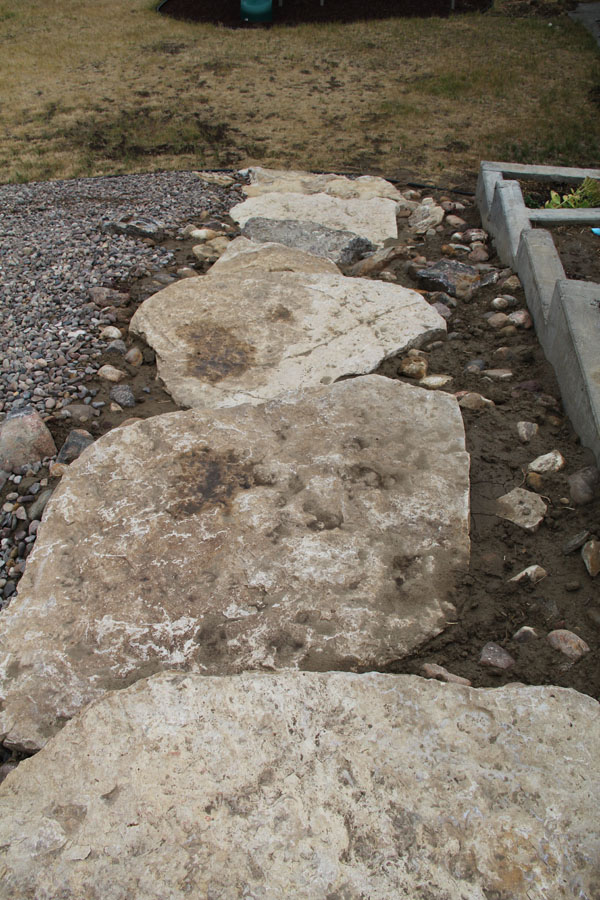
You will just have to imagine the lilac hedge full and and blooming, the juniper plants crawling over the gravel, and the salvia, seedums, and sage filling in with color. The rock staircase will be covered in beautiful ground covers (if the bunnies will leave them alone.)

The grass will be lush and green. Well, green at least. At some point we will probably plant a new variety of grass that can grow into a fuller, richer lawn. And I will enjoy not having to mow the steep hillsides.

The cement planters will fill in with hundreds of daffodils, tulips, and alliums. Roses and grasses will add texture and color year round, and I will eventually add more perennials to this area as I see how things grow and develop. I'll cover the soil with mulch in the spring as well.

Next spring I also hope to transplant some native yucca plants and add a few more perinnials to punctuate the gravel area without requiring a lot of water. 

For now we will rejoice in the satisfaction of a finished project and a much more manicured look as we pull in our driveway. 

gutters

You'll have to forgive the pun, but my mind is in the gutter today. (Har har.)

Our new seemless gutters and facia are up and we are pleased with the result. Here is a look at the before:

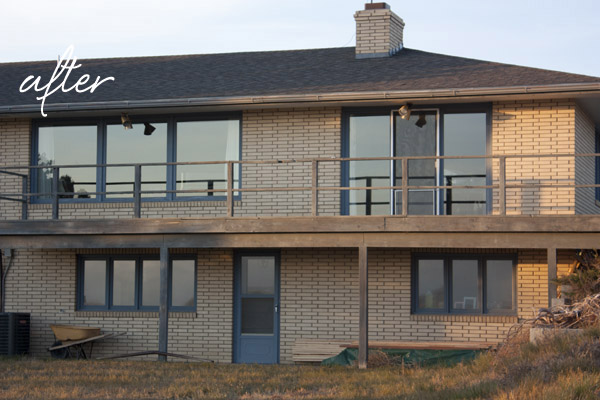
And after:

The guy who did the job bid less than half of the other company we priced. Choke. He was extremely prompt and did a solid job.

In the end we decided against doing metal soffit. It would have lowered the soffit ceiling a half inch or so, and visually even more with the dark color. The eves are already quite low. After examining the condition of the (probably original) paint job on the existing wooden soffit, we decided it looked pretty good for 40+ years, and it would be a simple job to sand the rough spots and repaint, thus cutting our gutter replacement cost in half. I think we will repaint in a similar color.

I think the new brown gutter/facia color looks awesome. Even though it has more contrast, it seems to blend in and look like its been there forever. I can't wait to eradicate the blue completely. 

Now I am turning my attention to the exterior lighting. I already told you my plan to paint the fixtures by the front door, but we also have a few of these around the house:

Not so bad from afar, maybe. And quite appropriately atomic, don't you think?

But look a little closer:

Ew. Not in great condition. And wrapped in electrical tape—presumably to keep them from rattling in the wind, but doing a poor job as we've witnessed during these last few very windy days. This particular fixture is framed front and center in our dining room view.

The question is, what do we replace them with? The best looking option would undoubtedly be recessed lighting. However, our roof has a very shallow slope, and the attic space is extremely tight toward the edge. We aren't sure there is actually room for a recessed fixture. We could move them closer to the house (and add a few more while we are at it), but that would mean patching the old holes and adding a lot more work. I am leaning toward replacing them with simple, inexpensive, non obtrusive fixtures. Here are some options I've found:


1. Cove Atomic Age Flush Fixture by Rejuvenation, $145

This one was shot down lickety split. Too much like the ugly ones we are trying to replace, and it wouldn't put out enough light. And too expensive. Enough said.

2. Hunter Marine II Outdoor Light from Home Depot, $44.97

Meh. 

3. Braxton Flushmount fixture by Restoration Hardware, $219

This is what I would buy if money wasn't a concern. But we have to buy 5 of these and that makes it ridiculous.

4. Hampton Bay from Home Depot, $19.97

This is the best alternative I have found that isn't too fancy for the modern look of this house. And the price is right. However, the slanted shape and more Craftsman feel makes me less than enamored. 


So, what do you think? Which would you choose? Have you seen any good (not-to-expensive) alternatives? What are your favorite lighting sources? I could definitely use some suggestions.

impending winter

It's been hard to figure out what to post about this week. With the impending weather change (it's supposed to snow tonight!) we've been scrambling to finish up outdoor projects. We have lots of things in progress but nothing finished. 

For one, we've been working on our yard—laying more weed fabric and spreading gravel. We just ordered our FOURTH load of gravel. Spreading gravel=very sore muscles. And when we are done with the landscape gravel we are hoping to grade and fill some holes in our driveway with crushed gravel.

Secondly, the dump was open in our small town this weekend for free dumps, so we decided to take the opportunity to empty a corner of junk in our garage (leftover from before we moved here.) Our garage is looking SO much better, but we still have a lot more organizing to do before it is ready to call done. We are still gathering bids for replacing the overhead garage door and side doors, and we are looking forward to improving how much dirt and debris ends up in our garage. These kinds of projects maybe aren't the most fun, but the end result just FEELS GOOD. 

Speaking of door bids, we are still waiting on someone to come measure the side windows for our front door. But this week I at least cleaned out my cold-snapped flowers and added a bit of fall decor:

I popped a few pumpkins leftover from Halloween and some branches into the pots that are much to heavy to relocate. By the way, I'm thinking of keeping those light fixtures and polishing them up with a coat of oil-rubbed bronze spray paint. What do you think? Or do you prefer the brass? I'm also thinking of doing this to some of my interior fixtures.

We also got bids for gutter, soffit, and facia. Soon we will have a two-toned house: brown soffit, facia and doors, and blue trim. Looks like trim painting will be on our to-do list next spring!

Well, that is it for this week. Hopefully the weather won't completely prevent us from continuing to make progress. Happy Friday, and stay warm!

don't try this at home

Earlier I showed you this photo of our yard plans:

One of my favorite features we planned was a rock staircase. When we went out to the field to scout for rocks, Tom kept pointing out smallish flat rocks about 12-15" wide. I had in mind something a little bit bigger. So we had some trouble agreeing on what rocks to pick up. 

Then we involved my dad, who happened to know just the rock pile to go to. I was pleasantly surprised—actually over the moon—when they hauled the first rock into our yard.

These big flat round rocks aren't exactly prevalent on our farm. We have plenty of big round rocks, mind you, but these we had to hunt for. 

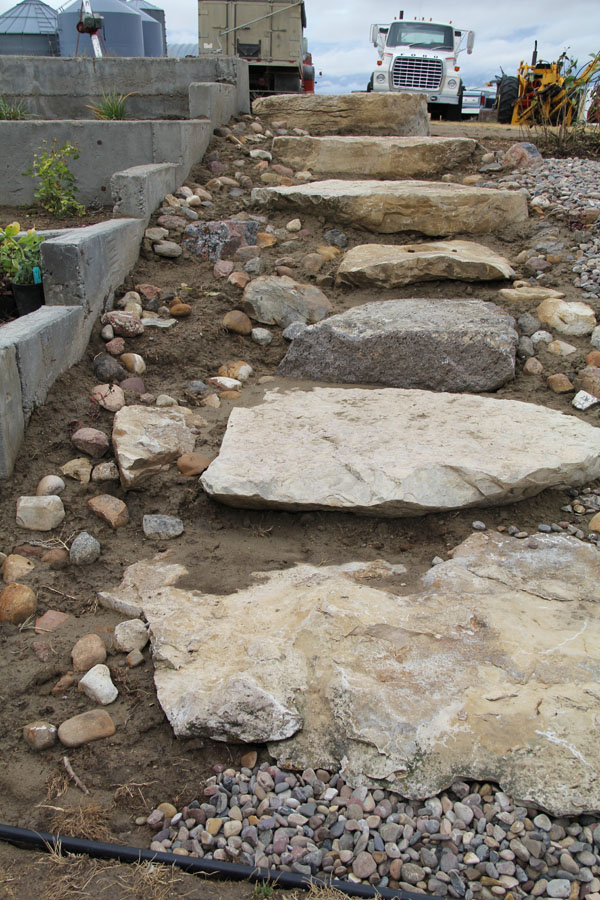
Here is the staircase after all the rocks were set:

Doesn't it rock? Here it is from the top looking down:

After we placed the big rocks, I packed in dirt and smaller rocks around them. My intent is to plant ground cover flowers for a rock garden of sorts. 

And here is the view from the bottom:

I know it is hard to tell from the photos, but those top 2 rocks are gigantic. (I should have put my kids in the photo for scale—and don't you just love the farm equipment in the background? Part of the deal around here.) Hauling those rocks in from the field was no small feat, and placing them was even more difficult. What I'm trying to say is, DON'T TRY THIS AT HOME! Unless you have lots of experience with big equipment.

This video shows the process of placing the second to last rock to give you an idea of what it took. (The last rock was even bigger and more challenging!) And by the way, sorry about the video quality. I used my new Canon, but clearly I need to study up on how to take good videos. Between the shaky and choppy filming, wind noise, and nervous wife commentary, it might be a little rough to watch.)

Any guesses on how much this would cost someone to have a landscaping company do this? To source the rocks, haul them, and place them? I'm guessing thousands of dollars. Needless to say, I feel very blessed to have this cool feature in my yard. What do you think?

Pssst. There is a great little giveaway today on one of my favorite blogs, From this Front Porch. Check it out to win some super moisturizing handmade goat's milk soap!

landscaping project

When I get started on a project I have a hard time stopping to blog about it. And especially when I have the guy's dedicated time to the project, I must take full advantage of it and work work work.

We are waiting for cooler weather and much needed rain to begin our fall seeding. Many farmers in our area seeded anyway, but the ground is dry and hard and it doesn't hurt to wait a little longer for better conditions to give the seeds a better start. In the meantime, my yard project that had been stalled has been started again—full steam ahead. Let's see if I can give you an idea of what we are working on:

Earlier this summer I dug trenches and installed edging along the hillsides in our lower yard. We are bringing in some large rocks and plants, then we will lay weed fabric over this area and landscape gravel over the top.

My poor lilacs (that had to be mowed to the ground this year) grew back with a vengeance but now are in sore need of water and weeding.

These are some of the big rocks waiting to be placed. We drug these in from the many rock piles around the farm (rocks that at one point or another were drug out of the fields!)

The other side of the yard gets the same treatment: large rocks and plants, weed fabric, and gravel. We also have a large, overgrown juniper and some other small (dead) plants to remove along the house.

Back to the east side of the yard: Earlier this year we dug the old plants out of the cement terraced planters. Now we are bringing in some manure from our corral area to richen the soil. Then we are planting a few perennials and bulbs. 

Next to the beds is the big daddy project of them all—a rock staircase. I am giddy about this! It is looking so very cool. More details soon.

And finally, this poor little bird bath needs a new home. The landfill, maybe? But it reminds me of my Grandma and so it might just find its way to another corner of the yard for nostalgia sake . . . and for the birds' sake. And to entice the birds away from my railing (and quit covering it with their little white gifts).

Updates on our progress coming! For now I must go get to work.

removing wallpaper

As you know, to put up my new wall unit, I needed to remove the wallpaper on that wall first. This was an intimidating task, but in the end it wasn't nearly as hard as I thought it would be. 

Now I am by no means an expert after removing one wall, but since I have a lot more to remove, I knew I would need to come up with a system that worked. I didn't have time to run to town after chemical or a steamer, and I had heard the steaming method was ineffective anyway. So after a bit of Googling I found the magic ingredient: liquid fabric softener.

I was worried about the paper in the living room because it was the paper-backed type. (The rest of the house is fabric-backed and peels right off in one peice, however, it leaves a residue of glue that will need to be scrubbed.) Removing this type turned out to be a simple process.


First, I peeled the top layer off, leaving the paper backing on the wall. If I was careful, I could do this in one big piece. You can leave the top layer, but it is usually not porous and you would need to score it using a special scoring tool to allow the water or chemical solution to soak through it to the paper backing. From what I read, scoring can leave marks in your drywall which is of course not desirable.

Next, I made my solution of hot water and liquid fabric softener. I used about 1 part softener to 3 parts water. I didn't experiment at all with the mixture because this seemed to work fine. You might be able to use just water—I don't know—but I think it helps to use the hottest water possible. I made the solution in small batches so I could keep the water hot.

Spraying the wall turned out to be the most tedious part. You want to soak it really well, so having a garden sprayer or something similar would make this job go faster. I also sprayed one panel ahead of where I was working so it could soak for about 5 minutes before I peeled. Any less and the solution didn't soak through the paper enough. Any more and it would start to dry out. 

With a scraper, I started from the top and carefully peeled the paper away from the wall, working in 6-8" strips down to the bottom. 

Where you might run into trouble:

1) If the wall wasn't primed and painted well before, prepare to have a giant-sized portion of patience. It won't come off easily and you will likely damage the drywall with your scraper. Fortunately for me, this was only a problem where the old heat registers were removed. 

2) In areas where seam repair adhesive was removed, extra scraping was necessary and a sticky residue was left behind that I had to sand to smooth out.

The end result, while satisfying, unfortunately was no where ready to paint. For some reason the paint was cracked where the seams were. In addition I had nail pops, nail holes, and a few gouges to repair—plenty of evidence that this was an old wall. I can see why it was tempting to cover it with wallpaper.

After scraping, spackling, sanding, and wiping the wall, I primed and painted and ended up with the slightly imperfect but satisfying result:

(Try to overlook the missing outlet cover and baseboards.)

So I hope this encourages someone to tackle your own wall paper removal job, and I'll keep you updated on mine!

new wall unit styled

I did a little shopping around my house to give my new wall unit a little style.


I don't really think accessories are my strong suit. One of my favorite parts of my old job was photo styling—especially rooms—but for some reason I struggle with styling my own house. But I'm trying to channel that old photo-styling mind set while also trying to keep the decorating meaningful. I don't like to just have a lot of "stuff" lying around. This time I'm happy with the end result. What do you think?

Here is a closer look at what I found lying around my house:

My Grandma's old Polaroid camera that I found tucked away in a closet. I actually checked these out on eBay to see what it was worth. Turns out everyone had one and they aren't worth 10 bucks. Oh well, it looks cool and it reminds me of my Grandma and her penchant for photography.

A desconstructed typewriter print that I purchased from 20 x 200. Tom doesn't get it but I find it fascinating and love the graphic look of it. Plus it goes awesome next to the vintage typewriter I bought from our family auction.

Some old photographs of my Grandpa and Grandma that were tucked away in the bookshelf we removed. I displayed the photo book I made of Tom's Grandma Elva. If I ever get around to making more photo books like I would like to, this is a great place to display them and entice people to pick them up and look at them. Don't you think?

My dad bought a bookshelf full of Reader's Digest books in our family auction. He didn't have a place in mind for them—he just liked them—so they have been boxed up in our storage room until now. The patterns on the covers are really fun, so I decided to display a few purely for cosmetic reasons.

My random chair collection has always felt a bit disjointed before, but I actually really like them all displayed here together. 

My little Target acrylic lamp was an impulse buy but has always been a bit of an orphan. I never had the perfect place for it. I like how it ties into the glass hourglasses here.

Finally, a stack of Pottery Barn design books needed a home. I removed all the dust jackets for a unified look. 

The whole living room feels much more put together now, even though there are many more projects to do. 

This wall is next:

I had a console table there before:

Removing the console table (I'm hoping to unload it on Craig's List for a few bucks) allowed me to open up the furniture layout in the room, which was great. It does leave a large blank wall, however, and it feels a little empty after getting used to having furniture there. 

I have other plans for the photo hanging on this wall. Not that I don't love it. I would love it anywhere. But I have a place better suited for it. On this wall I plan to hang my gallery wall of family photos. I may purchase more frames to fill this wall even more. I'm hoping just the weight of the frames will balance out this room without actually having furniture against this wall.

Now to strip more wallpaper. (It isn't as intimidating now that I've done one wall!) And of course paint. But I don't want to go to crazy painting more walls until we are able to scrape the popcorn off of the ceiling, texture it, and paint it. I'm not quite sure when that will happen, so don't expect any photos of this project too soon. 

After the room is painted we will replace all of the baseboards to match our basement (most of them are missing anyway where the heat registers were removed), replace the sconces (not my style!), and change the window treatments. The flooring will be replaced eventually also.

And . . . whoa. I'll stop there before I get ahead of myself. At least I have one wall going in the right direction! 

new wall unit

Hello. My name is Joellyn and I'm addicted to Craig's List.

I wasn't actually looking for a wall unit. This wall unit was looking for me. I saw the ad as I was browsing one day and noted that it looked cool—I even showed it to my mom—then moved on. 

photo from Craig's List adAbout a week later I found myself thinking about that wall unit again. For some reason it occurred to me that my dream of having built-in bookshelves along the back wall of my living room wasn't likely to happen for a very long time. So why not buy something that would stand in (and look ever so cool) in the meantime?

This is what the back wall of my living room looked like before:

The bookcase that is sitting there was removed from the other wall and was just sitting there for lack of a better place to put it (it is heavy, man!) but it is obviously wrong for the space. 

It had been at least a week since I had first seen the ad, so I was thrilled to find it still listed. It took several more days to finally get into town to check it out. She had listed it for $100, but she took my offer for $80. This is why I love Craig's List in Great Falls. In any big metropolitan area this unit would have been snatched up within hours, and would have pulled MUCH more than $80, I'm sure.

This might not be everyone's thing, but it is so very mid-century (1960s) and perfect for this house. And if we do build those bookcases someday, I can resell this unit for a profit. Just look up "Danish wall unit" online and you will see several very similar looking wall units for more than two or three thousand dollars. It's all about finding the right market, baby.

This is what it looks like in my house:

Since it is partially covered by my couch, here is another view:

The book stand unit on the right will be mounted on the rails as well, but I was missing a bracket that I have to pick up from the seller today. And after a good polish, I will of course style this baby and post more photos for you.

It is in excellent condition for its age and is all solid wood. I love how the color warms things up and lightens up the dark leather furniture I have. 

Oh, and did you notice one more thing?

I stripped the wallpaper off that wall and painted. (More on that later). I just couldn't bear to put this up over that old wallpaper so buckled down and got the job done. One wall down, 240 to go. Ha.

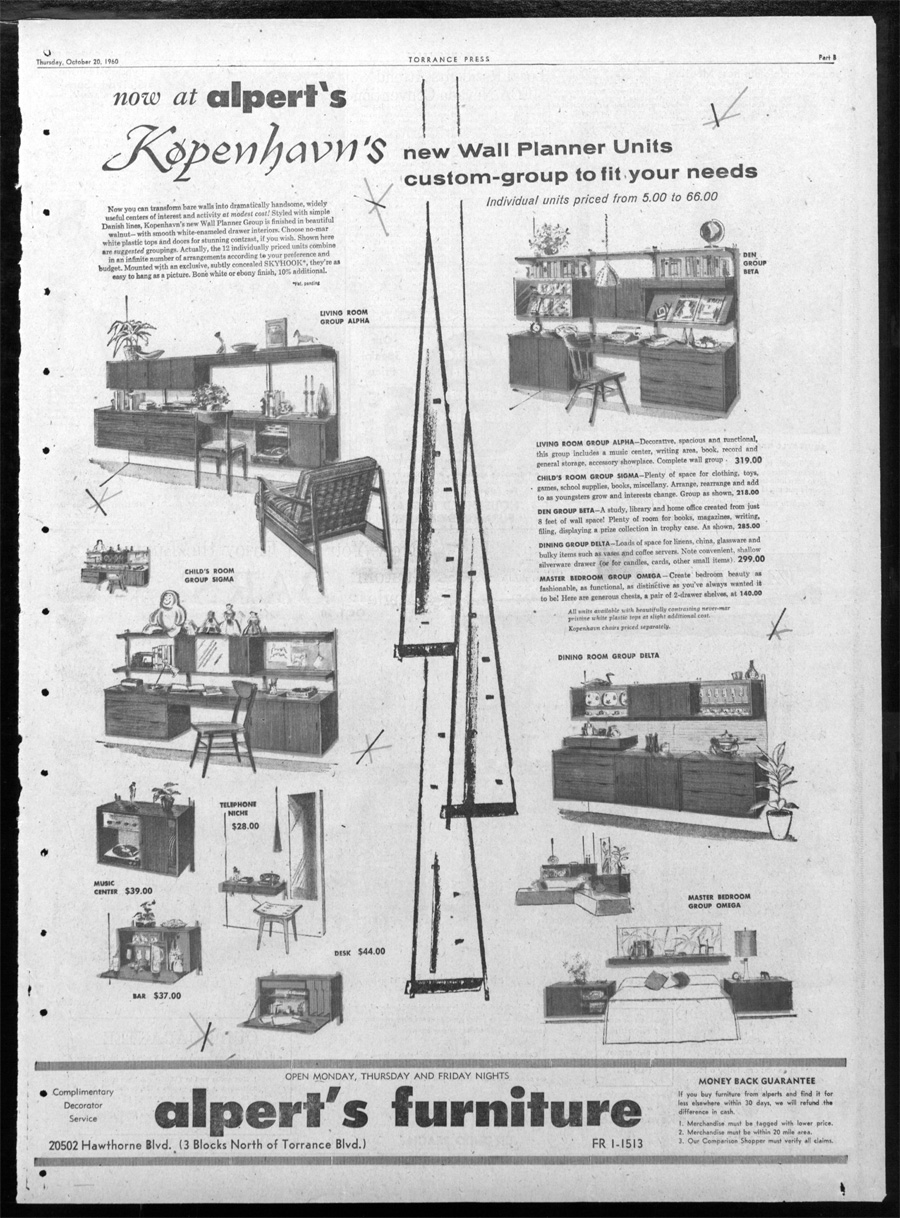
The unit is marked with the manufacturer's logo, "Kopenhavn". A little research revealed that this is not actually Danish, but is Danish inspired. Kopenhavn was a line trademarked by the Northern Chair Co. (based in Tacoma during the early 1900s), and this particular "wall planner group" was designed by Noral Olson. I looked for his name in other places and just found someone who designed miniature furniture. Same guy? I'm not sure. The Kopenhavn line seems to be somewhat rare. If you know more, do tell! Here is the coolest thing I found during my research—an ad from a furniture store in an old newspaper clipping:

I love peices that have a history, and it was fun to see the other units offered as part of the line. And the prices: $319 for that first living room set!
Tell me what you think of my find! I'll be back with more after I do some decoratin'. Bye for now!

new stair railing

I was going to wait to show you this after we finished all the trim, caulking, and painting, but that could be awhile and I just couldn't wait. 

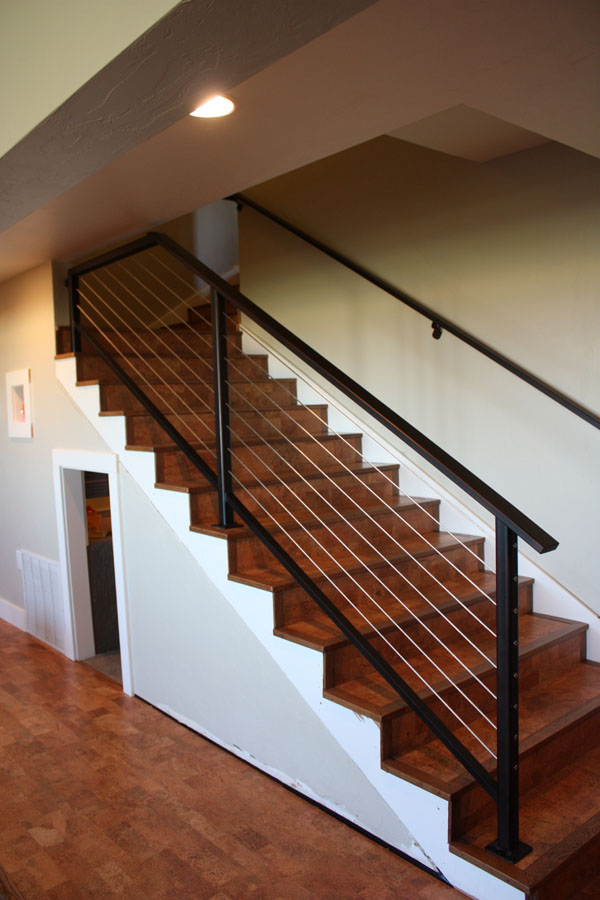
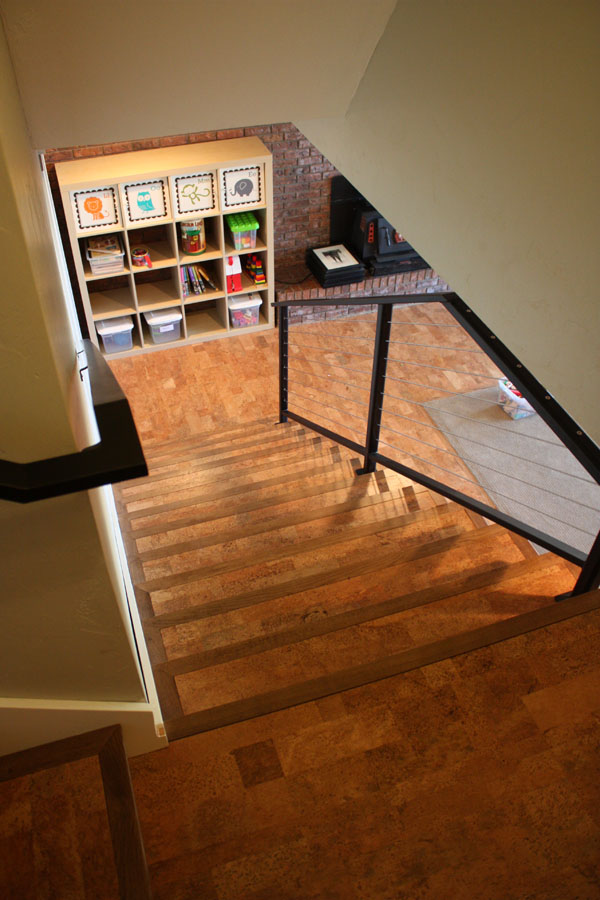
We have a new basement stair railing!

We couldn't be happier with how it finishes everything off. And we are relieved to have the safety factor resolved of course. The look is clean and modern and perfect, just like I wanted.

The railing was built by my dad's cousin, of Specialty Iron Works in Great Falls. They do great work! My hope is to eventually do the same railing outdoors on our porch, which is in desperate need of an upgrade. I think this style is perfect for our house. (Photo below from after our roof was replaced.)

So do you dig it?


Pinterest challenge—clipboards

Well hello, Tuesday. What happened to your friend Monday? And WHAT DID YOU DO WITH JULY, for that matter? 

It is harvest time here. That means life is flying by with all kinds of business. I must get off the computer as it is my day to cook harvest dinner for the crew and get this house of ours shipped into shape.

But first, have you seen the Pinterest Challenge?

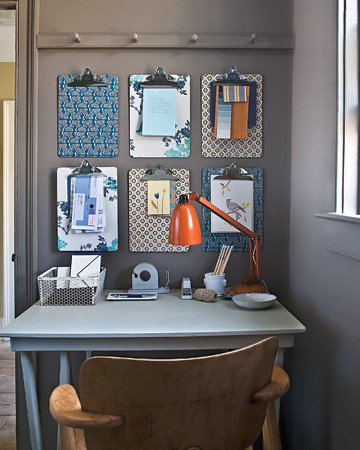
It seems like a great excuse to try out some of those fun back-burner projects. If you follow me on Pinterest, you might have seen this pin, originally from Martha Stewart:

I actually purchased some clip boards ages ago to use in my craft room downstairs, and this challenge was the perfect excuse to drag them out and put them to use. 

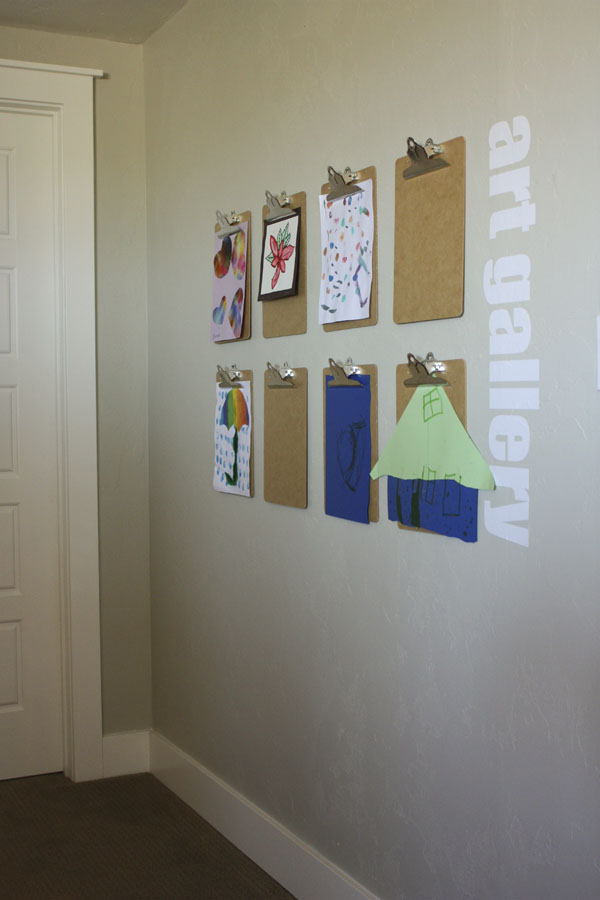
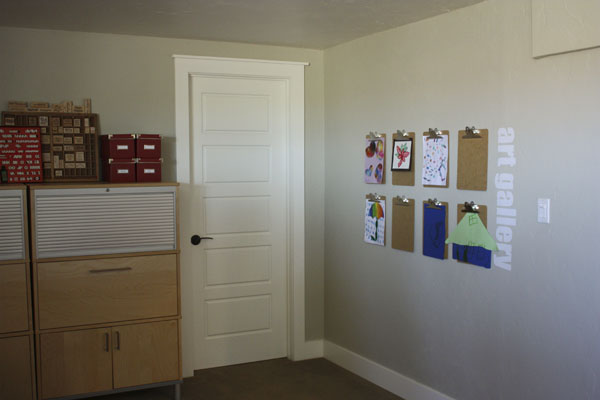
I used my clipboards to make an art gallery wall for my kids. We always have artwork laying around the house, each one special in its own right. I love to showcase their art, but I don't love it when they tape it to the walls. So this idea was born.

I left my clipboards unadorned to let their artwork be the star. I did order custom vinyl lettering from Uppercase Living, however, and I love the modern clean look.

And when its time to change out the artwork, I can simply snap a picture of the wall to preserve it forever—kind of like this:

A collection of these photos could make a darling photo book, don't you think?

Join me next Tuesday for another Pinterest Challenge project. I already have one in mind! 

Craig's List find—claw foot tub

I have been thinking for awhile that I would like a claw foot tub in this bathroom:

The brown fixtures are cool-retro and all, but they have years of hard water deposits on them and don't fit the aesthetic I hope for in this room. So I started to search Craig's List. We have no immediate plans to start on this room, but I figured it might take awhile to find the perfect tub. Surprisingly, tubs popped up for sale more often than I expected, but most of them weren't in the best condition and would need to be reglazed.

A phone call to a professional revealed a whopping $795 price tag for reglazing a claw foot tub. Considering they go for at least $2000 brand new, that might not be so bad. But considering the finish is only guaranteed to last 10-15 years, I was sadly beginning to feel this option might not be for me.

And then I found a listing for a tub that looked like it might work with its original finish. I called to set up a visit. And here is where it turned into one of those situations that felt like it was "meant to be". I talked to the guy to ask a few questions and told him I would call back when I had an opportunity to bring my husband in to look at it. (I don't like to look at Craig List finds alone. Never mind the fact that I would never be able to load a claw foot tub by myself.) The next day it rained (yes!) freeing up Tom to go with me, so I called him back and got his voice mail. When I heard his first and last name on his voice message, it clicked. I knew these people! It happened to be my brother-in-law's sister and husband. 

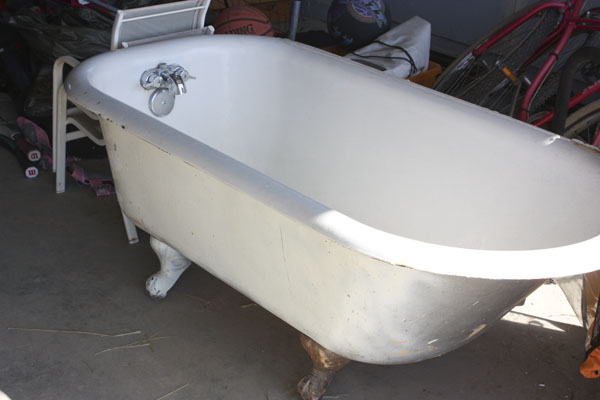
Long story short, we brought home the tub, and even got a good "friends" discount out of the deal. This is what it looks like:


It definitely needs a little TLC. The outside needs sanded and painted—I'm thinking a charcoal gray. I will paint the feet oil-rubbed bronze (or white?). The tub was built in, so their is caulking and paint along the top edges that needs to be scraped off. And the inside just needs a good scrubbing. There is a bit of yellowing around the drain, but overall the inside looks great. There are a few chips in the enamel, but only around the edge of the rim. We will either live with the imperfections or try a little enamel patch kit since it isn't on the interior of the tub.  

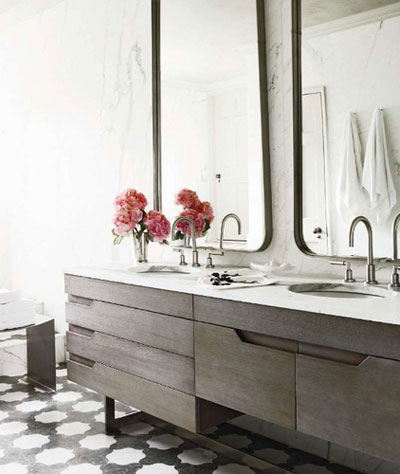
The second part of this equation is now I want to find an old dresser to retrofit for the vanity. I have shown you this inspiration photo before:

Source unknown.

I love the mid century vibe of this desk/credenza and I think something like this would be very appropriate for this house.

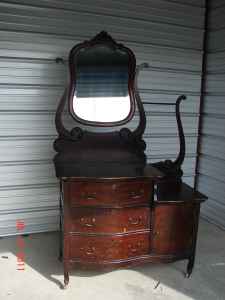
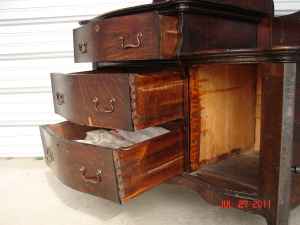
However, yesterday this popped on on Craig's List:


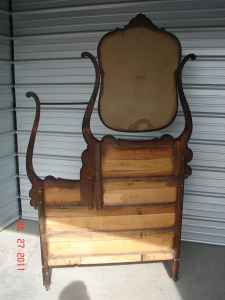
This seems like a pretty legit antique to me. I love that it is meant for bathroom duties, complete with spot for a wash basin, towel bar, and "potty cupboard".


Of course I haven't seen this in person so I have no idea if it would work for what I need. They are asking $300 for it. So, help me out. What do you think? Do you like the antique or should I hold out for a vintage mid century cabinet?