Halloween fun

Better late than never to show off our Halloween costumes this year. I can sometimes be a bit of a Halloween Scrooge (because of the work and sugar involved for one day), when I do get a chance to do something creative it increases my enjoyment ten-fold. 

Sarah asked to be an owl this year. After a quick look around I didn't find anything cute/cheap enough, so I decided to make it out of felt. I consulted Pinterest for a few ideas and then made up my own design. The great thing about felt—no hemming required. Quick and easy!

Eva wanted to be a princess for about the 20th year in a row, but only because she wanted to wear her high-heel dress-up shoes. In an effort to talk her into being something else I promised to buy her a pair of black heeled dress shoes. Not my favorite, but she's obsessed. That's all it took—true story. I made the ears and tail for her costume too. Easy peasy. 

So what about Abby? In the teenager way she donned an impromptu costume and took off to trick-or-treat with her friends. Thanks to my friend Scotti for nabbing this photo:

finally lounging

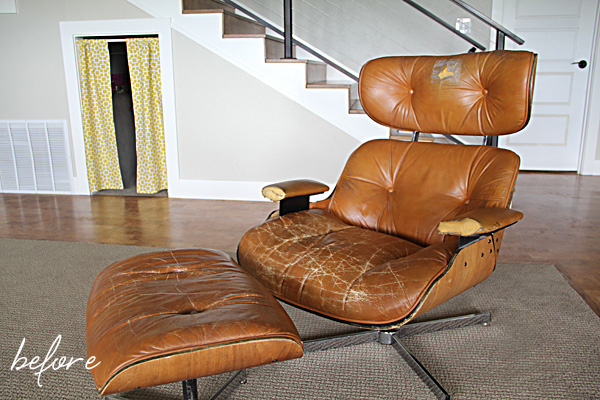
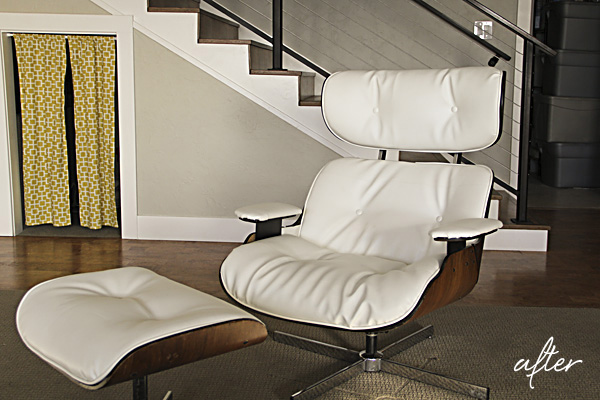
I am super excited to share today's post with you. I wrote about this chair only about... 6 months ago. In September I had a surge of productivity when I took the chair apart and completed the wood re-finishing. Then the pieces banged around in my storage room while I waited for my mom to have time to help me with the upholstery. On a cold and snowy Saturday a couple of weeks ago I was antsy to tackle a project. I left the kids with Tom for the day and plowed through the snow to my mom's house where I could tackle this project once and for all—without distraction, under the watchful eye of my mom and using her more advanced sewing machine. I'd like to say that was the end of the story, but it took a few more days before I could finally call it finished. I'm nothing if not persistent, though, so I can finally show you the finished product!
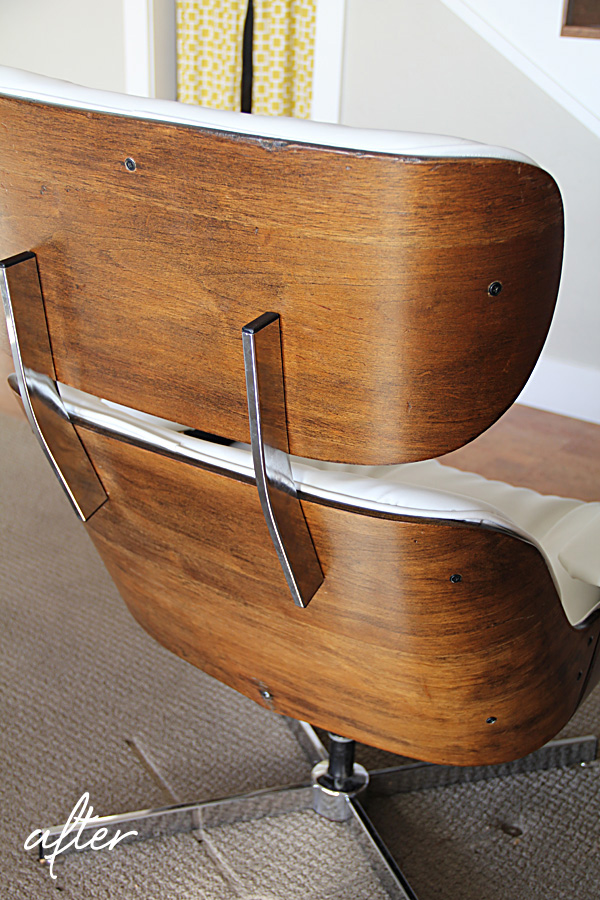
The back:
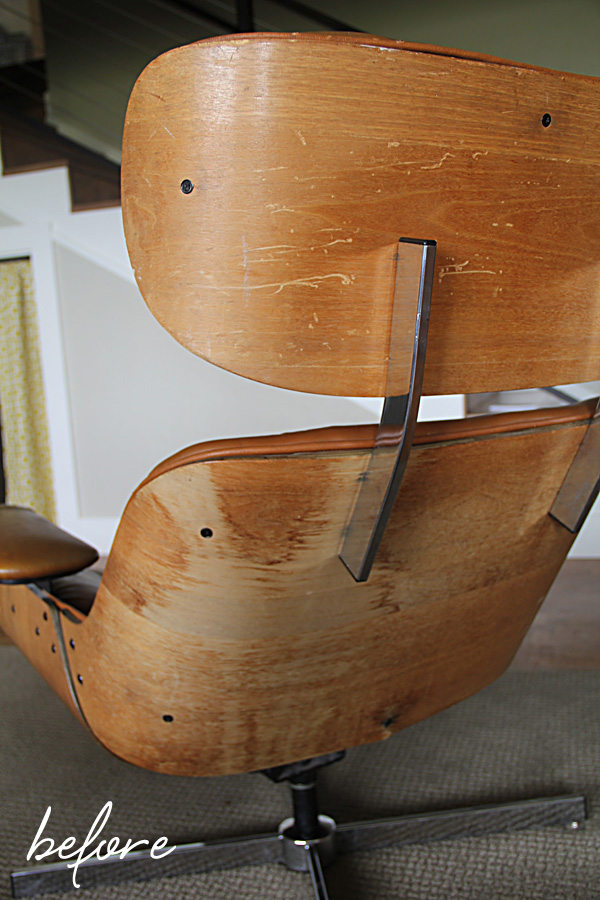
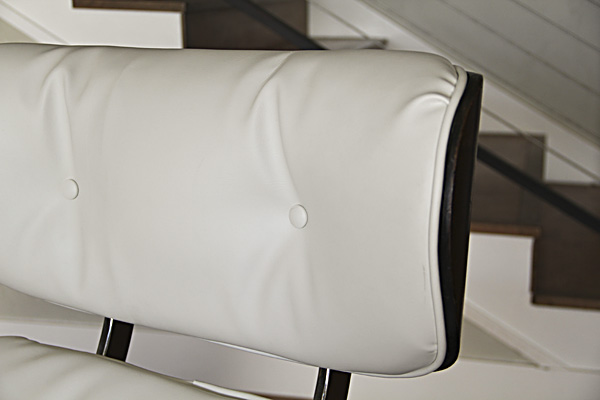
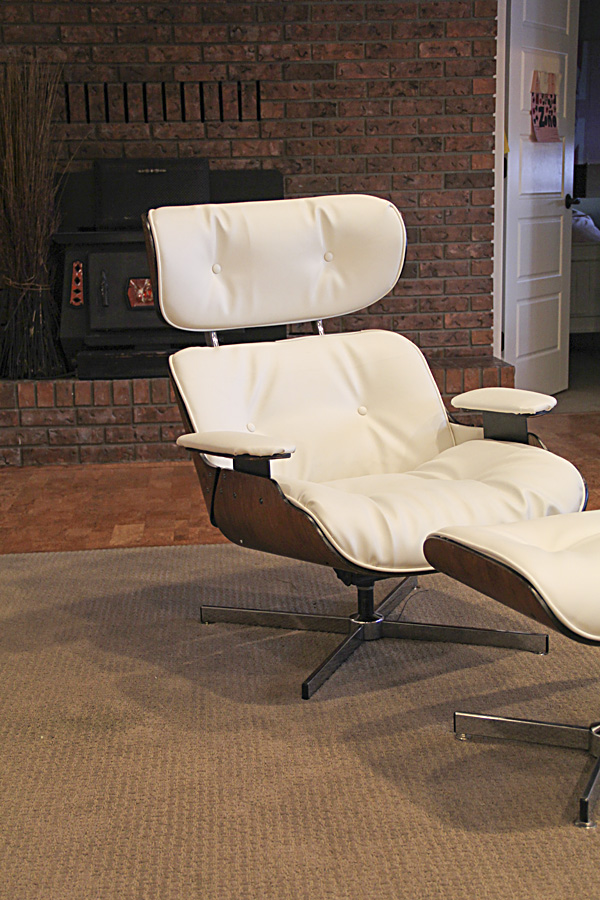
There she is! And I'm pretty proud of it despite its imperfections.

I must say this was no small challenge for me. It took time to disassemble, remove hundreds of staples, and carefully label and bag each piece of hardware. I took photos along the way to help me with reassembly—something I was glad for when I finally got around to it 6 months later. It was another time investment to refinish (sanding very carefully so as not to damage the thin veneer, then applying the stain and 3 coats of Poly acrylic finish, sanding between every coat). I spent another long day sewing hoping so much to finish it in one day. That night I gave up in frustration, feeling like I would never get it right. (I am, after all, a complete novice in re-upholstery). I spent a little time researching other redos online and discovered I might have been the only person crazy enough to attempt sewing the welting directly to the cushions before attaching them to the wood. Most people stapled their cushion fabric, then glued or stapled the welting separately. Easier, for sure, but my way was the way it was constructed originally. The problem was that the old leather was stretched out and made an imperfect pattern. Easing and gathering the stiff vinyl around the edges was really challenging. The result is very imperfect and there are plenty of puckers, but I think in the long run the construction will be stronger. 

A few days later with fresh and rested eyes I spent one more long afternoon stapling hundreds more staples into the flimsy wood frames (rather exhausting) and then screwing each piece back together. Even that part of the job took longer than expected, but it was so very exciting to watch it come back together!
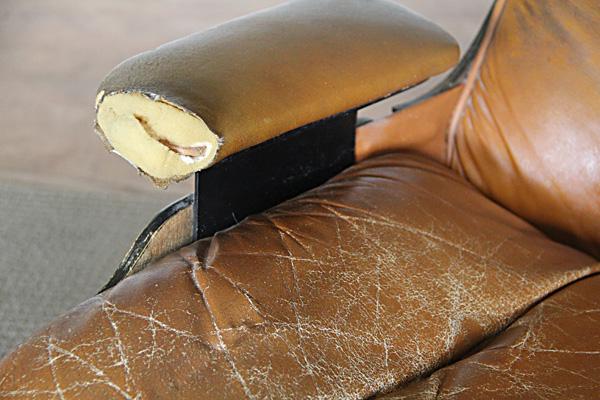
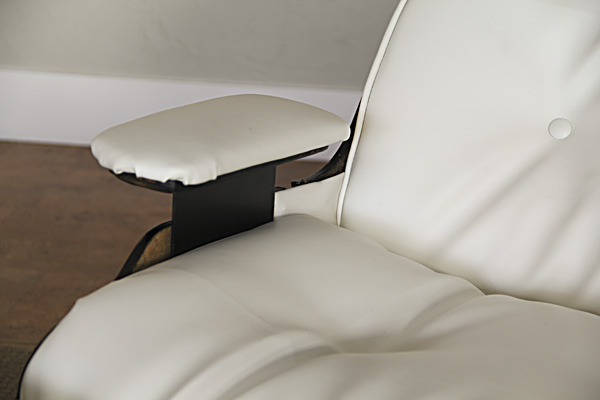
 

Had this been an original Eames lounge and not a knock-off, I would have been inclined to use real leather. As it was, the only $$ I had into this project were for a few small supplies: buttons, welting, needles, and upholstery thread. The chair was free (my Grandpa's chair, cast off to the back recesses of the storage room in our house), and the vinyl was something my mom and dad had on hand and donated for the cause. 
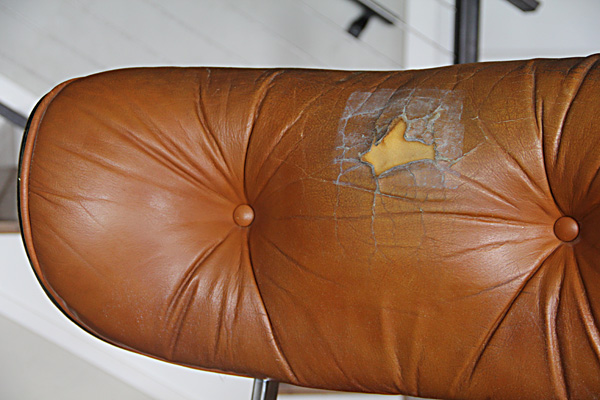
 

I intended to make my own buttons, but it didn't take long to figure out the stiff vinyl and cheap button frames from the fabric store would have made a lousy combination. At the last minute we took the vinyl to an upholstery shop and had buttons made for us. It cost all of $5. Obviously well worth it! 

After seeing how inexpensive and easy the buttons were, Tom thought I was crazy for not exploring the option of professional upholstery to begin with. Maybe it would have been affordable—inside 2 or 3 hundred bucks perhaps. And the result certainly would have been better. However, despite the number of hours it took me (a lot), I still am glad I attempted it myself. It might not be logical, but it gives me a feeling of accomplishment and leaves me with something to be proud of.
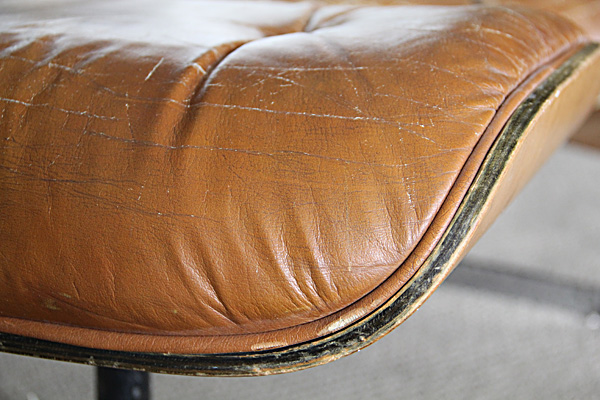
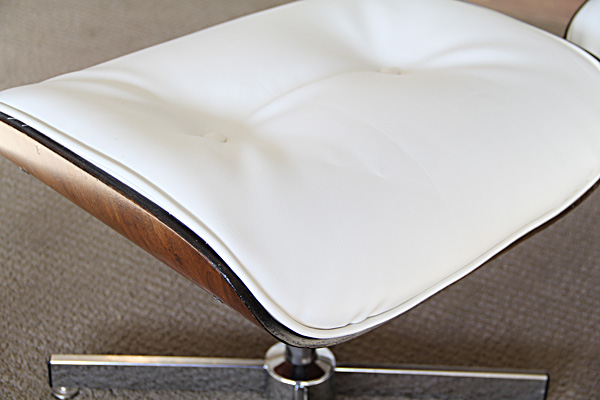
 

You might enjoy seeing a few photos of the process, although, I didn't take any of the sewing and reassembly. My hands were too busy to pick up the camera!

Taking it apart (Each piece was built with an inner and outer bent plywood shell):
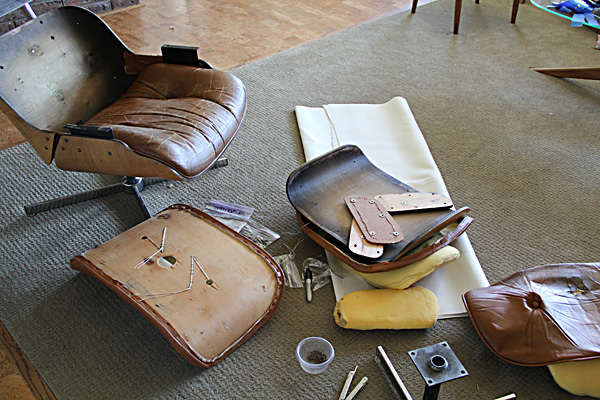
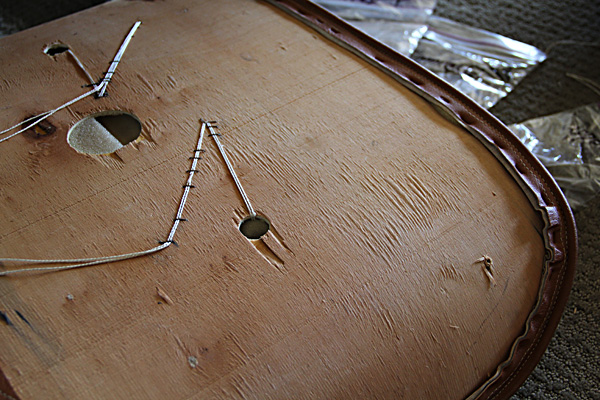
The back of the ottoman with the outer shell removed, showing how the cushions were stapled onto the fabric:
The leather removed:
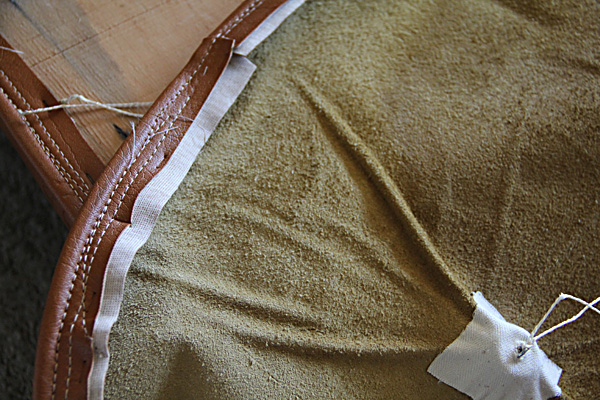
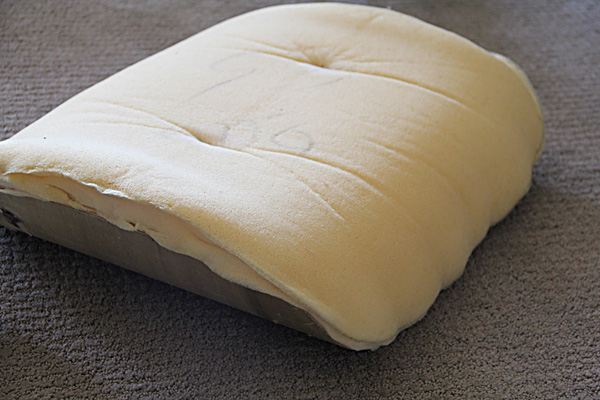
And the cushion foam and inner plywood shell. (I reused all the old foam):
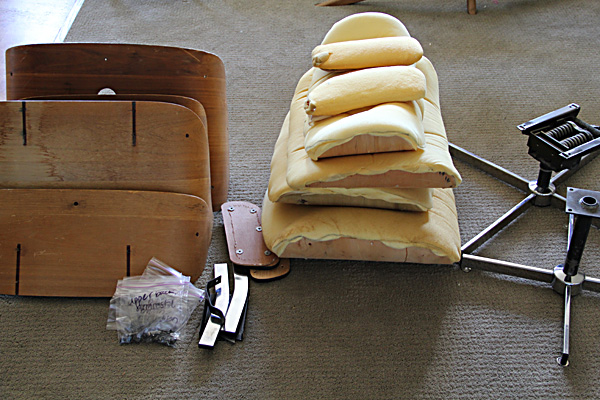
All the pieces lined up:
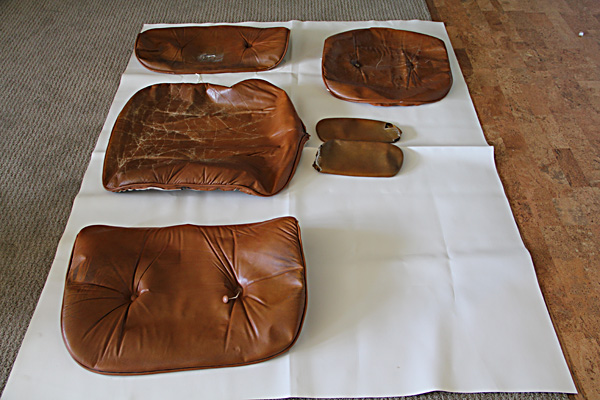
Checking to see if I had enough vinyl. This was before I removed all the welting. I then laid each piece flat, taped it to the vinyl, and cut around them. Each piece of welting had to be cut to the exact same length, so after they were removed I stretched them out and re-cut new strips.
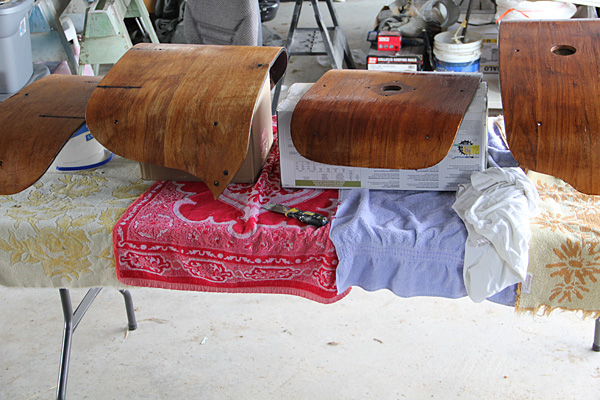
The pieces laid out in the garage for re-finishing:
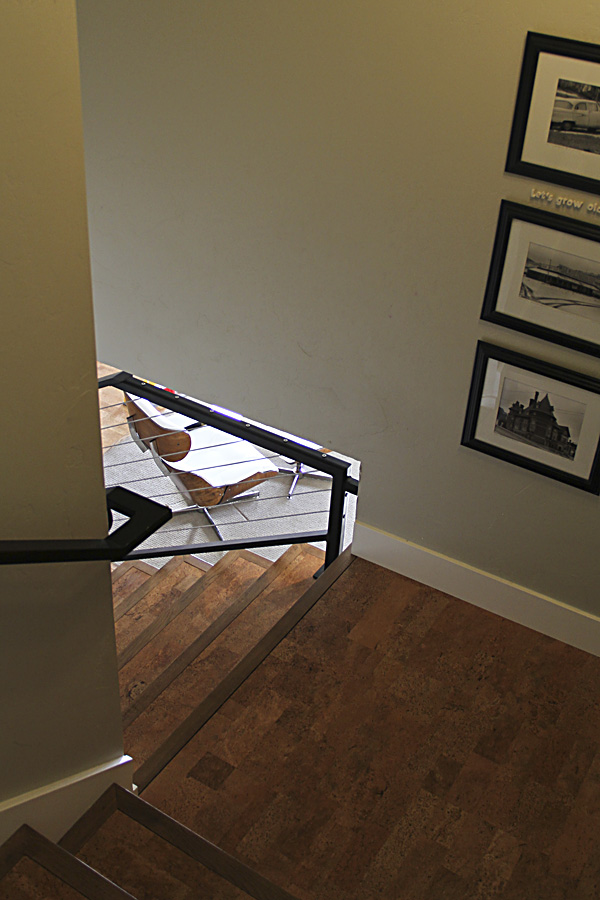
Now that it is done, I've heard a few say "This was always my favorite chair" or "I forgot how comfortable this chair was!" (Rumor has it the knock-offs are actually more comfortable than the real ones. This one reclines—the originals only swivel.) As such, I sort of want to move it upstairs to a place we can enjoy it often. For now, it resides downstairs.
The bright white vinyl isn't totally ideal with my living room furniture, however. And it looks pretty hot downstairs with my hounds tooth sofa:
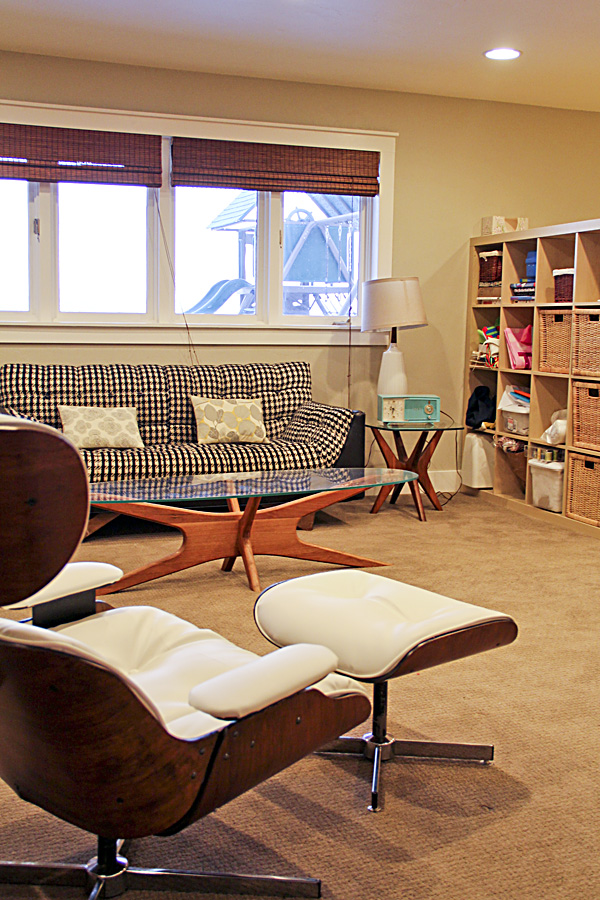
 

So for now we are trekking downstairs for a change of scenery during our evening lounging.

doll beds

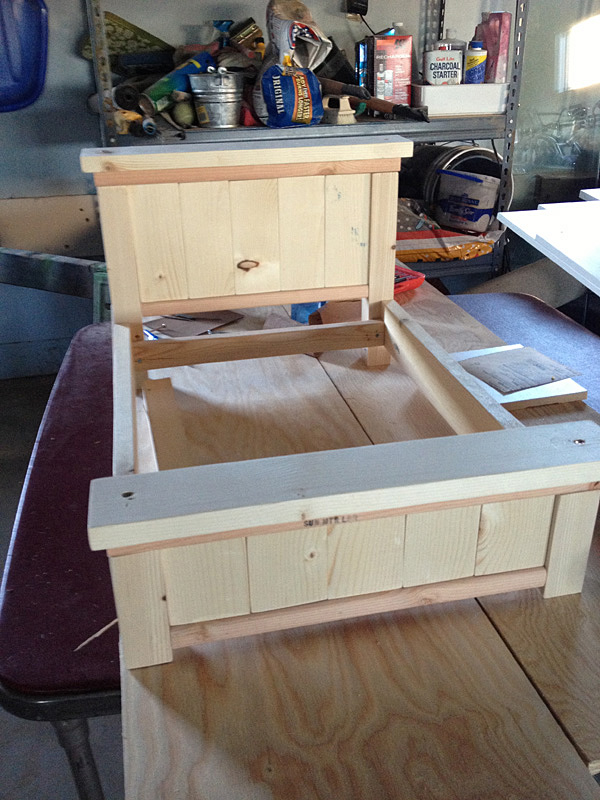
As you know, I made doll beds for the girls for Christmas, using this Ana White plan. 

To buy a true American Girl doll bed would cost anywhere from $70-$125. I spent about $30 in supplies to build all 3. (I would have used scrap wood for even less money, but since I needed to make 3 I didn't think I could find enough scrap pieces in consistent sizes. The wood I bought was cheap pine and I had to work around knots, bows, and other imperfections. What can I say? I was going for cheap and the rustic farmhouse look fit the bill.

I bought sample paint jars from Walmart and intended to paint all 3 beds a different color, but it was apparent that one jar wasn't going to be enough. I didn't want to spend more money on paint, so instead I painted the beds with white trim paint and then tried painting the insets on the headboard and footboard with the colored paint. In the end I didn't like the contrast, so I painted over the color and then sanded it off so the color would show through. At least this allows them to be able to tell their beds apart.

I waited to post better pictures because the icing on the cake was the quilts their aunt Amy made for them. Each quilt is pieced to match their beds and personalities.

Abby's is a purple pinwheel pattern,

Sarah's is pink and ruffled,

And Eva's has colorful dots and coordinates with her bedroom quilt. I love them all. Thanks Aunt Amy!

They look adorable all lined up in a row, but mostly they live in their own rooms with the girls. Eva's is in her little play tent, and Abby's is set up like a little bedroom with picture frames and knick-knacks. 


It was a fun project, and was pretty easy if you can make friends with a few power tools! I managed to not cut off any fingers so our friendship is in tact.


Before the year turns

I'm not one to go nuts over Christmas traditions and generally like to keep things low key and simple. It is one of the only holidays I actually make an effort to decorate for though. It just seems like a little festivity and a few twinkling lights really cheer things up when it is cold outside and the days are so short.


Sometimes I find it hard to decorate around the unfinished projects. Our front door is still unpainted and not fully trimmed out, but I finally added a wreath anyway. There is always a pile of boots in the entry- especially now that the puppy needs accompanied outside to do his business several times a day.

I reuse the same decorations every year, but I'll add to it if I see something that catches my eye. This year we made a crude little star from some leftover trim scraps and wrapped a few lights around it. I also bought this pretty pine plant off of our local Facebook yard sale site for $10. It will stay all year, but looks especially nice for the winter!

I found this adorable pair of vintage children's wooden skiis to add to my collection this year also. They were a steal ($5) at a holiday antique show.

There is a darling little place called Virgelle (named for its founders Vigil and Ella) on the Missouri River that opens only about twice a year to sell their wares. They are open as a bed and breakfast in the warmer months. It was a bit of a muddy trek to get there, but well worth the drive.

I could have easily dropped a few more pennies there if I'd had the pennies to drop. Our new puppy sort of ate a hole in my pocket.

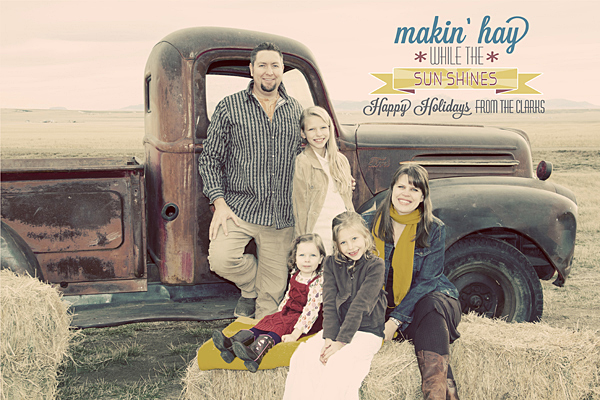
I love getting everyone's Christmas cards in the mail this time of year. As usual I display them in this vintage card carousel. This was our Christmas card this year:

I mentioned before that I let my kids decorate this year. It was fun for them and stress free for me.

They filled this bowl with silver pine cones and garland, and I loved it. You can see that I hung some art on the wall in our living room. I've had these New York prints and really like them, but had intended to use them somewhere else until I saw how nice the metallic frames looked against the gray walls. I would like to find a pair of mirrors to flank them since there is a lot of wall left on either side.

I like playing Christmas songs this time of year. This year the girls were asked to carol at the local nursing home with the 4-H club, and I got to accompany them on the piano. It was a grand time and was especially fun to see the joy on the faces of the tenants!

Simple white stockings hung by the chimney with care.

And a simple neutral tree.

My favorite twiggy reindeer appear every year also, even though I can't seem to find a glue to fix the wound they endured a couple of years ago...

I hope you enjoyed the tour of our holiday home before it all gets packed away for another year. Happy Holidays! :)

Christmas at the Clarks

Three American Girl Doll beds greeted my girls under the Christmas tree this year. Santa's freelance elf made them all by herself.

See? Here's proof by way of a few process shots.


I wouldn't know, of course, but rumor has it they were made from these plans from Ana White, and that they were pretty simple to build. They had to be for Santa's elf to manage them by herself. Painting them was no doubt the hardest part.

These beds gave us a lot of bang for our buck—in otherwords, we didn't have to break the piggy bank to give them something that felt substantial. Which was good, because...

...we sort of spent our Christmas wad on a little friend that joined in the festivities Christmas morning.

This is Benton, our new Golden Retriever puppy. The girls were pretty disappointed when Dexter the free dog had to go back home because he wasn't very nice to an important person in our lives. This is how we made it up to them. Not exactly free, but, well, we have always LOVED this breed and decided to splurge on what we really wanted.

More about Benton later.

Christmas at home in our pajamas is always a treat.

Grandma bought new boots for the girls and they were a huge hit.

Later Christmas day we migrated to my parents house where we joined up with more family and enjoyed a yummy prime rib dinner and a leisurely afternoon of game playing. We especially enjoyed the company of my little nephew elf.

We are truly blessed to enjoy a perfect Christmas. After Tom puts in a couple of good days work on my parents apartment project we are hoping to spend a few days with his family. If all goes well. At this point we are nursing a sick little Eva back to health and crossing our fingers that it doesn't spread. And adjusting to life with a puppy. (What did I get myself into?)

Lots more to share- back soon!

Pinterest challenge—Union Jack Pillow

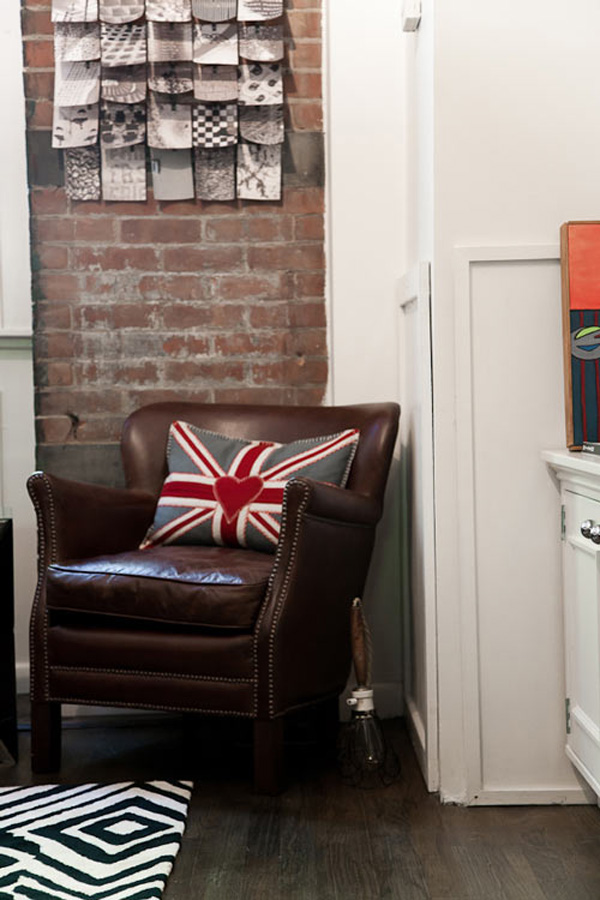
I've had this image on my Pinterest boards for a long time, labeled "This image just grabs me".

Source: DesignSponge

Why does it grab me? Because of the dark leather chair and black & white photos contrasted against the rough brick. But mostly because of the graphic punch of that Union Jack Pillow. I'm not sure when I started wanting to own a Union Jack Pillow... from this image or way before, but I've had my eye out for one for a long time. 

Not long ago I ran across a pillow on Haute Look that was made from felt. I loved it, but I passed it up because of the $50 price tag. Actually, I debated over it for 3 days, and just when I finally decided to go for it, I realized it was too late. Then I lived with regret. Until I decided I could make one.

Here is my version:

Above is the view I see into our office when I'm in bed.

I decided if I was going to make it I could take some liberties with the color. 

It took me a full afternoon to complete the project, but after seeing the result I wouldn't have cared if it took me a week of afternoons. I'm in love with my new pillow. I had $24 into the supplies: $7 for the down pillow insert (Ikea), $12 for the pillow cover (also Ikea) and $5 for the felt.

To make it, I first made a template with paper and then used those pieces as a pattern to cut the felt. The gray pieces were all the same size. It definitely took some time and careful measuring to do this part of the project correctly. 

To applique the felt to the pillow, I used scotch tape to hold it in place because I figured it would hold flatter than pins. I sewed right over the scotch tape and removed it afterwards. If I had it to do over again, I would try an iron-on adhesive to attach the pieces before sewing.

Another thing I would do diffferently—I wouldn't use a pre-made pillow cover. I really liked the fabric (a loose weave linen) or I wouldn't have gone this route. The pillow cover wasn't the proper size and needed to be trimmed down on one side. I left the other 3 sides in tact, but in hindsight it would have been easier to sew onto a flat piece of fabric and sew the back on the pillow later. As it was, it worked okay but was challenging working into the corners. I machine sewed half of the final side, inserted the pillow form, and then stitched the rest closed by hand.

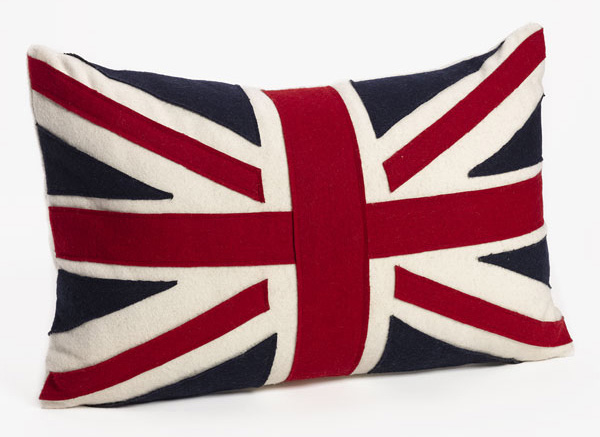
You might remember this isn't my first project with the British flag. I can't explain my attraction. It's less the iconography and more the geometric graphic punch. And trend, I confess. You see it everywhere. When searching for a pillow to guide me in my project, I found this one:

From Nordstrom, no less. ($58). So my taste isn't too far off of mainstream. The trend will pass, I'm sure, just as the once popular Americana has faded somewhat. I should pay tribute to my own Old Glory in a modern way. I sense a new Pinterest board coming on...

I had this project planned anyway, but I finished it off in time to participate in the Pinterest Challenge. Click through to see more inspiring projects!


Abby's bulletin boards

I've posted before about Abby's creativity, and it hasn't slowed down at all. Many of her project ideas come from the American Girl Doll magazine we subscribe to. I highly recommend this magazine. It is usually full of ideas that my girls can tackle without much supervision. Most of the projects are initiated and completed by Abby on her own. For this project she asked me to buy her some cork squares, and I obliged without much of an idea of what she had in mind.

This is what she came up with . . .


. . . all with some simple cork squares, painter's tape, and acrylic paint we had on hand. Didn't they turn out great?

all stitched up

Hi there! And how are you on this fine Monday in June? (June? What?)

At our house, we finished up school (Friday before Memorial Day) and summer is officially in full swing. The sudden lack of schedule has sent me into a bit of a tailspin, really. I'm not sure how to function. The upside is that now that I don't have the daily bus runs and calendar of after-school activities, so I'm feeling a bit more able to tackle projects.
World's most inconsistent blogger here. I set myself a goal to blog 3 days a week (for the few of you who take the time to come here, I'd like to actually give you something interesting to read), but frankly, last week I just didn't have the motivation to blog. I seem to go in spurts. Sometimes I want to blog and share, and other times I just want to get to work creating things to blog and share. The two don't seem to happen simultaneously very well. But I digress.
Projects... last I wrote I showed you these lovely fabrics I had just begging to made into something beautiful:


I'm happy to report that might sewing machine was dusted off and put to work. I asked you to guess what they were for. Don't you just love guessing games? Ha. I don't.

But if you guessed "window treatments", you were right. Here's a peek.

Unfortunately I'm not quite ready to give you a true reveal because I still need to tackle the caulking and painting of the window trim before I hang the new panels. The curtains are for the windows in our kitchen/dining room. Tom finally found a few spare minutes to put the trim up last week, and now he is handing the baton to me. I confess painting trim isn't my favorite job.

As for the other fabric, I had other plans. I've had the fabric for a long time, intended for reupholstering a chair I acquired for free in the mother-of-all-storage-unit finds on Craig's list. This is what it looked like before:

It's a pretty cute little Danish number that beige blah fabric did not do justice too. It was stapled on sloppily and the seat wasn't attached for lack of proper screws, I suppose. 

I stapled the new fabric on, then used the old fabric and some ribbon trim to finish off the underside—you know, in case the little mouse under my chair cares.

Now the chair has a sunny new disposition.

Easiest project ever. Not sure why the fabric sat unused for so long. I had a bit left over so I made some little curtains for the playhouse under the stairs. A perfect accessory for puppet shows and the like.

More projects are in the works, so check back soon!

sewing project

I have two large and lovely rolls of fabric at home, just begging for me to get my sewing machine out and dust it off. Both are Robert Allen prints that I scored at 50% off, but their coordination is an accident and I wasn't intending to use them together. Any guesses what I'm making?

photo book annual

My photo book arrived, and I'm thrilled with it!


It has been a goal of mine for a LONG time to do photo book annuals for our family photos, but it seemed like it always fell to the back burner. So to finally get one finished and printed feels SO GOOD. I'm freshly motivated to start on 2012, and also to work backwards until I have one for every year that we've been married. (Back to 1997!) When I get back to about 2004 I was shooting film, so my photos will need to all be scanned. I also didn't take as many photos back then, and I don't remember as many details to write about, so I may combine multiple years in one book.

I ordered my book from Shutterfly, and it was about $68 (including shipping) which I think is a screaming deal when you think about how much it used to cost to buy film and develop a year's worth of photos. Or how much it would cost in supplies (or time) to scrapbook. I had a 50% off promotion code, and an additional $10 off code that kept the cost down significantly. 

My book is 12 x 12 (ideal for fitting lots of pictures on a page) and 72 pages long. I used a lot of the photos and text from my blog rather than starting from scratch, which helped a ton with the time factor.

Here are a few of the layouts:

I set up a limited number of grids and font styles to follow and kept the design pretty simple from there. I intend to keep this same design theme going through all the books I do, so I wanted it to be pretty clean and classic.

Shutterfly has some really nice templates to follow, but I wanted complete design flexibility so I built mine in InDesign and uploaded full pages as JPEGs. The production isn't absolutely perfect—the spine text doesn't align perfectly for example, and I've found a couple of small design errors already, but I know from my years of catalog publishing that they are never perfect. 

Overall it turned out awesome and my family is already having a ball reliving our last year. I can't wait to start the next one—wish me luck!


Happy Valentine's Week

Valentine's Day was a bit of an afterthought this year, what with getting home from Hawaii just prior. And getting the flu. We brought a stomach bug home with us and it has taken pity on nobody. Abby is the last one to be affected and is home from school today. Progress on the kitchen has completely stalled while we all work on getting our mojo back. 

I did absolutely nothing Valentine-y for those I love the most. I guess we figured a trip to Hawaii was gift enough. We did spend one night pulling together a last minute homemade Valentine for the girls to give to their classmates, however. Tom wondered (as he always does) why I couldn't just settle for store-bought cards, but they just feel so impersonal to me. 

So I stole (borrowed) this idea found via Pinterest. While the idea wasn't original, it fit the bill of being personal and homemade.

They are rice crispy kisses, molded with a funnel and then wrapped with foil with a simple printed verse attached. And they hardly took any more time to put together than it would have to hand print 40 names on generic cards.

Parent's were invited to join Sarah's Kindergarten class for a party, complete with songs and brownies and ice cream. I was able to watch the kids open their Valentines and witness first hand what appealed to them. 1) Must have candy/treats. If it didn't, it was cast aside quickly. 2) Must be unique. One kid hand painted his cards on plain paper. They were so cute and while I may have appreciated the extra effort more than the kids, they did take a few extra moments to look at the card. 3) Must have the element of anticipation. If they have something to open—an envelope or a box—they really had a good time revealing what was inside.  Oh yeah. And 4) fake tattoos. For some reason those were a hit. 

Hope you had a fabulous Valentine's week!


creativity—rein it in or let it go?

I have raised little monsters of creative genius. Don't get me wrong—I am proud of them—but with creativity comes a LOT OF MESS. Anyone know what I'm talking about?

My girls are into American Girl dolls. They each have one, and I love that every birthday and Christmas is a piece of cake because they always have an outfit or accessory on their wish list.

Lately though, I've wondered if I should be wasting my money on those accessories. Abby especially has the most fun making her own!

Both girls have little "rooms" set up in the corner of their bedrooms. Here is Abby's setup:


I think every room of the house is accounted for here. That hip black bucket chair you see is made of a cute top and skirt that should be hanging in her closet. (They aren't damaged, just occupied.) The clutter that ensues is a bit frustrating, but I tolerate it as long as it is kept in one corner of the room. (It never does). It's the building process that is the messiest.

The craft room always looks like this. 

So they make their creations on their bedroom floors. (Wait, this picture was AFTER she cleaned up! But the strings, supplies, and fabric scraps still carpet the floor. Never mind the hot-glue-gun-melted spot.)

I was too late to snap a picture of this, but one day I found their dolls laying out on a sandy beach of colored cardstock in their homemade swimsuits with homemade beach bags and towels beside them. I didn't think much of it until later when I was cleaning up and found pieces of socks on the floor. Their bikinis were made out of socks! No wonder my daughter never has enough socks! They are resourceful, I'll give them that. They know right where to find my best scrapbooking adhesive and scissors. I had a workshop recently and found all 3 of my adhesive cartridges empty. I've started buying it in bulk.

I'll end my rant and just say: beware of teaching your little girls to sew. Or paint. Or use scissors. Just sayin'.

painting

If you thought this would be about painting our new kitchen, sorry to disappoint you. We aren't there yet. 

Actually, Tom took off to take the girls skiing on a recent Saturday, and since I was going to stay home with the baby, I was going to have my own breed of fun.

I've had some empty canvases sitting around my craft room for a long time. It was time to put them to use. 

For Abby's room I painted a Union Jack flag. In pink, of course. Why pink? Because I saw one online I liked. And it matches her room. Why Union Jack? Because it's iconic and brings back good memories of our trip there and reminds us of Abby's sweet cousins that live there. Why not?

The flag hangs next to one of our favorite photos of the girls. This photo is the perfect color for her room. (I shot this photo to cleverly hide the mess that always resides on the floor and bed. Ugh. 9-year-olds....)

In the bathroom I finally hung these funny little vases from CB2 that I purchased ages ago.

I hung them from 3M Command hooks and thought I was being really smart until the girls took a shower in here and one came crashing to the floor and shattered. Apparently the humidity wasn't good for the adhesive. Or something. I'm glad I know where to get another one.

The green tied in to the green in the little paintings I made for the cabinet.

Just a cheeky idea I had a long time ago. They aren't perfect but I like them for adding a little color and breaking up the wall of wood on the cabinet. (We still have the backsplash to install also.)

It's fun to finally put some decor up in our basement. I don't sit down and craft very often, and it was a fun way to spend a Saturday! 

mermaids

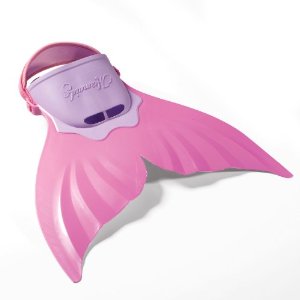
Lately my girls have been obsessed with mermaids. Especially Abby. I'm not sure what started it—but I know it was these mermaid fins that fueled it:

They were originally spotted in the Chasing Fireflies catalog that always comes in the mail just to tempt us (good for drooling, not so good for buying, although I did buy a dress from them once when I could NOT resist the cuteness. I don't regret the splurge, especially now that I have another baby girl that will wear it someday!)

Abby started asking for these mermaid fins, but we were concerned about their safety for someone who was just beginning to swim. Didn't God give us two legs for a reason? But Abby persisted and tried to make her own. First she cut the fins from cardboard and covered them with tape. When I told her they would not actually work in the water, she was devastated. Then she tried again using cloth and a hanger as a frame, duct taping flip flops to the hanger to attach her feet to. She was determined to try to swim with them, but of course I was quite concerned about how it would look if my daughter actually brought those things to the pool with her . . . (Why, oh why did I not get a picture of her creations?)

I compromised and bought little snorkel sets for the girls (with separate, normal fins.) They got our money's worth out of them during our trip to California last month. 

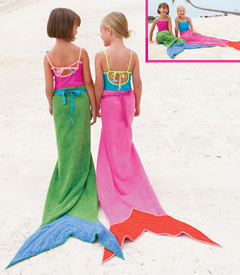
Back to the mermaids. They have also long admired these towels (sold by Chasing Fireflies too):

But this mom is mean and cheap and I would not buy towels at $48/pop. Never fear—when you have an ultra creative and talented auntie Amy, you might just get exactly what you want in the form of a beautifully handmade belated birthday gift! Aren't they absolutely amazing? The girls are tickled pink (and orange and green and blue.)

Thanks a million times, Amy!

Halloween

This (normally) Halloween Scrooge couldn't help but have a ton of fun this year.

Parties, friends, and family are what this day is all about. And candy and good food.

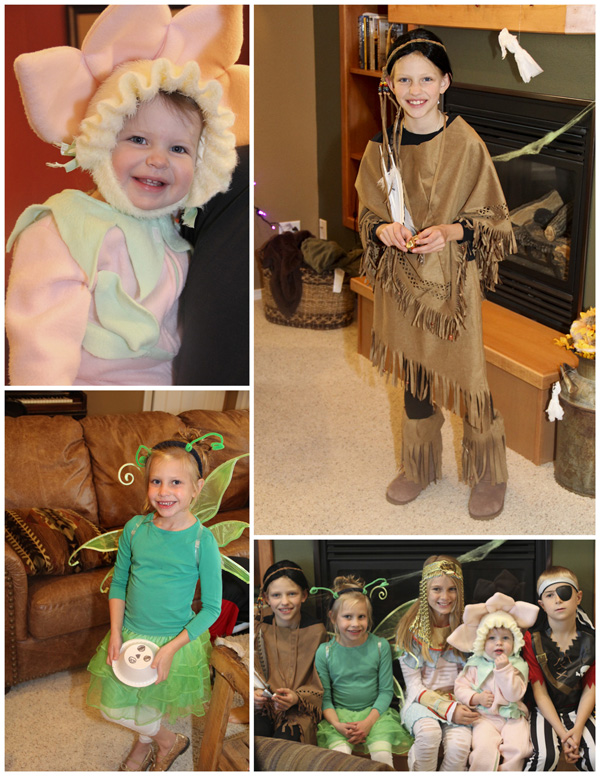
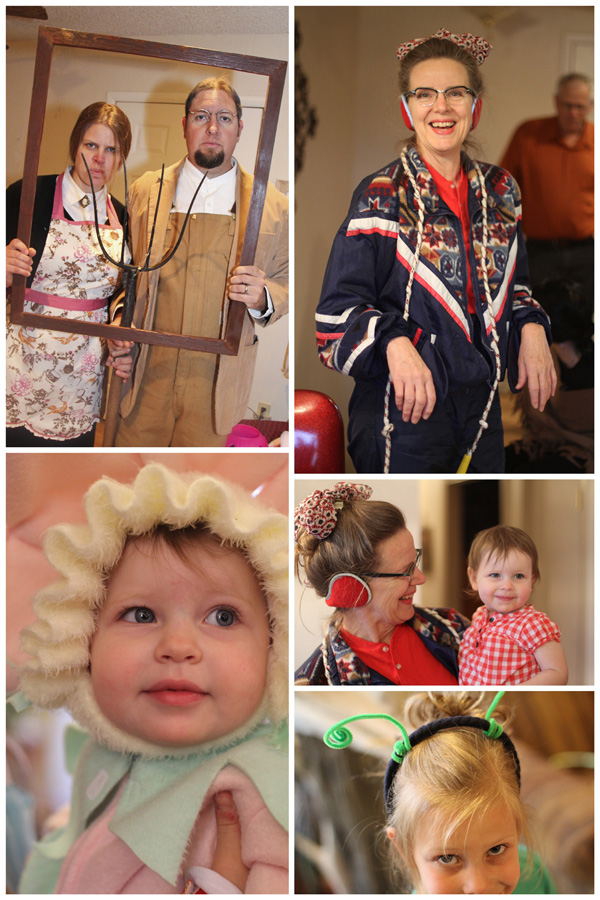
Eva wore the cutest hand-me-down flower costume. We made Abby's costume this year, using this tutorial. Sarah's butterfly was pieced together at the last minute for our Disneyland trick-or-treating adventure, and she was happy to wear it again.

Our American Gothic costume was thrown together last minute on Halloween day. Those are usually the best kind, aren't they? But it was my mom's costume (whatever it was—80's workout diva?) that took us all out. And all because I made fun of her for wearing that jacket while she was raking leaves the other day. ("What are you wearing, and where did THAT come from?")

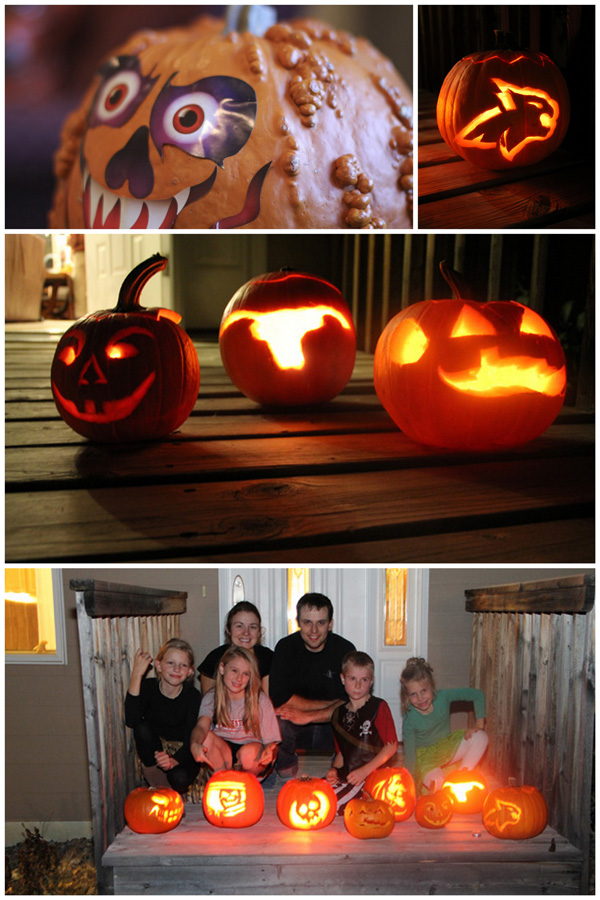
Big kids and little kids alike had a great time carving pumpkins. Especially the ones sporting our favorite mascots.

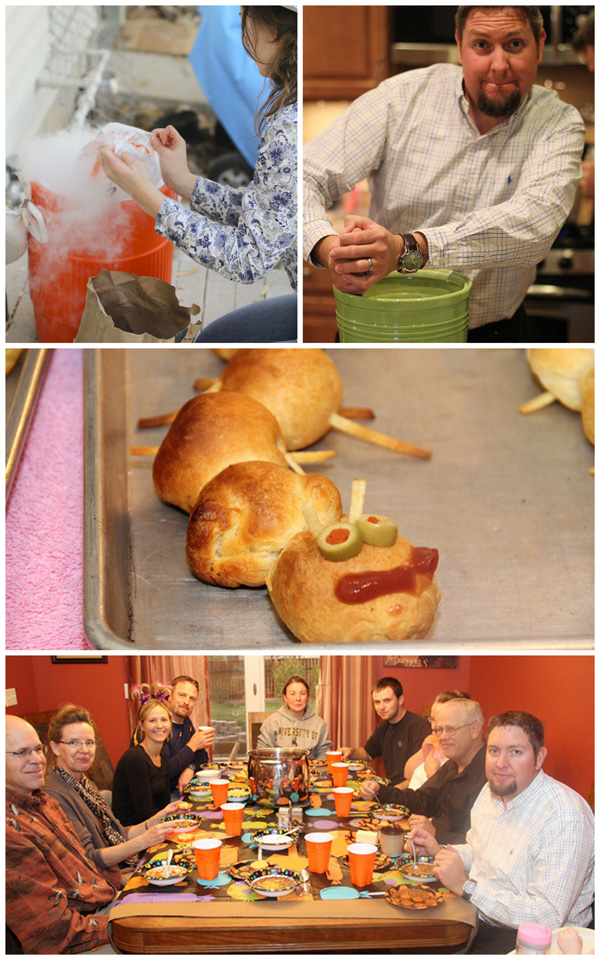
Tasty chili (did I detect a hint of duck?), homemade root beer and ice cream, wriggly worms, and more than enough sugary treats to go around. I shall be on a diet until next year. Or Thanksgiving, at least.

Pinterest challenge—clipboards

Well hello, Tuesday. What happened to your friend Monday? And WHAT DID YOU DO WITH JULY, for that matter? 

It is harvest time here. That means life is flying by with all kinds of business. I must get off the computer as it is my day to cook harvest dinner for the crew and get this house of ours shipped into shape.

But first, have you seen the Pinterest Challenge?

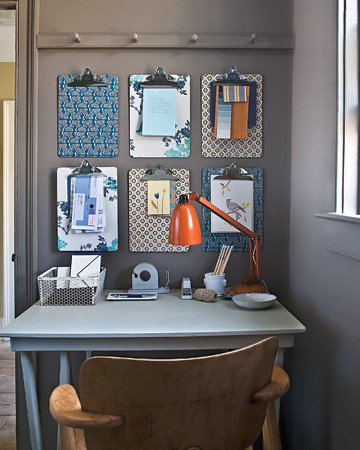
It seems like a great excuse to try out some of those fun back-burner projects. If you follow me on Pinterest, you might have seen this pin, originally from Martha Stewart:

I actually purchased some clip boards ages ago to use in my craft room downstairs, and this challenge was the perfect excuse to drag them out and put them to use. 

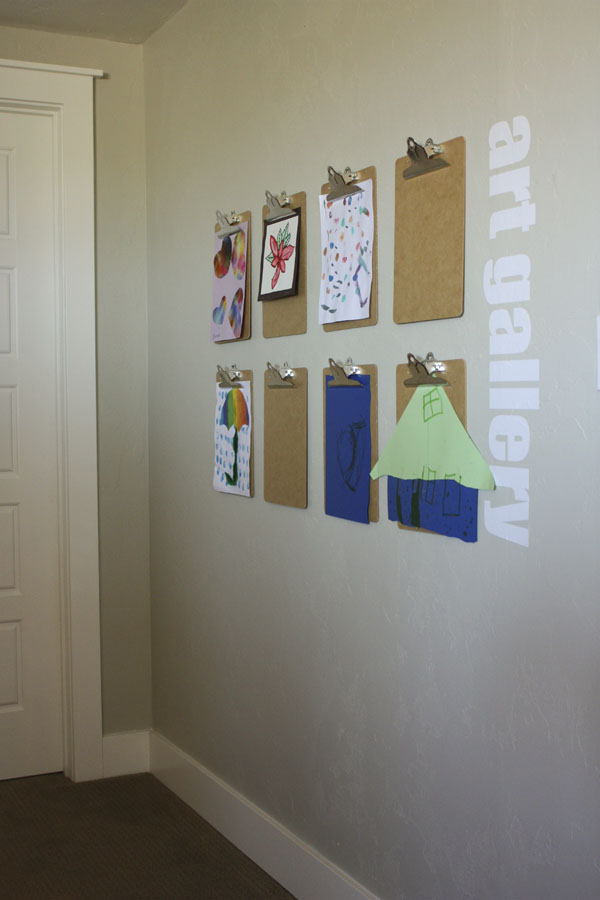
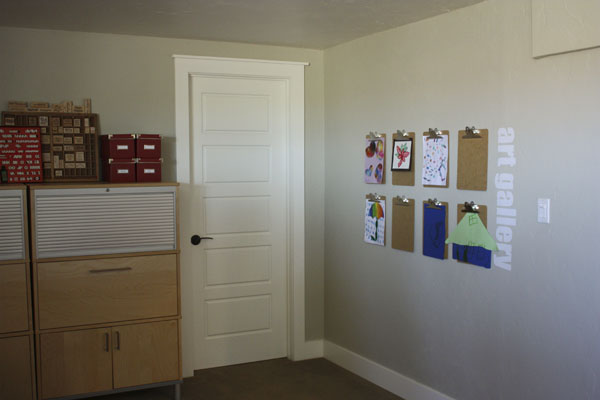
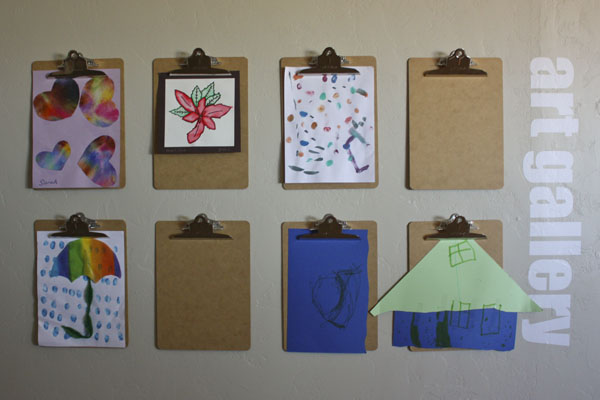
I used my clipboards to make an art gallery wall for my kids. We always have artwork laying around the house, each one special in its own right. I love to showcase their art, but I don't love it when they tape it to the walls. So this idea was born.

I left my clipboards unadorned to let their artwork be the star. I did order custom vinyl lettering from Uppercase Living, however, and I love the modern clean look.

And when its time to change out the artwork, I can simply snap a picture of the wall to preserve it forever—kind of like this:

A collection of these photos could make a darling photo book, don't you think?

Join me next Tuesday for another Pinterest Challenge project. I already have one in mind! 

How to make baby leg warmers

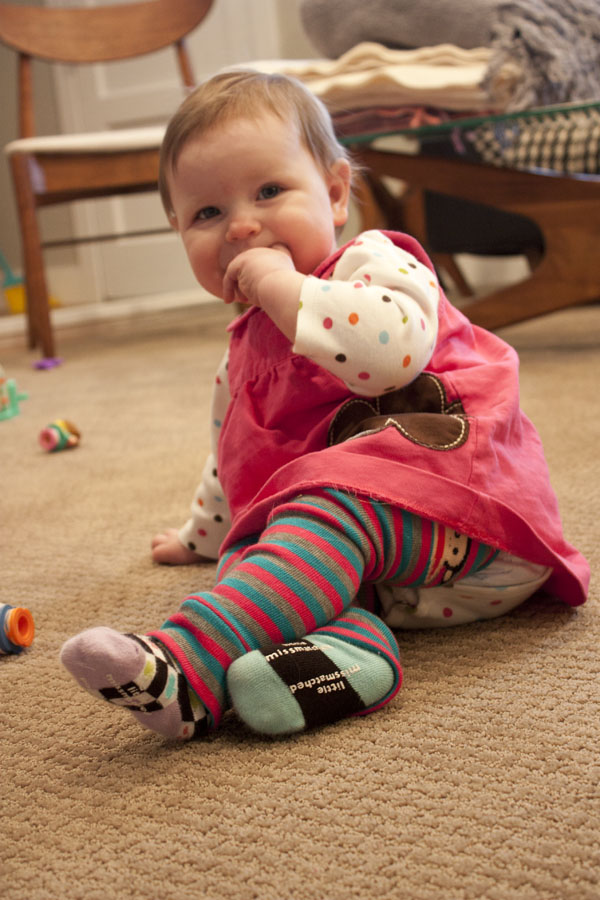
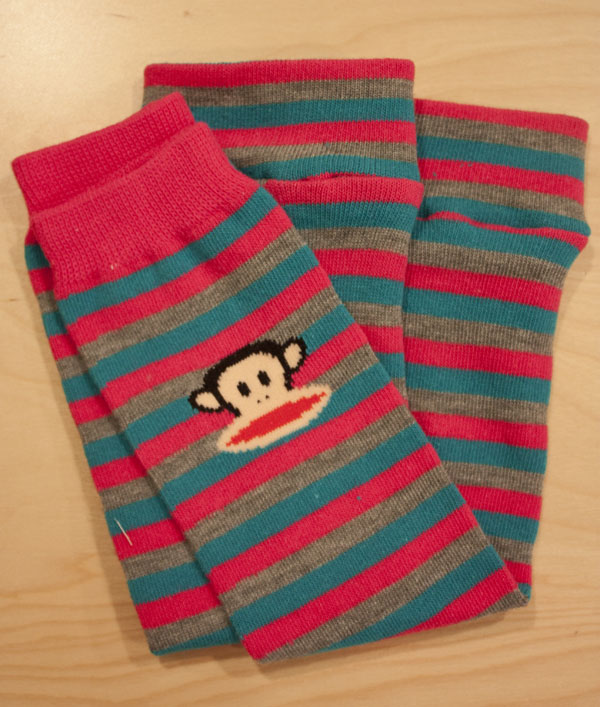
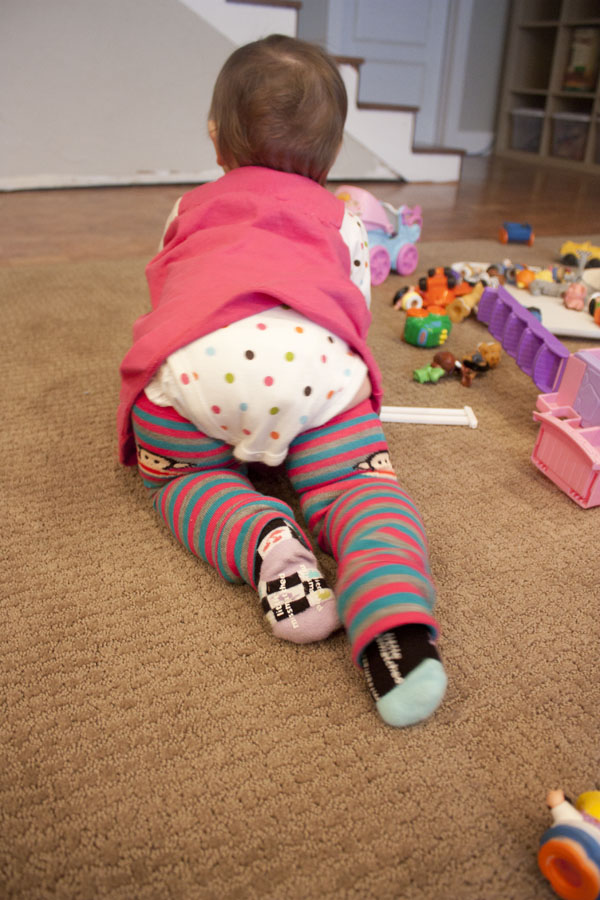
Last Christmas, my crafty sister-in-law Amy gave Eva little leg warmers she had made from women's knee socks. These things are the bee's knees, I tell you. So much better than tights, because you don't have to pull them down for diaper changes.

I don't know why it took me so long to get around to it, but after a quick little tutorial from Amy, I whipped up a few more pairs.

Here's how I did it:

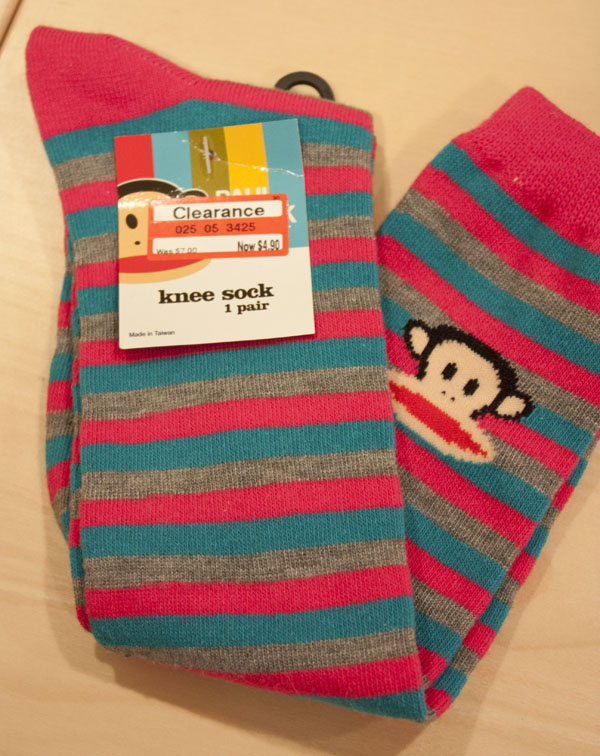
1. Buy a pair of clearance women's knee socks. O.K., they don't have to be on clearance. But why not?

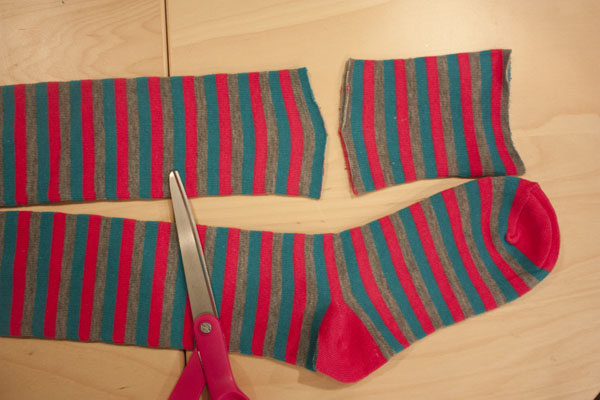
2. Cut the heel of the sock out and the toe of the sock off, keeping your cut lines perpendicular to the edges of the sock. (My cuts aren't perfectly straight here because I followed the lines of the stripes.)

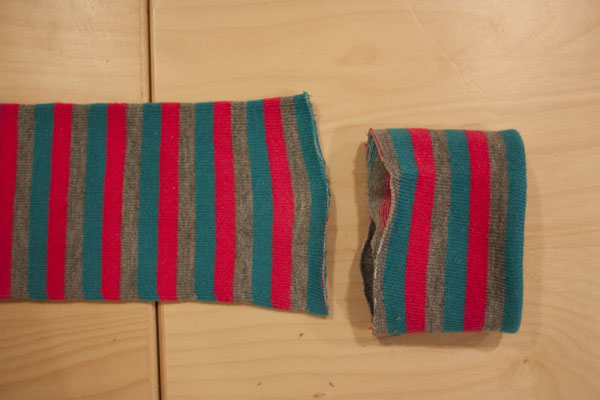
3. Fold the foot portion of the sock in half on itself (right side out).

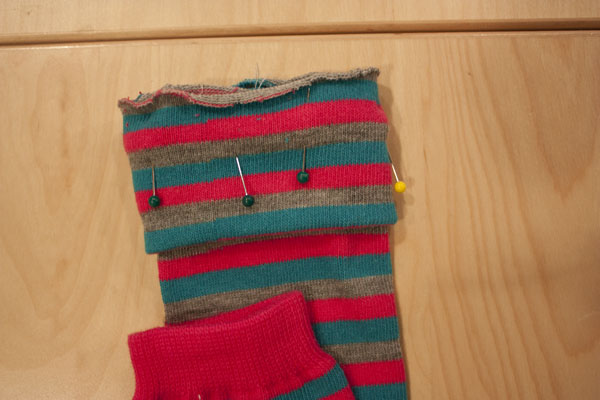
4. Slip the folded foot portion over the rest of the sock, lining up all of the raw edges, and pin.

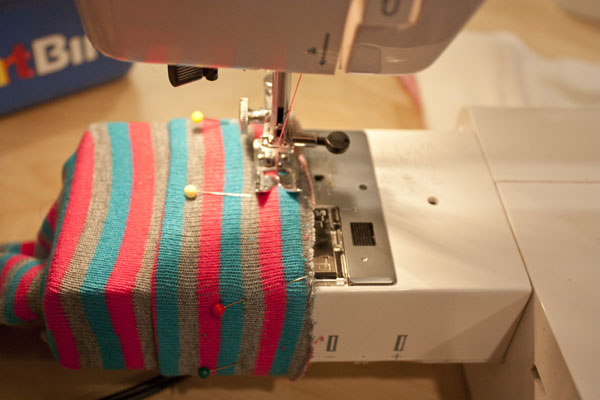
5. Remove the outer platform of your sewing machine, then stretch the sock around the base to sew, leaving at least a 1/4" seam allowance. (The edges of the sock tend to curl, so pinning and leaving enough seam allowance is key.)

6. Flip the sewn cuff back over and—ta-da—you are ready to dress your baby!

Note: Stripes are difficult to line up because the knit stretches as you sew. Embrace the imperfections or pick a solid color.

7. Attempt to keep your model in one place long enough to take a picture and fail.

8. Squeeze those delectable chubby thighs.


Easiest project ever.