baby bumpers

I got a raised eyebrow from the cashier at the dollar store when I came through to buy just one pool noodle. But one was all I needed.


Voila~ counter bumpers! Eva has reached the perfect height to crack her head on the edges of our kitchen counters. One collision too many sent me looking for a solution. I know this won't make any fashion statements, but that's what makes this great—I can just pop them on and off. 

March madness

Thought I would drop in for a quick hello.

Sorry I've been absent for awhile. It's been a blah "blah-g" lately. Oh well, it seems to go in phases like that for me.

I just found out today that Google Reader is going away! I'm not happy about that. Blogs have completely replaced magazines for me as a means for inspiration, and I need a good way to keep them organized and easily accessible. Do any of you use an aggregator for blogs? If so, what do you recommend?

In other news, the rental apartment project Tom has been helping my parents with is wrapping up.... just in time for spring farm work to kick into high gear. It doesn't leave time to tackle any big projects in our house, unfortunately, but instead of despairing I've been trying to focus on smaller bite-size projects we can chip away at. And projects I can tackle on my own. I even have a "punch list" going of things to finish up- all color coded and prioritized.

My dad took one look at the list and said "good luck!", which is a good indication of where his mind is headed. I'm vowing not to be discouraged. But why does the last 5% of projects drag on forever? Hopefully I'll have some progress to share with you soon. In the meantime, I'm trying to fit in lots of spring cleaning. I even detailed the inside of my car. Which is saying something, believe me.

In one last random note, I ran across these cool creations made from vintage saris. I especially like the camel for some reason. It would look fabulous in an ethnic inspired room! From here while it lasts.

busted up

Funny story–

We have been trying to ski as much as possible since its an outdoor family activity we can do in the winter when Tom isn't so busy. While Eva is young I stay behind much of the time, and when I do go I've been renting equipment, figuring I'd invest in some when I'm able to go more often.

Tom and I recently discovered our old (we're talking 20-year-old equipment from high school) ski gear in my Dad's shop—gear we'd thought we'd ditched when we left college but Dad saw fit to rescue. Of course, they are old straight skis that nobody uses anymore, but I thought my boots would be worth a try. I tried them on and they felt pretty good, despite the fact that was 3 kids ago and my feet have grown.

So last Saturday I decided to give them a test drive on the slopes. But as we were gearing up, a piece of the boot broke off, taking a couple of buckles with it. I shrugged and trudged off to the rental shop, a little disappointed that I wasn't going to be able to save money on boots after all.

After the day was over and I turned in my equipment, I slipped the old boots back on while I waited for Tom to pull the car up. While I waited I looked down and noticed the left boot had a crack in it also. Then I took a few steps to the car and the entire front of the boot popped off. I took a few more steps and the right boot did the same thing!

They literally busted up into pieces within seconds until I was left with this:

Now picture me feeling all put together in my new name brand ski pants and then watching my ancient brittle boots literally fall apart before my eyes. It took my pride down a few notches.

But then we had a good laugh over the pieces. At least it didn't happen on the slope!

cheers for Sarah

Every parent with more than one child must be blessed with the wisdom of more than one parenting method. In other words, every kid is different and what works for one will not necessarily work for another.

Anyone with me? Such is the case for my #2. The Middle Child.

I am learning that she needs a little extra "cheering on"; lots of positive encouragement. Sarah has a little trouble with focusing—I've heard this from each of her teachers and coaches. She isn't being naughty, she just gets distracted in her own little la-la land. She often has to be told several times to do something, which can be frustrating from a parent's (or teacher's) point of view. It is hard not to resort to yelling, but when I get frustrated her behavior only declines. When she gets discouraged, she shuts down.

Case in point—we are trying to teach her to ski. She is quite good at it, but only when she wants to be. If she falls once, all of the sudden she is falling all the time. She hates being told what to do to improve her skiing. Since we really want to make it a family activity that we all enjoy doing together, we are really trying to encourage her to love it. So carefully and patiently we follow her down the hill at her pace with lots of praise and cheering on. When she is up she is up!

She has a few little quirks as evidence of her anxiety for approval... she tends to chew on things (fingernails, pencils, shirt sleeves) so we have been working on those habits with the advice of an occupational therapist that visits the school. So far she has recommend a stress ball and a bracelet that is safe to chew on.

Don't get me wrong. Sarah definitely has talents worth celebrating and encouraging. She is doing well in school, despite her lack of focus. She is good at math and reads very well. She has a contagious smile. She has a beautiful voice and natural musicality. I'm hoping she will overcome her fear of what people think and try out for singing solos in her class programs because she is absolutely capable. We are going to start her with piano lessons soon.

Most times she follows in the shadows of her older sister and does the same activities, but Abby (to whom everything comes very easily) can be a tough act to follow. I'm starting to consider ways for Sarah to express her own individuality. Abby became obsessed with gymnastics and wanted so badly to enroll in dance this year. It was expensive, so when Sarah didn't seem passionate about it we decided only to enroll Abby. Instead, we found Sarah's opportunity in a little cheerleading program they started offering at the school this year.

So we have been cheering on our little cheerleader!

They had a performance during half-time of the last Varsity girls basketball game. She did awesome, and she really enjoyed the attention afterwards (flowers from her coach and lots of praise from the crowd and family who came to cheer her on.) It was fun to see her beam.

And seriously, what could be cuter than a line of little cheerleaders?

Afterwards, when she thought no one was paying attention to her, she and her friend used the drum platform to practice their skills and mimic the high-school cheerleaders. Of course, everyone was watching her. ;) At least, I was along through my telephoto lens.

I made the mistake of suggesting that—while cheering was super cute at her age—her mom might rather she didn't make a career out of it. Maybe she could instead play basketball when she is older. Oops, crushed her little heart... maybe we will just let her forget this conversation. (Even if I secretly hope her priorities change when she gets older. No offense to the cheerleaders I have known and respected for their talent and very hard work! We just happen to be a family who likes basketball.)

Here is her performance :

(I apologize for the poor video quality. Clearly I need some help learning how to use/focus my DSLR video! Casey and Scott, where are you when I need you? I miss the days when I could walk around the corner at the office and pick your brilliant brains.)

One more story about Sarah—remember the days in Kindergarten and First Grade when you got to be "Star of the Week" and line leader and such? I remember it well. Sarah's turn was this past week and we were asked to bring in photos of her from each year so they could see how she has grown. I haven't printed very many photos so I went through my hard drive to pick some out. This was the selection:

What a cutie. It was pretty fun to see them all lined up year by year. (All photos are mine except years 2 and 3 which are credited to the aforementioned Casey and Scott).

Ages ago I put together a scrapbook of Abby's first year. Its filled with first-baby photos and documents 3 baby showers I was blessed with. Of course I intended to do one for each of my kids, but this is the last scrapbook I've done. (Sad, but true!) Sarah often says to me, "Mom, why don't I have a baby book? You love Abby more than me!" And she loves to point out the pictures of those showers and say "Mom, why didn't I have a shower? No one loves me!" Of course, now that I've given you some background on her behavior, you understand her dramatics. But these photos have reminded me how badly I need to celebrate the life of my sensitive middle daughter and get a book made already. It would mean the world to her.

Pride is dangerous but self-worth is invaluable. It is a fine line, isn't it?

living room additions

I feel like I haven't had much exciting blog material lately—not much in the way of house projects happening at the moment. But I did make a couple of purchases for our living room recently.

One was this wall lamp from Restoration Hardware. I needed a light for my piano, and their conveniently timed lighting sale allowed me to score one for 25% off. This is my second lighting purchase from RH. I buy very little from them because most things seem outrageously expensive. But comparatively their lighting is surprisingly affordable. Of course I've been able to catch a sale on both purchases, but still, a pleasant surprise. Am I the only one noticing that?

I also took advantage of a sale on blinds for the windows. Necessary but slightly painful (window treatments are insanely expensive!), so hopefully they will last for-ev-ah. 

My choice was a subtle but effective solar roller shade from myblinds by Hunter Douglass via Home Depot.


My windows don't get washed too often in the winter. The light was shining just right to show you just how dirty they are...

... but really I just wanted to show you the imprint of the poor rather-large bird (23" span) that hit our window. We weren't home when it happened and the bird was nowhere to be found when we got home (the dogs were in the back) so I assume it survived? Just glad our window didn't break.

Happy Valentine's Day!

Feng Shui Friday—pantry organization

It's been a long time since I've posted a Feng Shui Friday post. Never fear, my organizin' heart still yearns for order and peace, even if actually getting there takes me a lifetime to attain.

I thought I would show you my pantry cupboard today—not because it is so amazing, but because I did actually put quite a bit of thought into how to organize it.

Remember this? On the left, the pantry of my dreams. On the right, the reality (I lived with this metal shelf in the corner for quite awhile before we purchased the pantry cabinet we have now). 

image: Emerson Fry


The pantry space I had to work with was pretty small. O.K., some small home and apartment dwellers would consider this ample, but my previous home had an entire closet devoted to a pantry. So to me it was downsizing. Before the remodel we had a slightly narrower cupboard, but it was 24 inches deep and everything would get lost in the recesses. I hated having to dig for everything. 

There are some pretty impressive pantry options with fancy pull-out racks and such. It seemed to me though that those racks took up a lot of extra space. Plus they were expensive. My original plan was to have 12" inch deep storage here, to alleviate the digging. Then I thought 18" would work better to accommodate some appliances. When I priced 18" cabinets, however, they turned out to be more expensive because essentially I would be buying a 24" deep cabinet and cutting it down. So, I decided to go for the deeper cabinet and just try to be smart about the organization.

Here are my pantry organization rules:

1. Everything has to have "street side property"—meaning, I have to be able to see everything in my pantry. I use the depth for storing multiples behind, and for overstock. If the space behind is wasted, so be it. For example, behind the cereal containers on the top shelf and store the extra boxes and bags of cereal. Behind the grains I have ice cream buckets filled with extra. (The peas, lentils and wheat are straight off the farm! Some of the others I buy in bulk). The canned food might only have 1 or 2 in the row and others go all the way to the back.

2. I have to use every inch of vertical space possible. I actually set everything up as tight as I could and then purchased an extra shelf to fill the void. Therefore, everything is organized according to height.

3. Decanting into uniform containers may seem like a pain, but it really helps the visibility issue. I also like that it gives everything a tidier appearance.

4. The smaller and irregular shaped items go into bins. The green bins hold my onions and garlic, pudding and jello mixes, and a variety of granola bars and fruit cups for kids snacks. I fill them as full as I can and stock the extras behind. The plastic bins on the row below hold rice (left), pasta (middle), and potatoes and squash (right). The bins act like drawers. Grouping these items really helps me to see how much I have on hand.

5. Finally, label everything! (I haven't gotten to this step yet, clearly. I wanted to test my system and leave time for a little rearranging before I committed with labels.) This can seem a little obsessive, but the biggest reason for this is restocking. A, it helps my family put things away in the right spot. B, I can see when I am out of something. If there is an empty spot, I automatically know what to add to my shopping list.

painted yellow

Wow, yesterday was an exciting day around here! Our kitchen was featured on Apartment Therapy which sent the traffic here on our blog sky-rocketing. I admit to being a bit nervous about it since AT readers can be a tough crowd, but the comments were all extremely positive and gracious. It was fun to get all of that positive affirmation on a project we worked really hard on! I shared all the comments with dad and Tom also, and we were all floating a bit high on life. Thank you! 

Now I think every other person in the world owns one of these Bekvam step stools from IKEA (peaking around the corner, above right). They come unfinished and look pretty hot naked, if I do say so myself. However, after getting heavy use during our various remodels, ours was looking a little hammered and was wearing a coat of shoe grease and paint splatters. Since we use it often in the kitchen I decided to give it a little makeover so it would blend into the decor.

I picked a swatch of the shelf and bought a quart of paint: Behr Donegal Tweed. Great name, great color. When I got it home I was thrilled with how well it picked up the yellow in my curtains. I bought a flat finish that would have looked great as is, but for some reason I had pictured it more as a wash, so I watered it down and painted a very thin coat over the stool, then finished it off with a few coats of Poly-Acrylic finish. I think now I would have liked the flat finish of a solid coat of paint better, but I think this finish will wear better.

I then used a scrap of oak from a previous project and had Dad cut me a little shelf for my hallway. I used the same paint wash treatment and hung it up with some maps I'd once had mounted and laminated.

It makes the perfect ledge for my London and New York wooden cities in a bag (from Muji)!

It has taken me a long time to get things put up on the walls in this house (they all needed to be painted first!) but sometimes it is these finishing touches that are the most fun.

Now for this awesome Donegal Tweed color. I need to find something else to slather it on. Quick!  

kitchen sources

I promised a source list for our kitchen, so I'd better get on with it. As much for my own sake as anyone's. Let me know if I've missed anything that you might be curious about! (I've included more photos for reference. List at the bottom).

The basics:


Appliances: 


  • Refrigerator: Amana, Home Depot (Purchased in 2010 when we moved in—not replaced with remodel. If/when it dies I will consider getting one without water and ice through the door. It always looks messy.)
  • Double Wall Ovens: Kenmore Elite, Sears  (The great thing about Sears is their discounts. Wait for the right time and you can get a great deal. We got almost 1/2 off!)
  • Vent Hood: Cavalier, Overstock.com
  • Cooktop: Kitchenaid, Sears (exactly like the more expensive Jenn-Air model. And again, Sears discounts apply!)
  • Dishwasher: Maytag (not replaced; a basic model that works great and will live forever I think. If it dies we will replace it with a stainless model probably.)
  • Microwave: Sharp Microwave Drawer, Sears


Lighting:


Furniture and decor:


kitchen before and after

I can't believe we are nearing a year in our new kitchen. We love it as much as ever, of course. Last time I posted about it we still had a pretty large list of projects to check off: trim work and painting, installing the open shelves, buying and installing a pantry cabinet, buying and installing a light over the island, and more. Slowly through the year we checked most of those things off the the list and I've been waiting... waiting... to call the whole thing "done" so I could post final photos. There are actually still a few little items to complete which I will point out to you, but I finally decided—good enough!

So off we go.

Maybe I shouldn't even point it out, but one of things on our list to finish is the tile above the left window. We ran out of mastic adhesive the first time around, and it seems like a great effort to get it all out to do such a small section. We might get around to it when we tackle another tile job in a bathroom or laundry room. For now it almost passes as intentional.

The shelves and light are new since I last showed you!

The pantry cabinet is also new. It beats the metal shelf that I lived with for awhile. Actually, this cabinet was mostly paid for with a credit from the cabinet company. Their color samples misrepresented the color and our cabinets turned out lighter than expected. They offered to refinish the doors, but the ends and frames wouldn't have matched so we opted for a credit instead.

You also get a sneak peak of some stenciling I did beyond it. Just a teaser!

We finished off the crown above the cabinets (a bit tricky since the space was pretty small) and painted all the window trim. I also bought new inexpensive bar stools.

The sideboard and china cupboard in the dining room were original, but I refinished them. I would love to remove the kick base and add feet to it someday. I sewed the curtains myself, and I don't think I've shown them to you yet either! I layered them with some woven panels I already owned.

I removed the doors from the firebox (my dad originally made them for my Grandma, but they just didn't work with my scheme (sorry Dad). I am planning to paint the inside a dark gray color, but actually the white doesn't bother me so much either. We have a little more fireplace to do also—namely fixing the propane valve so we can actually use it (!) and patching some mortar.


Here is an up-close look at the open shelves. I. love. them. Not only was it a good solution to a difficult space (there is a support beam above them that would have made an upper cabinet almost impossible), it keeps the kitchen very open and gives us really easy access to our every-day dishes. Right across from the dishwasher, no less. The supports are long steel bars that go through the shelves and into the studs in the wall. We predrilled holes for them before we tiled. (By "we" I mean my dad.) We used oak planks seamed together to make a solid wood shelf. I then stained and finished them as close as possible to the cabinet color. We added some hooks to the bottom to hang mugs.

Here is one last view:

I'll be back soon with more photos and a source list. Until then, if you want to learn more about our kitchen journey, you can follow the posts below:

What's wrong with my kitchen, anyway?
kitchen layout plans

ordering cabinets
kitchen finishes
What.A.Mess.
more demolition
kitchen lighting options
lighting options :: round 2
getting rid of the gunk
best laid plans
progress report—tile, cabinets, and stress
progress report—cabinets installed
we're cookin' now!
dining room hutch—before and after
kitchen backsplash and hood
kitchen organization

finally lounging

I am super excited to share today's post with you. I wrote about this chair only about... 6 months ago. In September I had a surge of productivity when I took the chair apart and completed the wood re-finishing. Then the pieces banged around in my storage room while I waited for my mom to have time to help me with the upholstery. On a cold and snowy Saturday a couple of weeks ago I was antsy to tackle a project. I left the kids with Tom for the day and plowed through the snow to my mom's house where I could tackle this project once and for all—without distraction, under the watchful eye of my mom and using her more advanced sewing machine. I'd like to say that was the end of the story, but it took a few more days before I could finally call it finished. I'm nothing if not persistent, though, so I can finally show you the finished product!

The back:

There she is! And I'm pretty proud of it despite its imperfections.

I must say this was no small challenge for me. It took time to disassemble, remove hundreds of staples, and carefully label and bag each piece of hardware. I took photos along the way to help me with reassembly—something I was glad for when I finally got around to it 6 months later. It was another time investment to refinish (sanding very carefully so as not to damage the thin veneer, then applying the stain and 3 coats of Poly acrylic finish, sanding between every coat). I spent another long day sewing hoping so much to finish it in one day. That night I gave up in frustration, feeling like I would never get it right. (I am, after all, a complete novice in re-upholstery). I spent a little time researching other redos online and discovered I might have been the only person crazy enough to attempt sewing the welting directly to the cushions before attaching them to the wood. Most people stapled their cushion fabric, then glued or stapled the welting separately. Easier, for sure, but my way was the way it was constructed originally. The problem was that the old leather was stretched out and made an imperfect pattern. Easing and gathering the stiff vinyl around the edges was really challenging. The result is very imperfect and there are plenty of puckers, but I think in the long run the construction will be stronger. 

A few days later with fresh and rested eyes I spent one more long afternoon stapling hundreds more staples into the flimsy wood frames (rather exhausting) and then screwing each piece back together. Even that part of the job took longer than expected, but it was so very exciting to watch it come back together!


Had this been an original Eames lounge and not a knock-off, I would have been inclined to use real leather. As it was, the only $$ I had into this project were for a few small supplies: buttons, welting, needles, and upholstery thread. The chair was free (my Grandpa's chair, cast off to the back recesses of the storage room in our house), and the vinyl was something my mom and dad had on hand and donated for the cause. 


I intended to make my own buttons, but it didn't take long to figure out the stiff vinyl and cheap button frames from the fabric store would have made a lousy combination. At the last minute we took the vinyl to an upholstery shop and had buttons made for us. It cost all of $5. Obviously well worth it! 

After seeing how inexpensive and easy the buttons were, Tom thought I was crazy for not exploring the option of professional upholstery to begin with. Maybe it would have been affordable—inside 2 or 3 hundred bucks perhaps. And the result certainly would have been better. However, despite the number of hours it took me (a lot), I still am glad I attempted it myself. It might not be logical, but it gives me a feeling of accomplishment and leaves me with something to be proud of.


You might enjoy seeing a few photos of the process, although, I didn't take any of the sewing and reassembly. My hands were too busy to pick up the camera!

Taking it apart (Each piece was built with an inner and outer bent plywood shell):

The back of the ottoman with the outer shell removed, showing how the cushions were stapled onto the fabric:

The leather removed:

And the cushion foam and inner plywood shell. (I reused all the old foam):

All the pieces lined up:

Checking to see if I had enough vinyl. This was before I removed all the welting. I then laid each piece flat, taped it to the vinyl, and cut around them. Each piece of welting had to be cut to the exact same length, so after they were removed I stretched them out and re-cut new strips.

The pieces laid out in the garage for re-finishing:

Now that it is done, I've heard a few say "This was always my favorite chair" or "I forgot how comfortable this chair was!" (Rumor has it the knock-offs are actually more comfortable than the real ones. This one reclines—the originals only swivel.) As such, I sort of want to move it upstairs to a place we can enjoy it often. For now, it resides downstairs.

The bright white vinyl isn't totally ideal with my living room furniture, however. And it looks pretty hot downstairs with my hounds tooth sofa:


So for now we are trekking downstairs for a change of scenery during our evening lounging.

doll beds

As you know, I made doll beds for the girls for Christmas, using this Ana White plan. 

To buy a true American Girl doll bed would cost anywhere from $70-$125. I spent about $30 in supplies to build all 3. (I would have used scrap wood for even less money, but since I needed to make 3 I didn't think I could find enough scrap pieces in consistent sizes. The wood I bought was cheap pine and I had to work around knots, bows, and other imperfections. What can I say? I was going for cheap and the rustic farmhouse look fit the bill.

I bought sample paint jars from Walmart and intended to paint all 3 beds a different color, but it was apparent that one jar wasn't going to be enough. I didn't want to spend more money on paint, so instead I painted the beds with white trim paint and then tried painting the insets on the headboard and footboard with the colored paint. In the end I didn't like the contrast, so I painted over the color and then sanded it off so the color would show through. At least this allows them to be able to tell their beds apart.

I waited to post better pictures because the icing on the cake was the quilts their aunt Amy made for them. Each quilt is pieced to match their beds and personalities.

Abby's is a purple pinwheel pattern,

Sarah's is pink and ruffled,

And Eva's has colorful dots and coordinates with her bedroom quilt. I love them all. Thanks Aunt Amy!

They look adorable all lined up in a row, but mostly they live in their own rooms with the girls. Eva's is in her little play tent, and Abby's is set up like a little bedroom with picture frames and knick-knacks. 


It was a fun project, and was pretty easy if you can make friends with a few power tools! I managed to not cut off any fingers so our friendship is in tact.


Meet Benton

I had a request for more puppy pictures, and I am here to deliver.


Tom grew up with a line of Golden Retrievers, each with some derivative of the name Ben. (Bently, Bennigan, Benvolio, etc.) When we first started thinking about a puppy, we looked at a litter of labs and almost put our money down on a Chocolate one. The girls wanted to name him "Chip." In the end though, we just couldn't do it. It didn't feel right. The parents weren't the best looking dogs I'd ever seen and their living conditions weren't ideal. Then, on a whim, I decided to look up Golden Retriever breeders in our state and happened upon a male that was available just before Christmas. Bingo.

I wouldn't say it was the easiest (or cheapest) decision to make, until we saw his picture. Cue, "awww". We were sunk. We kept him a secret from the kids, and then right before Christmas we made the 3 hour drive to get him, telling the girls "Daddy wants to look at some equipment for the farm." They were clueless until Dad came out of the house carrying our new puppy and I said "surprise!"

Tom had him named before we picked him up. His registered name is "Benton Gold", in the tradition of Bens (he's the 7th) and in honor of our hometown. Mostly we just call him Ben. Our next one will be "Benry the VIII." :)


If there is a next one. I grumble a little about how much work a puppy is and about him chewing on everyone's socks and my cowhide rug. Good thing puppies are adorable. It makes it easy to fall in love. Hopefully the puppy stage is short-lived and I will forget all about the work. 

We were hoping for a companion for Mia, our older dog who has very nervous and anxious behaviors. So far she isn't terribly impressed, and so far Ben spends more time inside away from her. Even so, having another dog around seems to make her relax. Normally she refuses to ride in the car, but yesterday as I loaded Ben in his kennel to visit the vet for shots, Mia jumped in right beside him without hesitation. I'll be anxious to see how else her behavior changes once Ben starts to spend more time outside with her. I'm hoping she will be less nervous around new people and will learn to use a pet door into the garage. 

Tom was ADAMANT about getting a boy puppy—you know—to help even the score. After we picked him up he took the girls to the store to shop for supplies. Everything they picked out, from his colar to his toys, was blue. :)

We are trying to "crate train" him. The goal is to get him into a schedule where we sleeps and naps in his crate (even eats in his crate) and goes outside immediately after to relieve himself. So far it is working really well. He hasn't been perfect, but I've been pleasantly surprised (knock on wood) how few messes we've had to clean up. The thing is, he is a very social dog and he prefers just to nap at our feet wherever we happen to be. He sleeps well in his crate at night as long as we put his crate right beside our bed.

That is a very thorough introduction–now wish me luck!


Before the year turns

I'm not one to go nuts over Christmas traditions and generally like to keep things low key and simple. It is one of the only holidays I actually make an effort to decorate for though. It just seems like a little festivity and a few twinkling lights really cheer things up when it is cold outside and the days are so short.


Sometimes I find it hard to decorate around the unfinished projects. Our front door is still unpainted and not fully trimmed out, but I finally added a wreath anyway. There is always a pile of boots in the entry- especially now that the puppy needs accompanied outside to do his business several times a day.

I reuse the same decorations every year, but I'll add to it if I see something that catches my eye. This year we made a crude little star from some leftover trim scraps and wrapped a few lights around it. I also bought this pretty pine plant off of our local Facebook yard sale site for $10. It will stay all year, but looks especially nice for the winter!

I found this adorable pair of vintage children's wooden skiis to add to my collection this year also. They were a steal ($5) at a holiday antique show.

There is a darling little place called Virgelle (named for its founders Vigil and Ella) on the Missouri River that opens only about twice a year to sell their wares. They are open as a bed and breakfast in the warmer months. It was a bit of a muddy trek to get there, but well worth the drive.

I could have easily dropped a few more pennies there if I'd had the pennies to drop. Our new puppy sort of ate a hole in my pocket.

I love getting everyone's Christmas cards in the mail this time of year. As usual I display them in this vintage card carousel. This was our Christmas card this year:

I mentioned before that I let my kids decorate this year. It was fun for them and stress free for me.

They filled this bowl with silver pine cones and garland, and I loved it. You can see that I hung some art on the wall in our living room. I've had these New York prints and really like them, but had intended to use them somewhere else until I saw how nice the metallic frames looked against the gray walls. I would like to find a pair of mirrors to flank them since there is a lot of wall left on either side.

I like playing Christmas songs this time of year. This year the girls were asked to carol at the local nursing home with the 4-H club, and I got to accompany them on the piano. It was a grand time and was especially fun to see the joy on the faces of the tenants!

Simple white stockings hung by the chimney with care.

And a simple neutral tree.

My favorite twiggy reindeer appear every year also, even though I can't seem to find a glue to fix the wound they endured a couple of years ago...

I hope you enjoyed the tour of our holiday home before it all gets packed away for another year. Happy Holidays! :)

Christmas at the Clarks

Three American Girl Doll beds greeted my girls under the Christmas tree this year. Santa's freelance elf made them all by herself.

See? Here's proof by way of a few process shots.


I wouldn't know, of course, but rumor has it they were made from these plans from Ana White, and that they were pretty simple to build. They had to be for Santa's elf to manage them by herself. Painting them was no doubt the hardest part.

These beds gave us a lot of bang for our buck—in otherwords, we didn't have to break the piggy bank to give them something that felt substantial. Which was good, because...

...we sort of spent our Christmas wad on a little friend that joined in the festivities Christmas morning.

This is Benton, our new Golden Retriever puppy. The girls were pretty disappointed when Dexter the free dog had to go back home because he wasn't very nice to an important person in our lives. This is how we made it up to them. Not exactly free, but, well, we have always LOVED this breed and decided to splurge on what we really wanted.

More about Benton later.

Christmas at home in our pajamas is always a treat.

Grandma bought new boots for the girls and they were a huge hit.

Later Christmas day we migrated to my parents house where we joined up with more family and enjoyed a yummy prime rib dinner and a leisurely afternoon of game playing. We especially enjoyed the company of my little nephew elf.

We are truly blessed to enjoy a perfect Christmas. After Tom puts in a couple of good days work on my parents apartment project we are hoping to spend a few days with his family. If all goes well. At this point we are nursing a sick little Eva back to health and crossing our fingers that it doesn't spread. And adjusting to life with a puppy. (What did I get myself into?)

Lots more to share- back soon!

Living room changes

 I have promised you photos of our living room changes, and I admit it feels like a chore to get these all uploaded. I should be cleaning my house today in preparation for my in-laws coming. And then when I downloaded the photos I took I was really disappointed. It was a really bright day, and without any window treatments on the windows, I couldn't control the light. The photos are washed out and too bright. Alas, they will have to do for now. The photos may not do the room justice, but I'm telling you—I absolutely love how it turned out and I love to spend time in there. 

I also should have labeled the photos "before" and "after", but hopefully you don't find it too hard to tell them apart! Ha! :) 

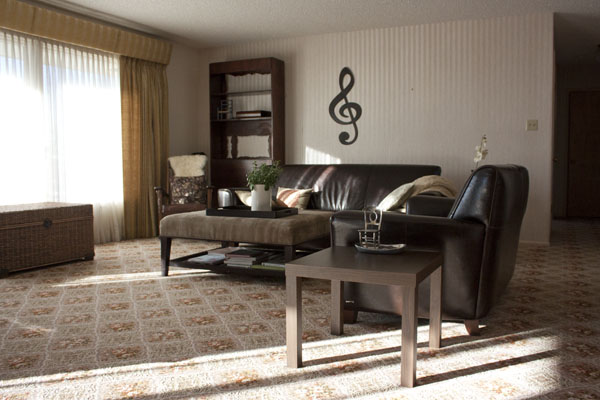
Here we go. This is the view you see when you enter our house and look into the living room. Before:

And after!

You can see a lot of the changes right here. New light fixtures, no more popcorn ceiling, new trim, fresh paint on the walls, and of course, new wood floors.

A little about the wood we chose: It is a pre finished, solid wood (Hickory) and wide plank (about 8"). It has some hand scraping and saw marks, and is finished in a color that is not too dark and not too light. I wanted something that wouldn't show every speck of dust. It was an in-stock deal and we got it for less than a third of retail price. Good thing—we have a ton of square footage.

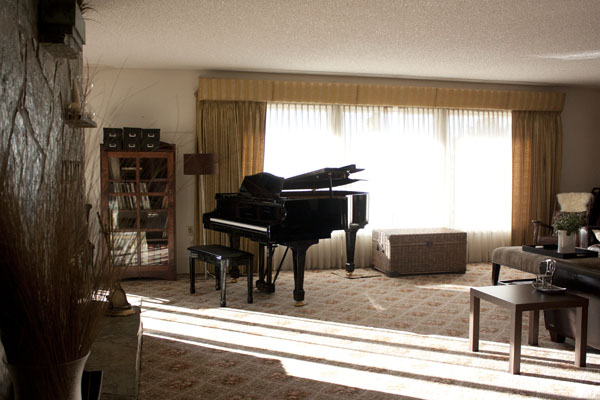
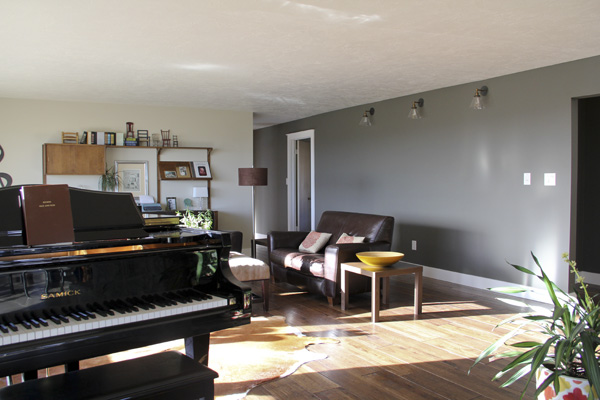
When you look further into the living room, this is the view you see. This is before we moved in:

Before we moved in my dad had the heat system replaced and all the baseboard registers were removed. It left some unsightly holes in the flooring and wallpaper, but we just lived with that for a long time. Next photo is with our own furniture:
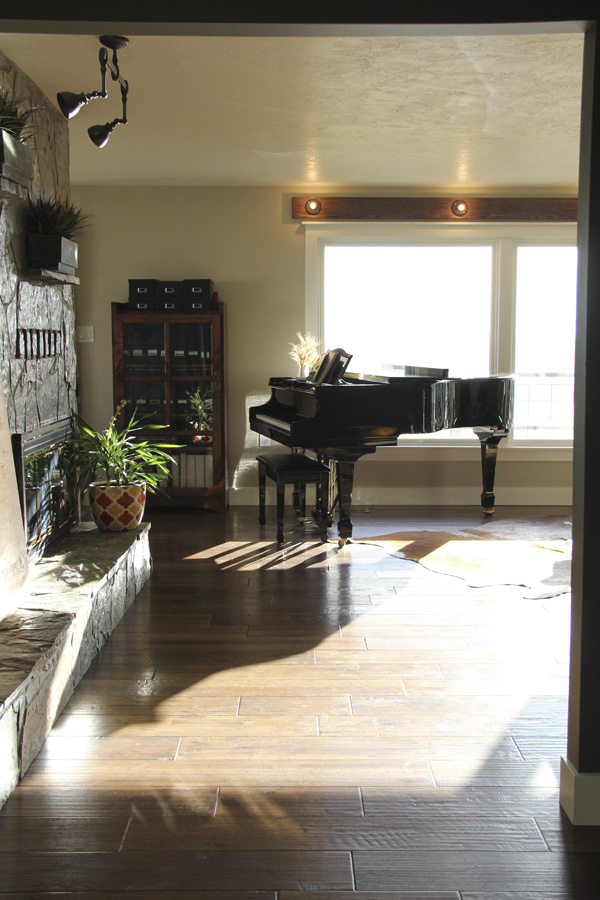
And now, after:

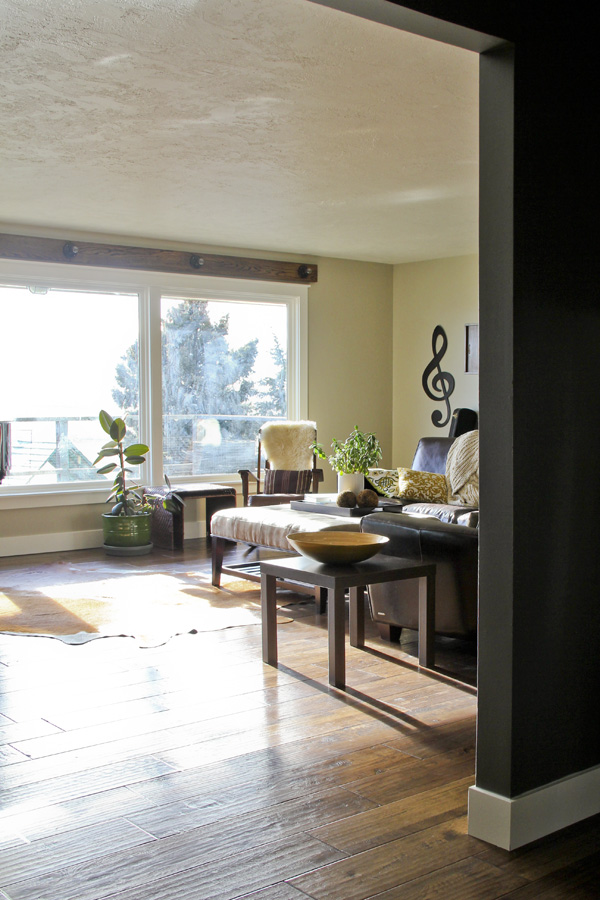
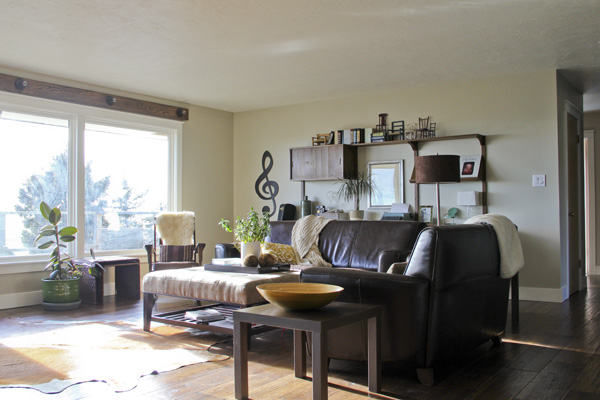
I had removed the wallpaper on the back wall quite a while ago in order to paint and install the wall unit that is there now. So I knew what I was getting myself into when it came to removing the rest. It was nice to have one less wall to do when we tackled it this time!

I still need to get window treatments and am going to opt for a woven solar blind that fits inside the frame for a clean look. I am waiting for a sale.

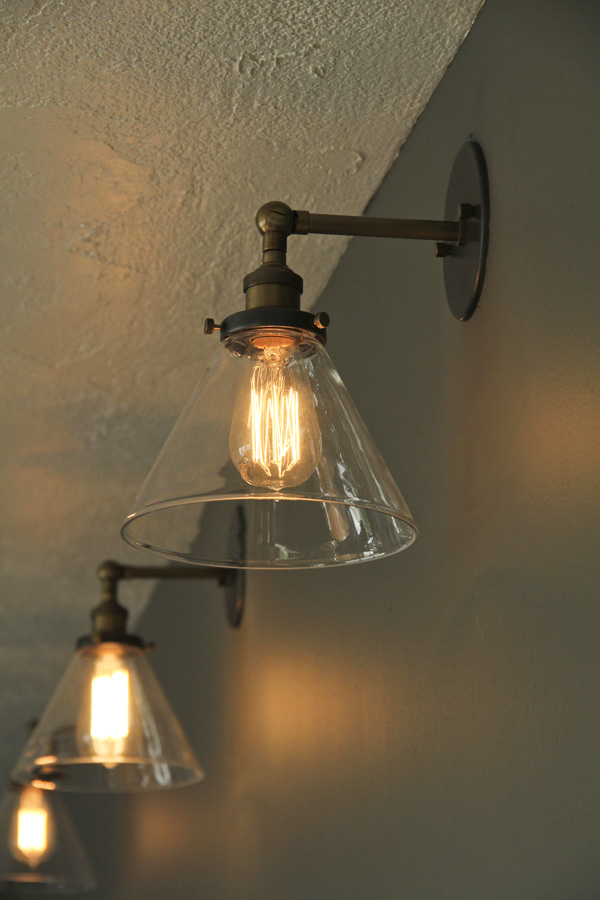
Above the window, my dad built a new light bar out of oak, and I stained and finished it. We added one more light. I just spray painted the old simple ceramic fixtures and added matching bulbs. My intention was to get a fixture like this:

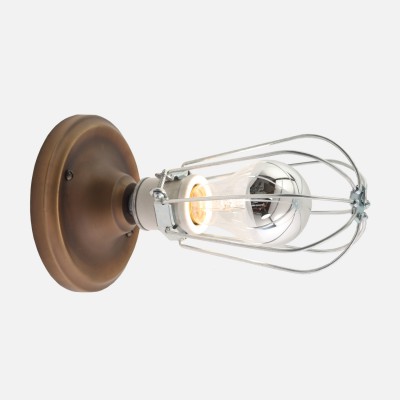
from Schoolhouse Electric

...or even just the cages, but after buying 5 of them it would be pricey. And I actually think the cheap option looks just fine.

Under the valance/cornice we removed, the old light bar looked like this:

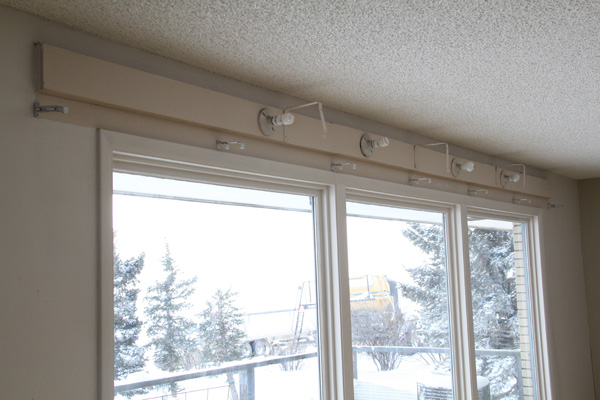
The box was made out of sheetrock and was cracked in several places. The lights weren't spaced evenly. The box was necessary to hide the wiring, because there is a header beam above the window. I love how the new wood bar looks.

On the other side of the room, there used to be a shelf unit that jutted out into the room and hid the passage into the hallway. While I was growing up, my Grandma had a fish tank on this shelf.

We removed the shelf right away, which left an interesting hole in the wallpaper and trim. It is hard to tell in this photo, but the wall was pretty shabby looking. The light fixtures and wallpaper don't really match the 70's era of the house, and they were added later (80's or 90's?) when my Grandma was apparently in the mood for more Victorian decor. It was the era of pastel colors and lace curtains.

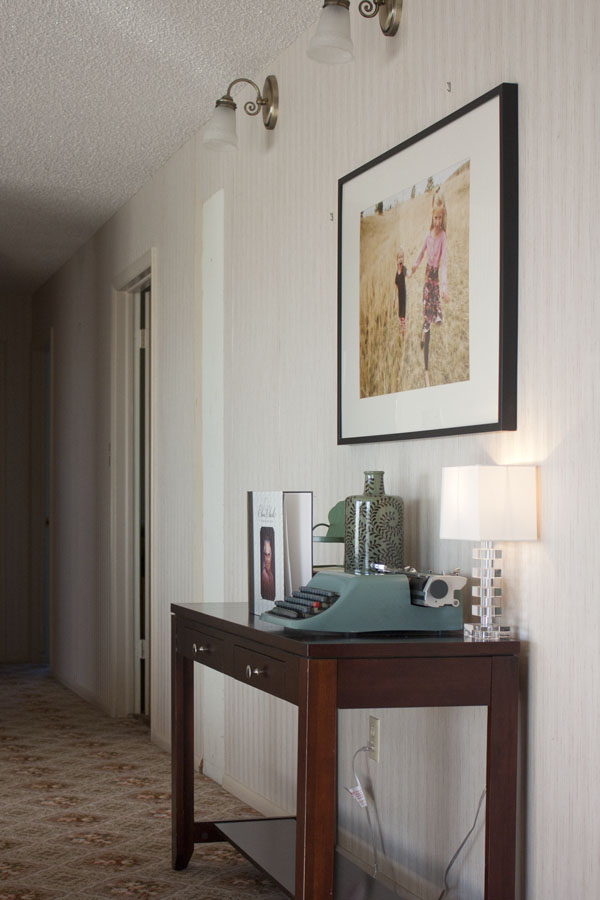
Now this view looks like this:

Clearly I need some art on this big blank wall! I'll work on that. I replaced the light fixture in the hall with one I found at the Habitat for Humanity ReStore for $6. At some point we hope to replace all the upstairs doors to match the basement doors (white.)

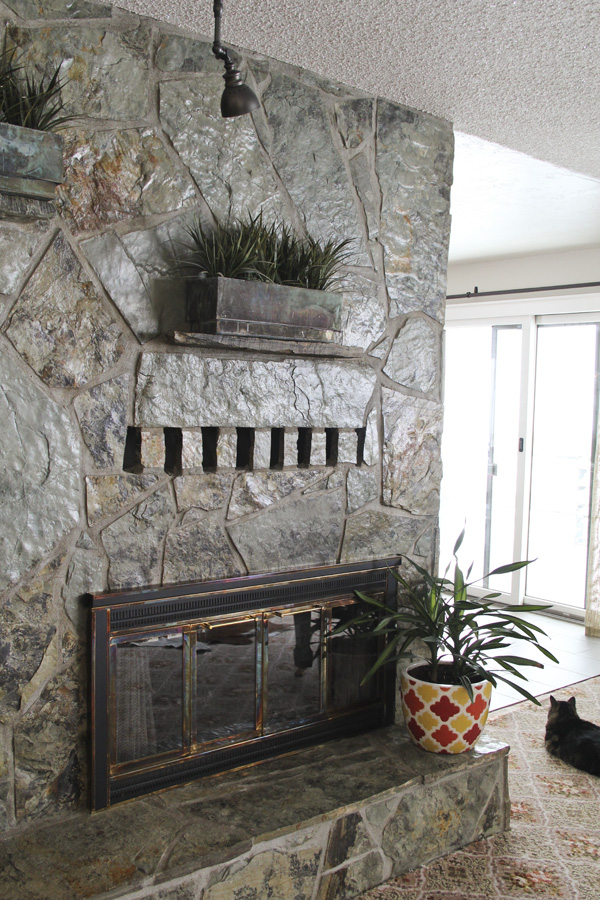
Light fixtures are always the subject of huge debate for some reason, and the living room was no exception. We were thrilled when we came across these from Restoration Hardware. They were reasonably priced to start and there was a 20% off deal. When all four of us liked it (Tom, myself, and my parents- which almost never happens), we jumped on them. I really like how the brass accents tie into the fireplace. They are made to use with Edison bulbs—and look fantastic with them—but unfortunately don't put out a ton of light. We might try them with different bulbs eventually, or just invest in a few lamps.

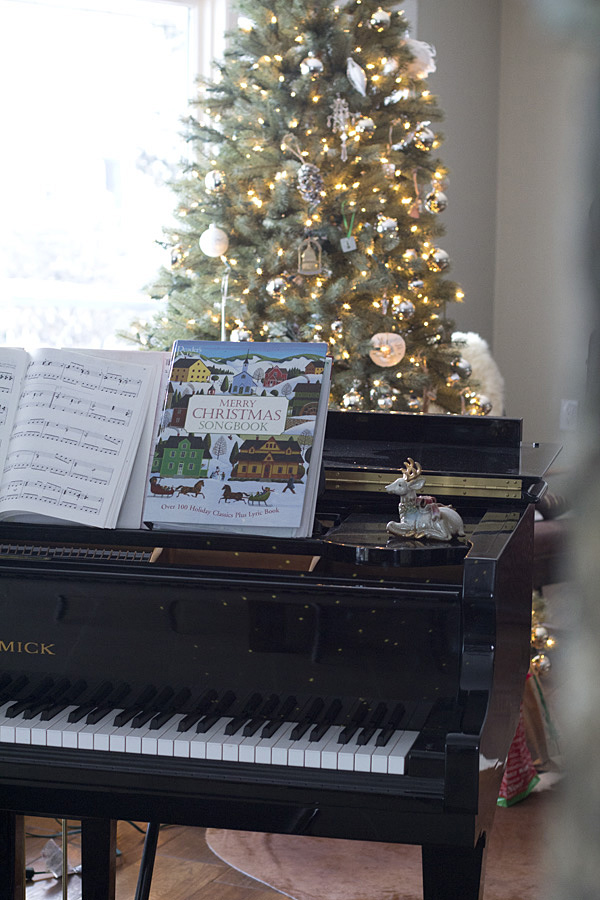
Another light on my wish list is a light for my piano. I had planned to look for a floor lamp that arches over, but I don't love them. Then I found this option (also from Restoration Hardware) which would mount to the wall and swing over the piano:

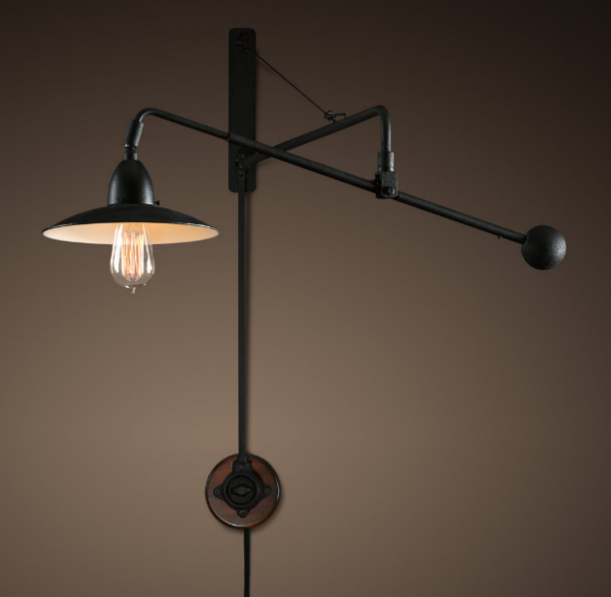
I haven't gotten it yet. Need to save my pennies. Another view of the big blank wall:

I chose to paint the one wall an accent color—Behr Dusty Mountain. It is a dark gray with green undertones and ties into the fireplace really well. The rest of the paint is the same I've used all over the house: Behr Sandstone Cliff (walls) and Behr Powdered Snow (trim and ceiling). I like to use a common theme to tie the entire house together, and then use accent colors that play well with the base colors.

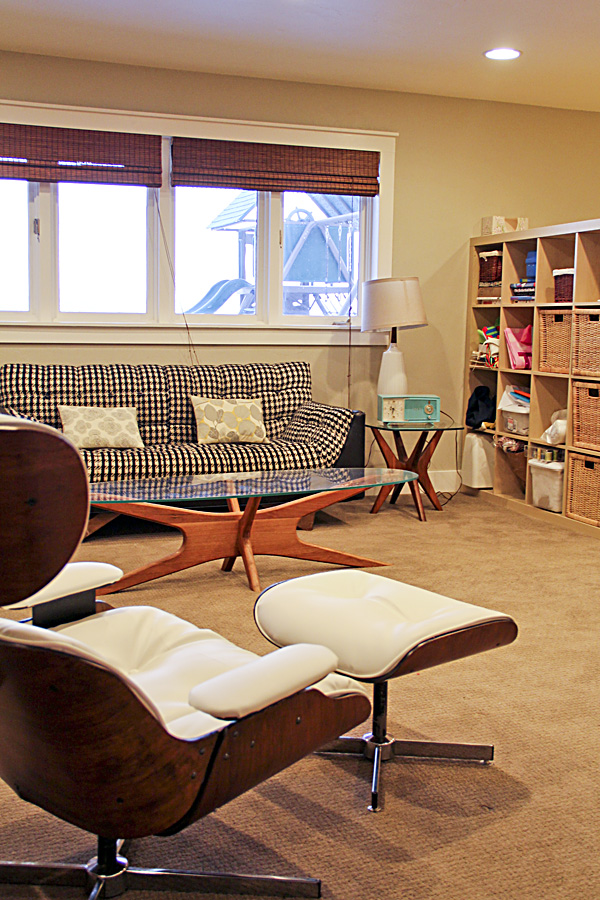
And the sitting area:

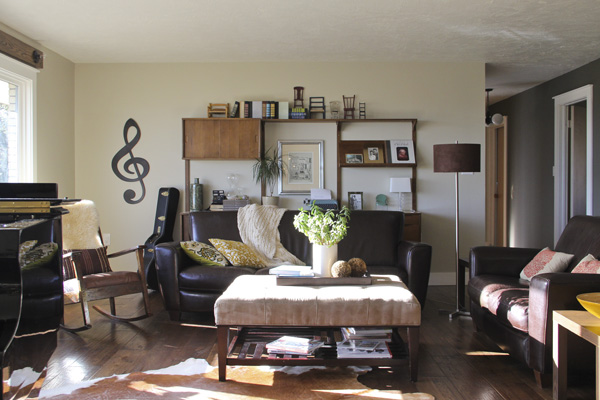
I need to get a rug. The cowhide will stay also—its a big room. I need a 9 x 12 and would love a nice thick wool pile. That is going to cost $$$, so while I save for the perfect rug, I plan to shampoo a chunk of the carpet we removed and get it bound. It is hard to put something old back in the new room, but we desperately need a rug to anchor the furniture and keep it from sliding everywhere. A rug will also help with sound absorption, however I haven't felt it has been overly echo-y or anything.

Our living room furniture was new when we bought our house in Utah. It wasn't expensive and definitely isn't my dream sofa, but it has held up well and serves the purpose. Down the road when we are well past all of our renovations, then maybe I'll allow myself to think about saving for a dream sofa.

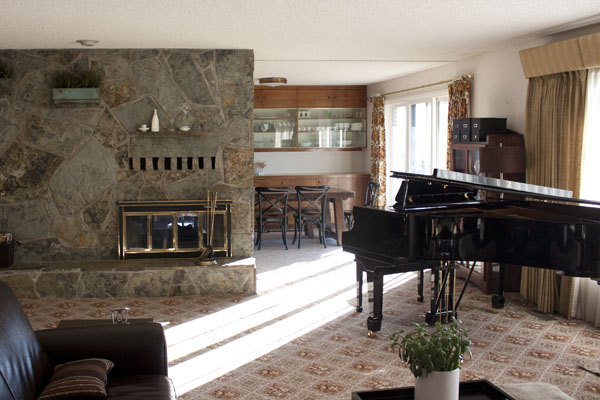
Looking toward the dining room, this is what it looked like before we moved in:

Before, with our own furniture:

And after:

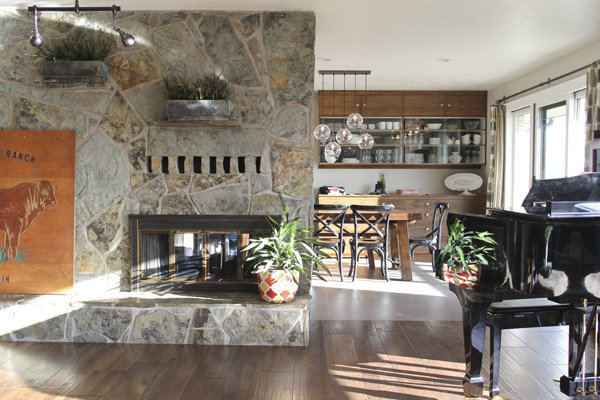
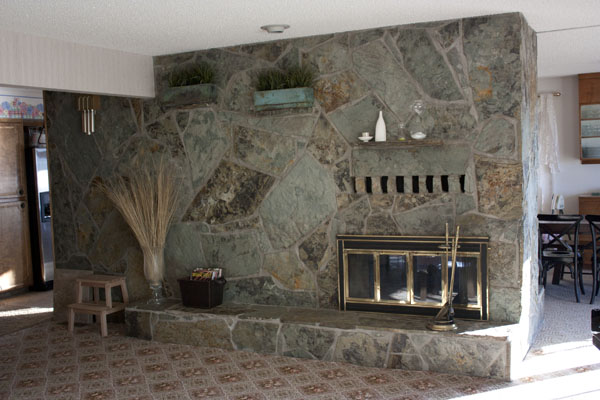
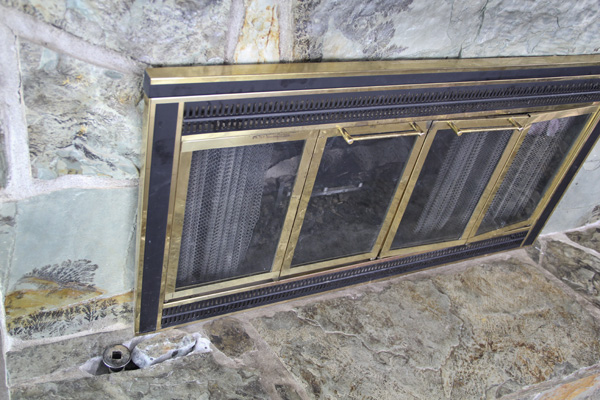
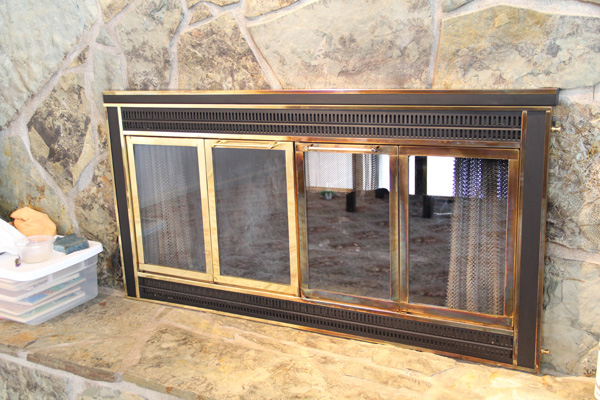
In this picture you can see better the difference in the brass finish on the fireplace. For awhile there was a lovely line on the ceiling where the popcorn ended (scraped in the dining room and not in the kitchen). I love having it look clean and seamless now! You can also see my dining room curtains. I don't think I've shown those to you yet. I promise better photos when I take kitchen after photos.

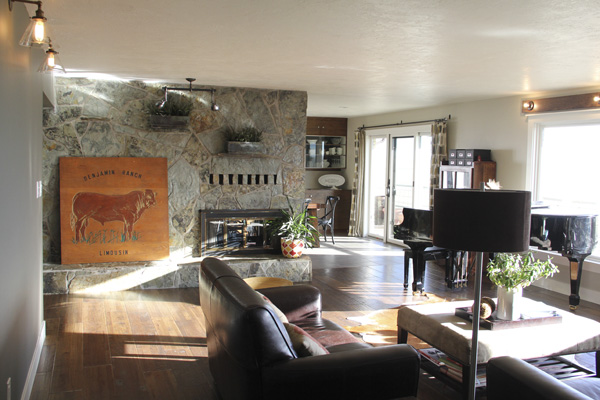
You will ask about the sign on the fireplace. It was hanging in our shop, and at the recommendation of a design-savvy friend, I decided to bring it in and clean the bird poop off of it. (I know, gross!) I think my artistic uncle must have made it. It is carved out of plywood and looks a bit kitsch, but I think its great. (We no longer have cattle on the ranch, but my Grandpa ran them for a number of years.) I kind of like the casualness of propping it up on the fireplace, but people are always asking where I'm going to hang it. I suppose it looks unfinished there? I'm not sure I want it as the focal point on the big wall. I was planning a gallery of family photos there. What do you think?

So there it is! Now the balance of our upstairs is swinging to the "mostly done" side, and it really feels like us! I hope you enjoyed the tour.


Holiday(s)

I'm not doing very well with catching up, am I? It has been a busy week. Abby started basketball practice every night, and we have been attending the Montana Grain Growers conference. On top of that, I've been a little under the weather. I did take some living room photos that I need to upload and hopefully have ready for you on Monday. Until then, these were my little ghouls this year:

Halloween in December. Awesome! I'm just trying to be fashionably late, that's all. We made Abby's costume with felt and foam. Sarah's was an old costume we had that we gussied up a bit with tulle. Eva's was a last-minute (as in 15 minutes before we went trick-or-treating) trip to the dress-up closet. I have to admit I'm a bit of a Halloween grinch and usually find it to be a lot of unnecessary effort, but the kids love it and it is fun to see them all dressed up. 

Now we are 18 days away from Christmas. Or let's just not go there. DENIAL! DENIAL! The girls wanted to decorate and I just wasn't feeling it. So I hauled the boxes and tree out and let them do all the decorating. It was easy for me and they had fun. Win win! We asked the girls what they wanted for Christmas and so far we are about 0 for 4. Either we can't find what they want or they are out-of-stock. Turns out waiting to shop in December can fail big time.

We are tempted to forgo gifts and buy the girls a puppy instead. If you follow me on twitter or Facebook you might have seen me introduce Dexter, a pretty 2-year old Retriever/German shorthair mix we found on Craig's List. He was energetic and sweet and the girls quickly fell in love with him. It seemed like it was going to be a match made in heaven... until he decided he didn't like my dad. He barked and growled at him mostly, but one night when my dad went into "his" garage, he actually tried to bite. Not good. So he went back to his old home. 

That seems like more than enough random chatter for one day, so I'll sign off and wish you all a happy weekend!

Fireplace makeover

Sometimes when we show people the changes we are making in our house we get the question "So what are you going to do with the fireplace?" As though since we are updating everything, why wouldn't we update one of the most obviously dated features in the house? However, as this fireplace is a huge focal point and architectural element in our home, removing it would not only be a major project, it would be disloyal to the original intent and integrity of the home. So it will stay.

And we actually really love it. The slate is from a Montana quarry and is called Montana picture rock. The colors are gorgeous (I have always been a fan of greens in decor) and many of the rocks feature leaf fossil patterns. It is a work of art. So one of my goals has been to make the fireplace feel like it fits in with the rest of the decor, while still transitioning it to the modern environment I'm aiming for. 

The photo above is an old one, before we started any renovations. I think the changes we have made have enhanced the fireplace—but those photos will come later!

Today I want to tell you about those fireplace doors. What to do?

Remove the doors? Unsafe for kids. Put in an insert? Actually, it would be two- one on each side. Expensive.

In a previous post I discussed my intent to spray paint the brass bits black. This is still a valid option, but someone left a comment and suggested I try darkening the brass. I decided it was worth a try.

The lacquered brass doesn't polish up well. Lacquer becomes scratched and mucky over time. In order to age the brass you have to remove the lacquer. It actually comes off pretty easily! One recommendation is using ammonia. I didn't try this but opted instead for something I had in my cupboard: fingernail polish remover.

(Note: in the photo above you can see the valve that turns on the propane for the fireplace. Unfortunately, this valve has leaked for a long time and the fireplace has gone unused. We recently drilled through the mortar to try to fix the valve, but our attempt failed. At this point I'm not sure what we are going to do—maybe hire a pro to fix the valve?) 

While most of the laquer came off easily, some was more stubborn and would find (after I started darkening) that I had missed spots. I used a toothbrush and scrubbed vigorously to remove as much as I could. 

To tarnish the brass, I purchased this brass darkening solution. Some methods recommend using liver of sulfur, but after reading that when heated liver of sulfur produces a poisonous gas, I decided that was NOT the product to use on a fireplace. Ha. This product did the trick easily. 

Here is the fireplace with half of it done:

The directions actually say to immerse the metal into a bath of solution to soak, but I simply used a cotton swab and continuously rubbed it over an area for a minute or so until I saw it begin to darken. 

All done! I know brass isn't everyone's favorite thing, but I like the tarnished brass much better than the lacquered brass. It blends into the rock better where the polished lacquered brass stood out. The purple/coppery tones of the tarnish are beautiful, and having it all shined up doesn't hurt either!

I promise living room photos soon—must clean and take photos first!

Thanksgiving recap and catching up

It's probably time for me to do something about this blog neglect situation. I didn't intend to leave you hanging for—what, nearly two months (gulp!) but I guess life has gotten away from me and I have found it difficult to take the time to write about it. 

Now I'll offer up my excuses. Since I last posted, we (among other things):

-celebrated several more birthdays, including Tom's and Abby's . . . associated sleepovers and cake baking.

-took a family trip to California.

-made Halloween costumes and did the typical Halloween festivities yada yada.

-hosted Thanksgiving at our house.

-and last but mostly to blame, worked on house projects.


What this means is this:

I have lots of material to blog about! :)  Now, if I can just sit down and get that first post written I will be on a roll. It might take a post a day until Christmas to get caught up. No commitments, though. 

Catching up seems daunting, so I will start with the most current events. Auntie Amy knitted new hats for each of the girls (above). Aren't they adorable? And here is Eva enjoying her baby cousin Brandon. She just loves babies.


My whole family was together for Thanksgiving weekend, and we hosted at our house. It was probably a crazy thing to do because we were finishing up projects, moving furniture, and cleaning house until 2:30 AM the night before. But ah, was it ever fun to cook Thanksgiving dinner in our new kitchen! And it is so good to have a deadline to work for, despite the craziness. 

Speaking of kitchens, I have been dying to finish up the last of the projects in ours so I can take some real photos and post before and after pictures of the project. But first I wanted to finish every. last. detail. And we did pretty good.

This is what we accomplished this month on the kitchen:


  • Order a new pantry cabinet and install it (actually, this happened awhile ago, but I don't think I've posted about it.)
  • Build the wood shelves (Dad) and stain and finish them (me). L-O-V-E them. 
  • Caulk and paint all the window trim.
  • Hang the curtains that I finished sewing ages ago.
  • Install, caulk, and paint the crown moulding above the cabinets.
  • Install soft-close hinges on our cupboard doors (we meant to order them this way, but some came without. Love this feature). 
  • Install mug hooks on new shelves.
  • Order and install a light fixture over the island (finally)! An issue of debate finally settled. 
  • Make over the fireplace doors (more on this later).
  • Paint the beam and other touchup.
  • Replace outlets and switches.


Still to do:


  • Tile an area above the window that didn't get done before because we ran out of the adhesive we used. Oops.
  • Makeover firebox.
  • Paint stool
  • Fix the propane leak in the fireplace. We haven't been able to use our fireplace because the valve leaks. We drilled through the mortar to attempt to fix it, but it is still leaking. 
  • Patch mortar
  • Cut the kickbase off of the sideboard/buffet and add feet. (My dad is going to help build some strong feet to bear the weight of this heavy piece. Someday.)


I would like to get the first three things done before I post pictures. The rest might be a while.

We've been busy, right? There's more.

Here is our list for the hallway:


  • Install new vertical windows
  • Install new front door
  • Install new side light windows (they arrive this week!) 
  • Paint front door and side garage door. (I bought the paint.)
  • Install trim (almost there)
  • Caulk and paint trim.
  • Buy new entry rugs that can handle all the ranch dirt that tracks in and out of here.
  • Make shelf and bench for mudroom/coat hook area. 
  • Stencil wall of coat hook area.
  • Hang hooks in coat hook area.
  • Hang artwork in hall.


Still more. Here is the list for the Living Room:


  • Remove wallpaper.
  • Remove those old dusty curtains.
  • Remove carpet. (Yes, we did!)
  • Scrape popcorn ceilings.
  • Retexture ceilings.
  • Paint ceilings.
  • Spackle, sand, and smooth walls.
  • Prime and paint walls.
  • Install hardwood floors (Yes, we did that too! Grin!)
  • Redo light bar (under old cornice/valance). Build, sand, stain, finish, and install. Paint light fixtures.
  • Order and install new sconces.
  • Install new hallway light.
  • Retrim everything.
  • Caulk and paint trim. (almost there)
  • Replace outlets and switches. (almost there)
  • Order new window treatments. Probably solar blinds.
  • Get a light for piano. I'd like a floor lamp that arches over the piano.
  • Get an area rug. We might bind some of the old carpet for now. Maybe. It's hard to put something old back into a new space.
  • Build desk and cupboard for desk niche. 
  • Stencil wall behind desk niche.
  • Replace doors upstairs so they are all white and match the trim. Someday.


Whew. Tired yet? We certainly were after pushing to get all of this done before Thanksgiving. And I'm still trying to catch up on the laundry and house cleaning that gets neglected while I'm working on projects.

One big reason for pushing so hard (besides the fact we were hosting Thanksgiving) was because now we are going to take a break (on our house, anyway). My parents have helped us extensively on house projects, so now we are going to attempt to help them in return with one of their projects. They just purchased a 4-plex in town as an investment, and one unit is going to be gutted and redone. They would like to finish it before the new year. Yes, we are all glutton for punishment! :)

After that, if all goes well, I would like to work on our house again until spring farm work calls. Besides finishing the above list, with any luck we'll tackle the laundry room, guest bathroom, and girls rooms. I'll spare you those lists for now. Until then, I will have plenty to show you with the projects I mentioned above. 

And that's all I have for today. Ha :) It is good to be back.

(P.S. I have an issue with compound words. When I run spell check that is all it picks out. A string of incorrect compound words. Sorry, but I'm leaving them! Forgive me.)


Drive by shooting

With a camera that is.

On the way to the bus stop we encountered a skunk family. We see them nearly every day, though you probably can't spot it in my drive-by photo. Yesterday it was a fox high-tailing it across the road. Nearly every morning we also scatter a few antelope from the roadside. This is our typical 3-mile drive to the bus stop, complete with a beautiful sunrise.

Today it is cold, rainy, and muddy. A welcome releif!

Happy Birthday, Sarah!

I'm getting this up at the last possible minute, but wanted to wish Sarah an official online happy 7th birthday!


She asked for a cowgirl cake, and I obliged. It was fun to make.

Over the weekend we had all the first grade girls (yes, there are only 5!) for a sleep over. They decorated these little letters for a fun craft project.

On Saturday night we had a family party at Grandpa and Grandma's. Today she shared her favorite cookies at school and we had her favorite dish for dinner (meatballs). Aren't birthdays great . . . when you are a kid and can drag out the celebrations for several days?

Happy Birthday, Sarah! We love your smile and your spirit.