impending winter

It's been hard to figure out what to post about this week. With the impending weather change (it's supposed to snow tonight!) we've been scrambling to finish up outdoor projects. We have lots of things in progress but nothing finished. 

For one, we've been working on our yard—laying more weed fabric and spreading gravel. We just ordered our FOURTH load of gravel. Spreading gravel=very sore muscles. And when we are done with the landscape gravel we are hoping to grade and fill some holes in our driveway with crushed gravel.

Secondly, the dump was open in our small town this weekend for free dumps, so we decided to take the opportunity to empty a corner of junk in our garage (leftover from before we moved here.) Our garage is looking SO much better, but we still have a lot more organizing to do before it is ready to call done. We are still gathering bids for replacing the overhead garage door and side doors, and we are looking forward to improving how much dirt and debris ends up in our garage. These kinds of projects maybe aren't the most fun, but the end result just FEELS GOOD. 

Speaking of door bids, we are still waiting on someone to come measure the side windows for our front door. But this week I at least cleaned out my cold-snapped flowers and added a bit of fall decor:

I popped a few pumpkins leftover from Halloween and some branches into the pots that are much to heavy to relocate. By the way, I'm thinking of keeping those light fixtures and polishing them up with a coat of oil-rubbed bronze spray paint. What do you think? Or do you prefer the brass? I'm also thinking of doing this to some of my interior fixtures.

We also got bids for gutter, soffit, and facia. Soon we will have a two-toned house: brown soffit, facia and doors, and blue trim. Looks like trim painting will be on our to-do list next spring!

Well, that is it for this week. Hopefully the weather won't completely prevent us from continuing to make progress. Happy Friday, and stay warm!

Halloween

This (normally) Halloween Scrooge couldn't help but have a ton of fun this year.

Parties, friends, and family are what this day is all about. And candy and good food.

Eva wore the cutest hand-me-down flower costume. We made Abby's costume this year, using this tutorial. Sarah's butterfly was pieced together at the last minute for our Disneyland trick-or-treating adventure, and she was happy to wear it again.

Our American Gothic costume was thrown together last minute on Halloween day. Those are usually the best kind, aren't they? But it was my mom's costume (whatever it was—80's workout diva?) that took us all out. And all because I made fun of her for wearing that jacket while she was raking leaves the other day. ("What are you wearing, and where did THAT come from?")

Big kids and little kids alike had a great time carving pumpkins. Especially the ones sporting our favorite mascots.

Tasty chili (did I detect a hint of duck?), homemade root beer and ice cream, wriggly worms, and more than enough sugary treats to go around. I shall be on a diet until next year. Or Thanksgiving, at least.

Feng Shui Friday—Paint your front door

TGIF, my friends—and that means it is time for a new Feng Shui Friday Challenge. This is a fun one I think.

To find out how you can join the Feng Shui Friday challenge, click here.

Today's Challenge—Paint your front door (or clean and tidy up your entry)

According to Feng Shui principles, your front door is the main source for energy flowing into your home, so it makes sense that you would want it to be neat and tidy, attractive, and functioning well. Improving the appeal of your front entry would be a high priority if you were selling your house. Why not make it just as attractive for yourself and your guests while you are living in it?

Feng Shui experts recommend red for your front door because red stands for vitality, energy, success, and prosperity. But if red doesn't go with your home, don't worry. Pick another color—or, at the very least, make sure it is crisp and clean. 

Do any of you have a colorful front door? If not, are you up for a challenge?

Here is my rather sad front entry:

Beleive me, it has looked even worse. This summer I at least decluttered and planted some flowers in pots to flank the front door. Now the flowers are fading from the cold weather, and I've added some pumpkins that are awaiting the carving treatment. But let's talk about that front door. I'm not actually going to paint it. Yet.

First I am going to replace the door. I know, I know, some people would kill for an authentic mid-century door like this. Replacing it with a similar door would cost lots of cash. What you can't see here though is that there are holes in the door (I've actually seen bees flying in and out of the holes!) and it doesn't seal well. In fact, you can see daylight through the cracks on the inside, and dust and straw even blows in through them if the wind blows from the east. Also, the sidelight windows are sratched and foggy between the glass.

Eventually, we are going to be changing the trim color back to it's original brown (although a bit darker). The house will go from this:

to this (a quick Photoshop hack):

I think the contrast of the darker brown makes the light brick color look so much better and much more modern. (By the way, we are not only replacing the front door, but all the exterior doors on the house, including the garage door.)

Back to the front door. This is (another Photoshop hack on a poor quality photo, but it gives you an idea) what I am thinking for a front door style and color:

What do you think? It is a lot of glass, but out here on the farm privacy isn't as much of a concern. And the light coming through on the inside will be so nice. The paint-chipped steps need some serious attention also. At the very least a new paint job, but even better a faux concrete treatment or tile. 

While I do love the idea of adding a few pops of red (via a couple of Adirondack chairs on the deck and a porch swing, perhaps), I'm not sure I am game for putting it on my front door. But this is what it would look like, just for kicks:

We are still in the middle of the door shopping process, so nothing is final about the style of this door. The width is wider than standard, so we may need to get creative. Just for fun, here are a few more front door looks I am attracted to:  (The top image in this post and each of the following images are from Houzz.)


Which do you like? I'd love to hear about your own front door adventures. Happy Friday!

Vacation ABCs

When we left for our vacation last week, we of course told the girls' teachers they would be missing a few days of school. Sarah's teacher kindly told her not to worry about doing any makeup work, but requested that she bring back photos to share with the class.

So in addition to the sea shell mementos we put together, we decided to make the photo sharing into a little project as well. Since Sarah is in Kindergarten and working on all of her letter sounds, I thought it would be fun to find something to take a picture of starting with every letter and turn it into a book. Both girls got into the game and it turned out to be a fun way to document our trip. Here are the pages of our book, and a recap of our vacation all in one:


Now you know your ABCs . . . I mean, now you know all the details of our trip. I've sent the pages to Shutterfly to make a little paperback book. So much more fun than sending a few photos to school, don't you think? 

back to work

Last time I posted was to tell you about my Grandpa's passing and that I would be away from my blog. Thank you all, dear friends, for your sweet comments. Last Saturday was his funeral, and it was a memorable and lovely day. (If you would like to know more, my mom wrote a touching recap.)

What I didn't tell you was that my blog break would last a little longer than that. We had planned to leave on a family vacation to Newport Beach the day before the funeral. We felt blessed for the timing of things and that we were able to stay for the funeral, help with arrangements, and host family at our house. In the end we only postponed our trip for one day and made up for the lost time by spending two long days on the road. But more about that later.

I missed a couple of milestones during my blog break. Most importantly, Abby turned 9! Poor girl—her actual birthday was a bit overshadowed by the other events that day (funeral). We gave her a proper celebration a few days before, however.

Doesn't she look so grown up? I feel like I already have a teenager on my hands. I was a little lazy this time and got a DQ ice cream cake, but the birthday girl was happy. Especially since they decorated it with horses. 

And this little gal passed 16 months:

And still not walking. Stubborn little stinker.

But you must notice those adorable little moccasins. A little LA shopping find. And that sweet little dress and tights, a gift from our San Diego friends who have a little pipsqueak named Emma. 


Eva and Emma are only about a month apart in age. Not only that, they have the same middle name (Grace), and the same initials (E.G.C.). They are destined to be friends. (Thanks for the cute gifts, C&K!)

We were glad to have a catch-up day today before the girls head back to school in the morning. You know, the usual laundry, unpacking, cleaning out the car. (Does anyone else's car look like an absolute pig sty after a trip?) I also worked on this little project:

We bought a big, inexpensive bag of sea shells in Newport Beach, and we split them up into these little bags for the girls to give to their classmates at school. I printed and stamped some simple bag toppers to go with them. These old-as-the-hills retired stamps and Stampin' Up! warehouse sale products do come in handy once in a while and serve a greater purpose than filling up my cupboards!

This post has gotten long, and still no deets about our trip. I promise to make you suffer through at least one more vacation post soon. :)


In memory of Clarence E. Benjamin

There is an air of melancholy over our days this week. Yesterday my last surviving grandparent, Clarence Benjamin, passed away. Yet, when we have hope and assurance of a better life after death, we can't help but feel relief and peace mixed with our sorrow. He lived to a ripe age of 92.

Grandpa and his first son

Grandpa was a farmer, rancher, and business man who loved what he did. Better than that he was a father, grandfather, and great-grandfather with a ready hug. Even having 9 kids of his own didn't sour his taste toward children and he always made time to appreciate us.

Grandpa and I (at about age 2)

Grandpa and EvaGrandpa and Sarah at his 90th birthday

My childhood memories of him have unfortunately faded with my poor memory, but I do well remember the summer my Grandma died. I had moved home that summer to plan my wedding and was there at the hospital the day she failed to make it through heart surgery. I remember his stun and grief. That summer he was longing for companionship and wandered around to quite a few conventions and various places. I traveled with him several times. He would always get a short ways down the road and turn the keys of his Cadillac over to me. 

One of my favorite photos of Grandpa and Grandma

He was there for my wedding later that summer, even though I could tell it was a hard day for him. We got married in the same room Grandma's funeral was held in earlier that summer.

Tom's Grandma Elva Clark, Grandpa, Me, Tom, and my Grandma and Grandpa Stephens

And now we find ourselves living in the house he and Grandma built together, and working on the farm he originally purchased and established. To say I am thankful for his legacy is an understatement.

By chance, we happened to be in town (where Grandpa lived in his care home) for a conference this past weekend. Grandpa had broken his hip the day before and was in the hospital. Since he definitely wasn't strong enough for general aesthesia, the doctors were hoping they would be able to put a pin in his hip using local anesthetic. However, under the heavy influence of pain medicine he declined quickly. He was very drowsy, wasn't keeping his oxygen up, and wasn't waking up even to eat and drink. By some miracle, when we walked into his hospital room to see him his eyes popped open and we were able to enjoy quite a few minutes with him. He acknowledged our presence and even said a few words. We joked a little about how we needed to go to these conferences to learn how to farm—yet he could have taught the classes we were attending. He spent our visiting time gripping my hand tightly. After a bit Tom snuck out to buy him an ice cream cone at McDonald's—his favorite—and we watched my Aunt Joann feed him what turned out to be his last treat. It was a blessing to be there and a memory I will always cherish. He died 2 days later.

We will honoring him at a funeral service on Saturday, and I am helping with those preparations and expecting a houseful of guests this weekend. As such, I will likely be silent on the blog this week. Thank you all for your support.

don't try this at home

Earlier I showed you this photo of our yard plans:

One of my favorite features we planned was a rock staircase. When we went out to the field to scout for rocks, Tom kept pointing out smallish flat rocks about 12-15" wide. I had in mind something a little bit bigger. So we had some trouble agreeing on what rocks to pick up. 

Then we involved my dad, who happened to know just the rock pile to go to. I was pleasantly surprised—actually over the moon—when they hauled the first rock into our yard.

These big flat round rocks aren't exactly prevalent on our farm. We have plenty of big round rocks, mind you, but these we had to hunt for. 

Here is the staircase after all the rocks were set:

Doesn't it rock? Here it is from the top looking down:

After we placed the big rocks, I packed in dirt and smaller rocks around them. My intent is to plant ground cover flowers for a rock garden of sorts. 

And here is the view from the bottom:

I know it is hard to tell from the photos, but those top 2 rocks are gigantic. (I should have put my kids in the photo for scale—and don't you just love the farm equipment in the background? Part of the deal around here.) Hauling those rocks in from the field was no small feat, and placing them was even more difficult. What I'm trying to say is, DON'T TRY THIS AT HOME! Unless you have lots of experience with big equipment.

This video shows the process of placing the second to last rock to give you an idea of what it took. (The last rock was even bigger and more challenging!) And by the way, sorry about the video quality. I used my new Canon, but clearly I need to study up on how to take good videos. Between the shaky and choppy filming, wind noise, and nervous wife commentary, it might be a little rough to watch.)

Any guesses on how much this would cost someone to have a landscaping company do this? To source the rocks, haul them, and place them? I'm guessing thousands of dollars. Needless to say, I feel very blessed to have this cool feature in my yard. What do you think?

Pssst. There is a great little giveaway today on one of my favorite blogs, From this Front Porch. Check it out to win some super moisturizing handmade goat's milk soap!

Missoni

Who needs Missoni when you can have authentic 60's chevron goodness? Just sayin'.


I inherited these afghans with the house. I liked them enough not to get rid of them, but not enough to display them. Now I might have to reconsider. 

Sarah is 6!

This past weekend we celebrated the 6th birthday of our little Sarah! (I hope she doesn't mind if I call her little. Actually, I'm pretty sure she would mind, but I refuse to stop.) 

~

We love you so much, Sarah, for your boundless energy, funny quips, and creativity. You know how to push your bounderies and your parent's buttons, but we wouldn't trade your spunk for anything. You have enough personality for SIX kids!

6 things that made your birthday memorable:

1) You didn't share it with your sister (who's birthday is in 2 weeks) for a change. This time it was ALL about Sarah.

2) We had a birthday breakfast of pancakes at Amma's house before our morning of soccer games.

3) Birthday gifts were simple this year because the big gift is a trip to California and Disneyland this month. You got spending money!

4) You got to spend the evening on a "date" all by yourself with Grandpa and Grandma. I'm pretty sure they spoiled you rotton.

5) You wanted a princess cake so Mommy attempted a castle. (I'm pretty sure your sister wants a DQ ice cream cake, don't you think?) You look so beautiful and grown up.

6. Your friends brought a piñata to share and it was full of candy that you stuffed your faces with the rest of the day!

Happy Birthday, Sarah! We hope it was special for you.

~

Unfortunately, Sarah also got the flu for her birthday and had to stay home from school today. We are bracing ourselves for the worst and expecting it to run its course through our family this week. Today the guys started hauling grain, so instead of working in the yard I am tending to my little sickie and also tending to my neglected house. This yard project was all-consuming last week. Hopefully we will be able to get back at it and finish it before cold and snow beat us to it—updates coming soon!


landscaping project

When I get started on a project I have a hard time stopping to blog about it. And especially when I have the guy's dedicated time to the project, I must take full advantage of it and work work work.

We are waiting for cooler weather and much needed rain to begin our fall seeding. Many farmers in our area seeded anyway, but the ground is dry and hard and it doesn't hurt to wait a little longer for better conditions to give the seeds a better start. In the meantime, my yard project that had been stalled has been started again—full steam ahead. Let's see if I can give you an idea of what we are working on:

Earlier this summer I dug trenches and installed edging along the hillsides in our lower yard. We are bringing in some large rocks and plants, then we will lay weed fabric over this area and landscape gravel over the top.

My poor lilacs (that had to be mowed to the ground this year) grew back with a vengeance but now are in sore need of water and weeding.

These are some of the big rocks waiting to be placed. We drug these in from the many rock piles around the farm (rocks that at one point or another were drug out of the fields!)

The other side of the yard gets the same treatment: large rocks and plants, weed fabric, and gravel. We also have a large, overgrown juniper and some other small (dead) plants to remove along the house.

Back to the east side of the yard: Earlier this year we dug the old plants out of the cement terraced planters. Now we are bringing in some manure from our corral area to richen the soil. Then we are planting a few perennials and bulbs. 

Next to the beds is the big daddy project of them all—a rock staircase. I am giddy about this! It is looking so very cool. More details soon.

And finally, this poor little bird bath needs a new home. The landfill, maybe? But it reminds me of my Grandma and so it might just find its way to another corner of the yard for nostalgia sake . . . and for the birds' sake. And to entice the birds away from my railing (and quit covering it with their little white gifts).

Updates on our progress coming! For now I must go get to work.

removing wallpaper

As you know, to put up my new wall unit, I needed to remove the wallpaper on that wall first. This was an intimidating task, but in the end it wasn't nearly as hard as I thought it would be. 

Now I am by no means an expert after removing one wall, but since I have a lot more to remove, I knew I would need to come up with a system that worked. I didn't have time to run to town after chemical or a steamer, and I had heard the steaming method was ineffective anyway. So after a bit of Googling I found the magic ingredient: liquid fabric softener.

I was worried about the paper in the living room because it was the paper-backed type. (The rest of the house is fabric-backed and peels right off in one peice, however, it leaves a residue of glue that will need to be scrubbed.) Removing this type turned out to be a simple process.


First, I peeled the top layer off, leaving the paper backing on the wall. If I was careful, I could do this in one big piece. You can leave the top layer, but it is usually not porous and you would need to score it using a special scoring tool to allow the water or chemical solution to soak through it to the paper backing. From what I read, scoring can leave marks in your drywall which is of course not desirable.

Next, I made my solution of hot water and liquid fabric softener. I used about 1 part softener to 3 parts water. I didn't experiment at all with the mixture because this seemed to work fine. You might be able to use just water—I don't know—but I think it helps to use the hottest water possible. I made the solution in small batches so I could keep the water hot.

Spraying the wall turned out to be the most tedious part. You want to soak it really well, so having a garden sprayer or something similar would make this job go faster. I also sprayed one panel ahead of where I was working so it could soak for about 5 minutes before I peeled. Any less and the solution didn't soak through the paper enough. Any more and it would start to dry out. 

With a scraper, I started from the top and carefully peeled the paper away from the wall, working in 6-8" strips down to the bottom. 

Where you might run into trouble:

1) If the wall wasn't primed and painted well before, prepare to have a giant-sized portion of patience. It won't come off easily and you will likely damage the drywall with your scraper. Fortunately for me, this was only a problem where the old heat registers were removed. 

2) In areas where seam repair adhesive was removed, extra scraping was necessary and a sticky residue was left behind that I had to sand to smooth out.

The end result, while satisfying, unfortunately was no where ready to paint. For some reason the paint was cracked where the seams were. In addition I had nail pops, nail holes, and a few gouges to repair—plenty of evidence that this was an old wall. I can see why it was tempting to cover it with wallpaper.

After scraping, spackling, sanding, and wiping the wall, I primed and painted and ended up with the slightly imperfect but satisfying result:

(Try to overlook the missing outlet cover and baseboards.)

So I hope this encourages someone to tackle your own wall paper removal job, and I'll keep you updated on mine!

new wall unit styled

I did a little shopping around my house to give my new wall unit a little style.


I don't really think accessories are my strong suit. One of my favorite parts of my old job was photo styling—especially rooms—but for some reason I struggle with styling my own house. But I'm trying to channel that old photo-styling mind set while also trying to keep the decorating meaningful. I don't like to just have a lot of "stuff" lying around. This time I'm happy with the end result. What do you think?

Here is a closer look at what I found lying around my house:

My Grandma's old Polaroid camera that I found tucked away in a closet. I actually checked these out on eBay to see what it was worth. Turns out everyone had one and they aren't worth 10 bucks. Oh well, it looks cool and it reminds me of my Grandma and her penchant for photography.

A desconstructed typewriter print that I purchased from 20 x 200. Tom doesn't get it but I find it fascinating and love the graphic look of it. Plus it goes awesome next to the vintage typewriter I bought from our family auction.

Some old photographs of my Grandpa and Grandma that were tucked away in the bookshelf we removed. I displayed the photo book I made of Tom's Grandma Elva. If I ever get around to making more photo books like I would like to, this is a great place to display them and entice people to pick them up and look at them. Don't you think?

My dad bought a bookshelf full of Reader's Digest books in our family auction. He didn't have a place in mind for them—he just liked them—so they have been boxed up in our storage room until now. The patterns on the covers are really fun, so I decided to display a few purely for cosmetic reasons.

My random chair collection has always felt a bit disjointed before, but I actually really like them all displayed here together. 

My little Target acrylic lamp was an impulse buy but has always been a bit of an orphan. I never had the perfect place for it. I like how it ties into the glass hourglasses here.

Finally, a stack of Pottery Barn design books needed a home. I removed all the dust jackets for a unified look. 

The whole living room feels much more put together now, even though there are many more projects to do. 

This wall is next:

I had a console table there before:

Removing the console table (I'm hoping to unload it on Craig's List for a few bucks) allowed me to open up the furniture layout in the room, which was great. It does leave a large blank wall, however, and it feels a little empty after getting used to having furniture there. 

I have other plans for the photo hanging on this wall. Not that I don't love it. I would love it anywhere. But I have a place better suited for it. On this wall I plan to hang my gallery wall of family photos. I may purchase more frames to fill this wall even more. I'm hoping just the weight of the frames will balance out this room without actually having furniture against this wall.

Now to strip more wallpaper. (It isn't as intimidating now that I've done one wall!) And of course paint. But I don't want to go to crazy painting more walls until we are able to scrape the popcorn off of the ceiling, texture it, and paint it. I'm not quite sure when that will happen, so don't expect any photos of this project too soon. 

After the room is painted we will replace all of the baseboards to match our basement (most of them are missing anyway where the heat registers were removed), replace the sconces (not my style!), and change the window treatments. The flooring will be replaced eventually also.

And . . . whoa. I'll stop there before I get ahead of myself. At least I have one wall going in the right direction! 

new wall unit

Hello. My name is Joellyn and I'm addicted to Craig's List.

I wasn't actually looking for a wall unit. This wall unit was looking for me. I saw the ad as I was browsing one day and noted that it looked cool—I even showed it to my mom—then moved on. 

photo from Craig's List adAbout a week later I found myself thinking about that wall unit again. For some reason it occurred to me that my dream of having built-in bookshelves along the back wall of my living room wasn't likely to happen for a very long time. So why not buy something that would stand in (and look ever so cool) in the meantime?

This is what the back wall of my living room looked like before:

The bookcase that is sitting there was removed from the other wall and was just sitting there for lack of a better place to put it (it is heavy, man!) but it is obviously wrong for the space. 

It had been at least a week since I had first seen the ad, so I was thrilled to find it still listed. It took several more days to finally get into town to check it out. She had listed it for $100, but she took my offer for $80. This is why I love Craig's List in Great Falls. In any big metropolitan area this unit would have been snatched up within hours, and would have pulled MUCH more than $80, I'm sure.

This might not be everyone's thing, but it is so very mid-century (1960s) and perfect for this house. And if we do build those bookcases someday, I can resell this unit for a profit. Just look up "Danish wall unit" online and you will see several very similar looking wall units for more than two or three thousand dollars. It's all about finding the right market, baby.

This is what it looks like in my house:

Since it is partially covered by my couch, here is another view:

The book stand unit on the right will be mounted on the rails as well, but I was missing a bracket that I have to pick up from the seller today. And after a good polish, I will of course style this baby and post more photos for you.

It is in excellent condition for its age and is all solid wood. I love how the color warms things up and lightens up the dark leather furniture I have. 

Oh, and did you notice one more thing?

I stripped the wallpaper off that wall and painted. (More on that later). I just couldn't bear to put this up over that old wallpaper so buckled down and got the job done. One wall down, 240 to go. Ha.

The unit is marked with the manufacturer's logo, "Kopenhavn". A little research revealed that this is not actually Danish, but is Danish inspired. Kopenhavn was a line trademarked by the Northern Chair Co. (based in Tacoma during the early 1900s), and this particular "wall planner group" was designed by Noral Olson. I looked for his name in other places and just found someone who designed miniature furniture. Same guy? I'm not sure. The Kopenhavn line seems to be somewhat rare. If you know more, do tell! Here is the coolest thing I found during my research—an ad from a furniture store in an old newspaper clipping:

I love peices that have a history, and it was fun to see the other units offered as part of the line. And the prices: $319 for that first living room set!

Tell me what you think of my find! I'll be back with more after I do some decoratin'. Bye for now!

Feng Shui Friday—wash your windows

Hello and hurray! It's Friday! (Fridays are the one day I don't have to go anywhere these days—except to and from the bus stop, so I LOVE them.) I think it is time for a new Feng Shui Challenge, don't you? Don't worry, this one is highly practical and fairly obvious: Wash your Windows (#18 in the book 27 Things to Feng Shui Your Home)

Dirty windows stop your vision from seeing the view beyond. It's not hard to relate this in a figurative sense. Cloudy vision keeps you from looking beyond yourself into the world around you. Likewise, dirty windows keep the sun from shining into your home, thus blocking the energy/chi that flows into your home. 

When we built our home in Utah, we moved in next door to a professional window washer. Yes, Dave actually washed windows for a living and he was very good at it. Since he offered to wash our windows in exchange for dinner and a movie out (double date), we took him up on it—multiple times. In fact, I'm pretty sure I never once washed my own windows during the 5 years we lived there. They just didn't get dirty very often in the city.

Now on the farm, dirty windows are hard to ignore.

Between pets' noses, baby's sticky hands, and the dust and grit that is ever present on the farm, my windows do not stay clean for long. And so, I have had to learn to do this job which, I'm afraid, isn't my favorite. I've had to come up with a system that works for me.

These are my tools:

A bucket of hot, soapy water: I use Dawn dish soap. And the hottest water possible. Wash the inside windows first (less dirty) and then the outside. My outside windows are always covered in spider webs in the corners, so my water gets pretty gross by the time I'm finished. 

A good scrubber: Mine comes off the handle and I can toss it in the wash. 

A good squeegee: Squeegee quality and technique is everything, I'm telling you. Neighbor Dave could work the squeegee like I've never seen—so fast and no streaks. He could do our entire house, inside and out, in about an hour. It takes me about an hour to do just my main living areas. (The bedrooms don't get done very often!) 

A long handle: I prefer not to use the handle for better control, but outside there are just places I can't reach without it.

A micro fiber cloth: I use this to wipe the excess water from the sills and clean the window frames if needed. 

Rubber gloves: Fold the edges back into a cuff to catch the drips.

Newspaper and Windex: Follow up with this for a streak-free shine. If you care about that. My windows are old and imperfect anyway, so I embrace the streaks and do the best job I can do with the squeegee. They'll get dirty again anyway, right?

Ah, much better. I love having clean windows. Though now you can see all the chipped paint on the deck, the sad railing, the half-done landscaping job, the weeds, and the dry dry grass that hasn't seen a lick of rain lately and hasn't been watered either. And this door leaks like a sieve (despite the extra weather stripping we've added and our pets have proceeded to chew up) and needs replaced badly.

Gotta go. I have too much work to do!

Eva–15 months old

Wow, time is a-flyin'. In my typical baby book blog fashion, here are a few things I don't want to forget.

Eva at 15 months:

She has 2 more teeth, bringing the count to 6. And she loves to use those chompers to eat corn on the cob! In fact, if she doesn't get to try everything on the table that every else has, she makes her displeasure known. (Fortunately, she doesn't seem to be a hard teether. Yeah, she gets a little fussy and irritiable, but it doesn't last forever. And she is still sleeping like a champ. Putting her to bed and letting her sooth herself—even if it means crying it out for a bit—makes all the difference.)

Oh boy, is she in love with her Daddy. Now that harvest is over she gets to enjoy more quality time with him and their bond is growing stronger and stronger.

And she is walking . . . on her knees. (Not her feet). I know! That should be harder, right? Silly goose. I'm pretty sure she is close to getting it. At least she lets us walk her around holding her hands now.

She loves to give out kisses. Usually a sweet little peck, but sometimes it comes out more as a slobbery lick.

She is fond of her sisters, too. Especially Abby. And Abby is a great little helper. Eva is blowing a kiss in this picture. So cute!

Time flies and these kids won't stop growing! I have a few birthdays sneaking up on me in less than a month (Sarah, Tom, and Abby). Yikes! Must. Get. Busy.

camera accessories

As everyone knows who starts down the road of improving their photography skills, it leads to a dangerous roller coaster of spending. First you want a new lens, then another. And then you upgrade your camera, and pretty soon you have a huge new list of must-haves. That has definitely been my experience. 

Oh, but I am so enjoying my new camera already (the Canon 60D). Here are the first 3 shots I snapped:

Snap.

Snap.


Snap. Straight out of the camera—not bad. Nothing remarkable, yes, but I can already tell my new camera is so much more light sensitive. I love it.

All my old lenses still worked, of course, as did my memory cards. But since it has video, I did purchase a bigger card. And I had to purchase a new spare battery. And I bought a new flash and filter for it. It doesn't end there.

My new camera is bigger than the old one (here is a {bad iPhone shot} of the old Rebel and new camera side by side so you can see the size difference) and the lens that came with it is larger than my old one as well. (18-135 as opposed to 18-55mm.)

The trouble is, now with the bigger camera and new flash, I am having trouble fitting everything into my cute little backpack I've always used. I love the size of it—so easy to take with me everywhere. 


My mom would happily trade me for her larger basic black Canon bag, which would hold everything much more easily and save me from dropping another couple $100 on a tempting but highly impractical chic leather bag. (Ha.) 

On the other hand, I'm wondering if I would regret letting go of my small bag. So, shutterbugs, is it better to have a bigger bag so you can carry all your equipment with you, or leave a lens or two at home and travel lightly? Please advise.


I'm pretty sure I should also be in the market for a new camera strap. I mean, it would be way cheaper than buying a new bag, right? And it would distinguish my camera from the millions of other black Canons floating around in the world. Here are few on Etsy.com that caught my eye:

maddlebee123, $23.50PorteenGear, $45.00 (Ouch, but beautiful)
Couch, $21.95sizzlestrapz, $49.99What do you think? Which would you choose? Maybe I should make my own... hmm? I love the richness of the leather straps, but I'm also digging the first one with the lens cap pocket. What a great idea. Happy Friday!

Labor Day Getaway

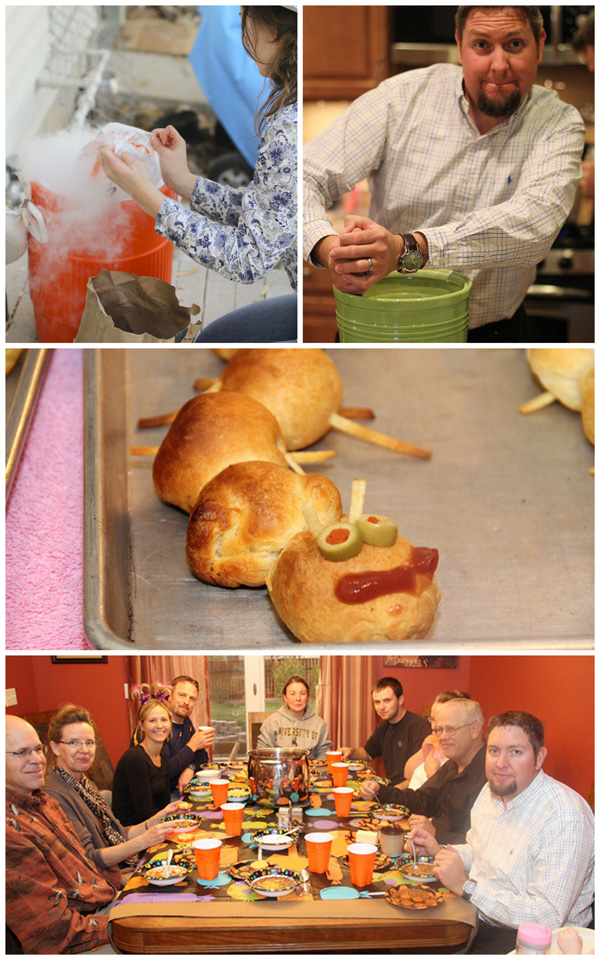
Last week we raced the clock as we tried desperately to finish harvest before the long weekend began—then a few weather delays and things weren't looking so good. Friday night we finally finished with a HUGE sigh of relief and a rib dinner to celebrate.

Weary but happy. It was a bit hard to switch gears and figure out what we wanted to do for the weekend, but we knew we wanted to pack our trailer and get out of dodge.

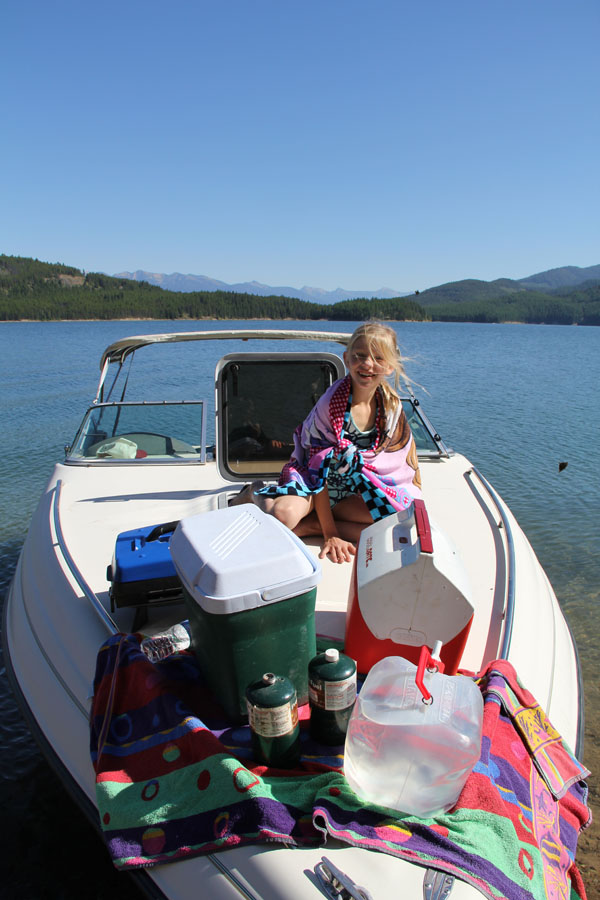
We decided to venture to the west side of the state this time to Hungry Horse. Its a beautiful drive through the south end of Glacier Park to get there and only a bit more than 3 hours from us. The 34-mile long reservoir, situated in tree-covered Forest Service land, greeted us with crystal clear waters and a cloudless day. Mmm, gorgeous.

The normally busy west side of the lake was closed for road construction, so we boated to a deserted campground there and unpacked for lunch. But, the deserted campground made us much more nervous about bears wandering in and finding the smell of our grilling burgers delectable. We all made fools of ourselves watching warily as we chewed our burgers and then packing in a rush to get back on the boat. Nature amateurs. Psh. 

Adding to our anxiety was this deer that circled our picnic table while we ate. 

Normally we wouldn't find a deer to be scary, but this one was just a bit too curious. We were afraid (since it obviously wasn't afraid) that a young buck like this could be aggressive. And what is up with that odd growth on his neck?

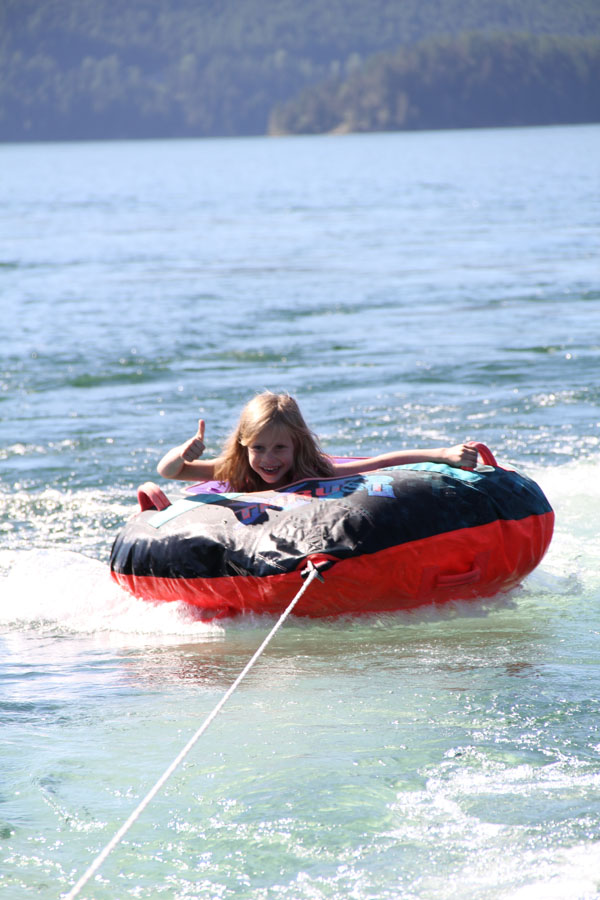
Safely back on the boat, the girls tried out the tube. The adults were too chicken to get in the cold water but the girls had a blast. Sarah (doing the "faster" sign) is our little daredevil.

Take us over the BIG waves, Grandpa!

Whoa. There they go.


Eva enjoyed the cuddy cabin with Grandma. 

Hungry Horse is the land of the Huckleberries, and we partook (for a price since the growing season for Huckleberries wasn't ideal this year.)

Hungry Horse is also just a few miles from the west entrance to Glacier Park. We decided to spend Labor Day there, along with the rest of the state's touring population. Labor Day is the last day of the year to go over the Going to the Sun Highway before they close for winter.

I've often told my Utah friends that they should visit us on their way to see Glacier Park. It is something everyone should see in their lifetime. Here is a little taste why:

Avalanche creek, where we stopped to eat lunch.

One of many glacial waterfalls as we climbed Going to the Sun Highway.

See that little ribbon of highway next to the creek in the photo of above? That is where we started. 

And that is where we are headed—to the top of Logan Pass. (It was a little hazy.)

The road is literally carved into the mountain side. Driving it is not for the faint of heart, or those afraid of heights.


The reward at the top and views along the way are worth it.


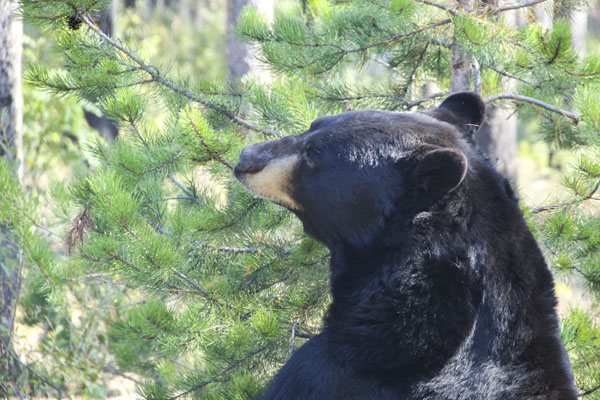
We did get to see a couple of black bears, too . . .

 . . . behind an electric fence and from the safety of our car. We (ahem) may have paid a little money to see them, too. Not quite as thrilling as seeing them in the wild. I have, on previous trips, seen Grizzly Bears on top of Logan Pass.

Down the other side we decided we would try to attempt a hike to Virginia Falls. However, the more than 2 mile hike (one way) proved a bit much for this baby toting bunch, and we opted to stop at the closer Baring Falls instead and called it a day.

A makeshift sling helped a whole lot. (I must make myself one of these! I should have done it a year ago.)


Mom bought everyone Glacier Park tees and hats. (Aw, aren't they cute?)


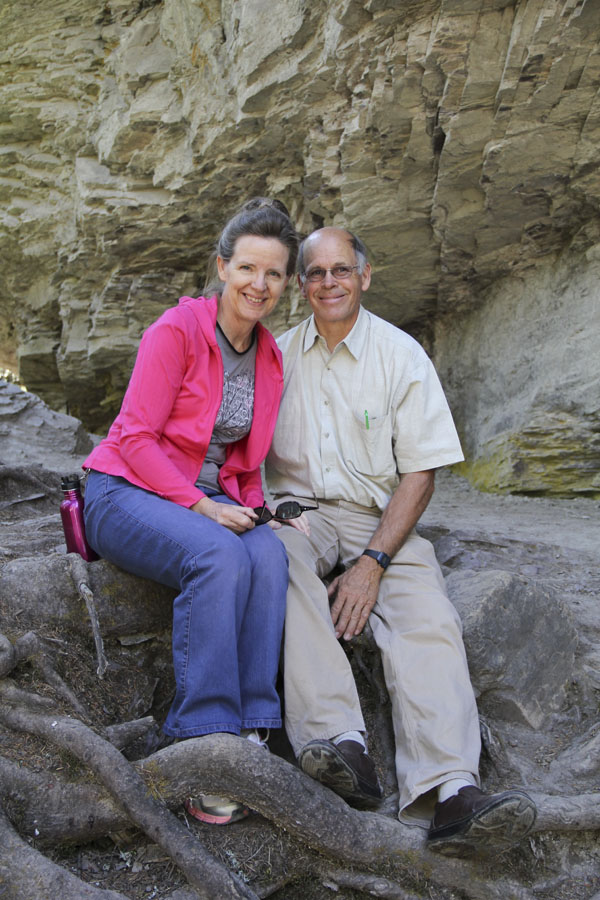
And of course we took advantage of the plentiful photo ops.


One last stop for a photo of Lake MacDonald, the largest of many lakes in the park.

So now, I hope you are adequately tempted to take a trip of your own (and stop by to see us along the way!)

So, even though it was long, we were blessed to have a great harvest this year, and even more blessed to cap off the summer with a memorable trip. Thanks for letting me share, and I hope you had a great weekend too!


Feng Shui Friday—organize your . . . refrigerator?

Have you ever thought of adding a little Feng Shui to your refrigerator? I have. And so has my favorite organization guru Benita Larsson, as evidenced by her Pinterest boards. She has pinned the following images:

Source: Shine Yahoo!

Source: cleanandscentsibleSource: bhg.comSource: goodbyehousehellohome


I haven't taken things quite this far, but I have attempted to group dairy on one shelf, leftovers on one shelf, condiments in the door, etc. I definitely haven't gone so far as to label everything. Maybe if I did my family would start following my system. Hmm?

I was teasing my mom the other night when I was searching for some salad dressing and jam for dinner and ended up throwing away half of the (expired) jars in her door. I well remember my Grandma (her mom) having two very packed refrigerators full of leftovers packed in old cool whip and butter containers. Unfortunately, if I let my refrigerator get too full I end up growing science experiments and throwing it out anyway. I have to be able to see everything or it won't get used. I'm fortunate also to have an extra refrigerator down the hall to make this possible. 

Anyway, here is my own little refrigerator tip:

Every day during the summer we make lunches for Tom to take out to the field. I got tired of going through the daily routine of grabbing the mayo and mustard from the door, the meat and cheese from the drawer, the lettuce from the other drawer, and so on. I decided to make this little sandwich tray that holds all the necessary fixin's:

I just grab it along with the loaf of bread and go to town. Its a simple thing but it really makes the job easier! The tray is just an upside down pan lid. Next summer I am going to take this a step further and make a basket with preportioned carrots, fruit, and cookies. 

My girls eat mostly hot lunch, but if you pack a lot of school lunches, this could make your life so much easier. Happy Feng Shui Friday!

Update

Since I've been a little neglectful with my posts lately, here is my typical brain dump update:

We have 100 acres left to harvest, so with any luck we will FINALLY finish today. It has seemed to really drag out this year for some reason (we started late, planted a ton of acres, had a couple of weather delays, and lots of broken down equipment, for starters). The girls have a 4 day weekend that we are really hoping to take advantage of. The camper is pulled out front and if I can muster up the energy to start packing it up we will go find a place to camp for the weekend.

I've taken very few photos this harvest for some reason, but I do have a few and I'll try to post a harvest recap soon.

Speaking of photos, I happily spent my eBay profits and bought my new camera (the Canon 60D) and flash and it came in the mail yesterday! I have charged the battery but haven't even turned it on yet. I'm hoping to dive into it this weekend and learn how to use it. The controls are slightly different than my old one, and I have no experience using an external flash. I'm really hoping this new camera renews my motivation to shoot more (and thus have more material to share here!)

I also bought my new vacuum with my leftover camera money, the Dyson Animal DC28. I spent all day Monday in the combine and heard over and over on the radio about a promotion Sam's Club was running starting on Wednesday. Their deals included $150 off a Dyson vacuum. Wednesday morning I called them to make sure they had them in stock since they didn't show on their website—they had only one!!! What kind of store runs a promotion on something they only have one of? (Rant.) I asked them to hold it for me, but they wouldn't do it. So I made a special trip to town and two hours later I pulled into Sam's Club and made a beeline for the vacuums, pulling the one and only box onto my cart. Literally seconds later, a woman came up behind me looking for the same vacuum. I apologized and said I grabbed the last one, and she said, "No problem, they'll have more!" I didn't have the heart to tell her they didn't in fact have any more and they wouldn't be getting any more in. Stupid. But nevertheless I was happy I'd made it just in time and enjoyed my $150 discount. I've taken it out of the box and tried it out. Its a heavy sucker (pun intended)—heavier than my old Dyson—but it really does suck (literally). I should have the cleanest house on the block in no time. Ha. (That was a long story about a vacuum, wasn't it? I told you this would be a brain dump.)

The girls really enjoyed their first two weeks of school. I really love witnessing their independence as they make new friends and settle into their own routines. They have also started soccer practice twice a week and I've started piling the miles on the "ranch limo" again, running back and forth to fetch them. Soon there will be piano lessons too. It keeps us moms hopping, doesn't it? As much as those extracurricular activities add busyness to our lives, I also believe it is critical to the success and confidence of our kids to give them opportunities to develop skills and accomplishments of their own. Those extracurricular experiences really shaped me as a child. I'm going to try to remember that instead of focusing on how much extra work it adds for me. 

House projects have really stalled out this summer since farm work (and supplying the farmers) has required all our time. I'm hoping to get back in the swing of things soon so I have more material to blog about finally! First on the list is finishing up some yard projects. My curb appeal is sorely lacking lately. I'll be sure to keep you informed of our progress (in between seeding and spraying and other fall farm work). 

I'll be back shortly with a Feng Shui Friday post, and I hope you all have a fabulous weekend!

they don't make things like they used to

Before school started the older girls spent a week with their grandparents in Bozeman. To get them back we met them part way in between at the lake. The kids had been there for the weekend, but we only had a couple of hours to try out Papa's new boat.

This thing is a classic from the 1960's. He got it for $900 as part of payment for a job he did. I guess they say you get what you pay for, but its a pretty sweet relic. You know when you see a classic and it just makes you feel like it was built to last?


The dash is all retro but functional—even the depth finder, which goes "click, clickety, click" as it runs.

And here is the driver, enjoying the ride on the back of the boat:

Wait. Did I just say he was driving from the back of the boat? Oh yeah. Did I mention the motor doesn't work? It can be fixed. I'm sure of it. But for now we had to enjoy the ride with the trolling motor. No big deal. Just sit back, relax, and put your feet in the water.

Eva even enjoyed the ride.

The kids tried out the tube. It looks like they are all about to fall off!

But I'm pretty sure we were going less than 5 mph.

So, bad motors aside, have any of you enjoyed any relics lately and appreciated how they used to make things? I think its awesome when older things are well maintained and appreciated for what they are instead of discarded.