the swing set

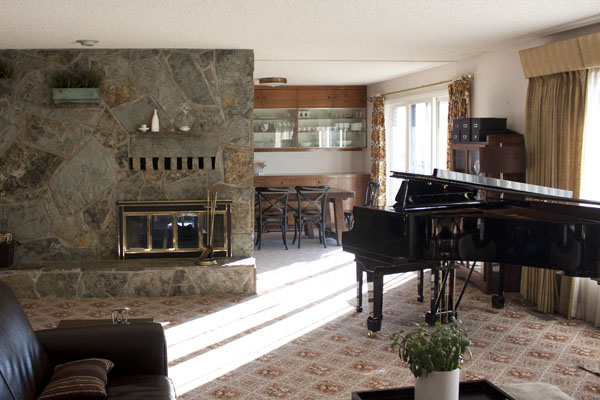
Hello dear blog readers! I have missed you. It has been a whirlwind of a week since I last posted. We were away for the weekend gathering food for our souls, and now we are back with unpacking to do, a house to clean, and a pile of laundry, and thus the cycle begins all over again. We have a family reunion coming up so the trailer won't stay parked away for long.

By the way, it has been so fun running into some of you the past few weeks and hearing things like "You've inspired me to Feng Shui my closet" or "When are you going to post pictures of that swing set already?" It is gratifying to know that so many read this blog and it makes me feel so connected, even on this isolated farm of ours. I could go for days and days without ever wanting to leave this house, but I doubt I would feel the same way without the computer to connect me a little to all of you.

So... the swing set. The title of this post should actually say "THE SWING SET!!!!!!!" because that is how excited we are about it. This thing is awesome and the girls have spent hours (yes, hours) every day on it. In fact as I write this post they are outside with swimsuits and a sprinkler enjoying their "water" slide. It has been worth every penny spent (since we no longer live down the street from the park)!

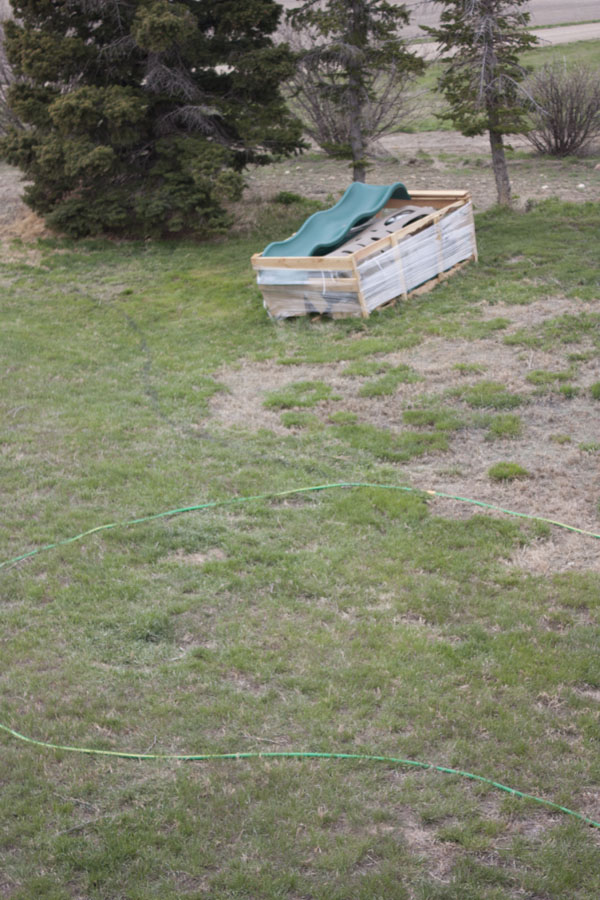
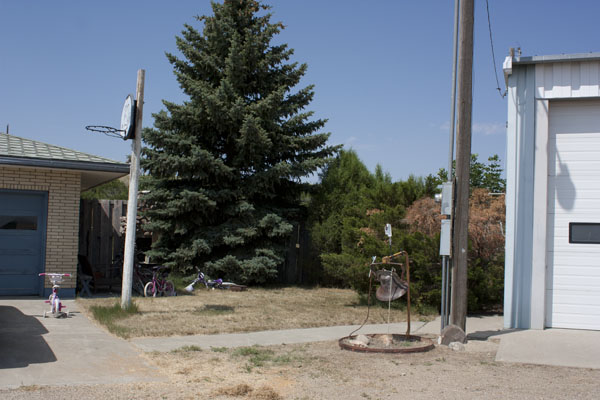
We first dug out the area for the swing set, and then set it up on the dirt.

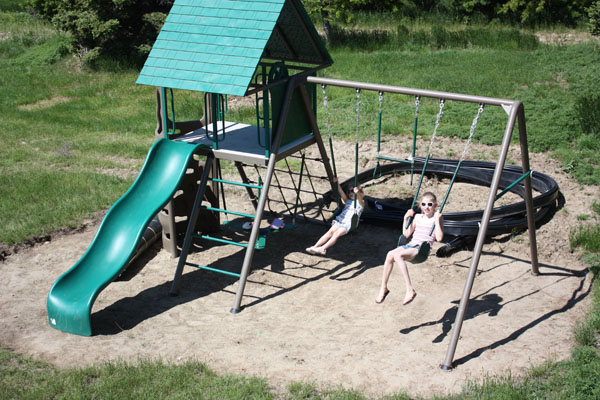
The girls didn't waste any time trying it out that way, but we were anxious to finish the area and make it a bit safer.

If you are interested, the swing set is by Lifetime, and we purchased it from Costco online. It was a bit more expensive than some of the wood sets they often display, but in my mind a few hundred dollars was worth not having to ever worry about re-staining it or getting slivers. I am impressed with the quality of this set and it has great reviews.


From Costco (which was already a couple hundred dollars cheaper than elsewhere) we got the additional rope ladder, bucket swing (for the baby), and a little picnic table included for free.

And here it is with the edging and rubber mulch:

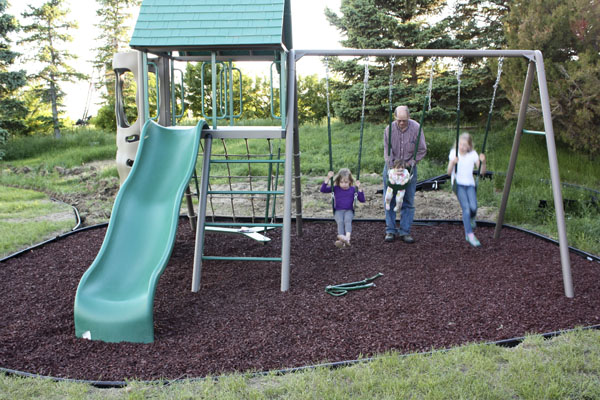
A huge huge thanks to my Uncle Lloyd and cousins Corey, Taylor, and Carson for helping install the edging and weed fabric. They made a big job go so much faster. (And of course a huge thanks to Rob and Brian, a.k.a. the swing set fairies, for finishing the swing set too!)

Eva absolutely loves to swing.

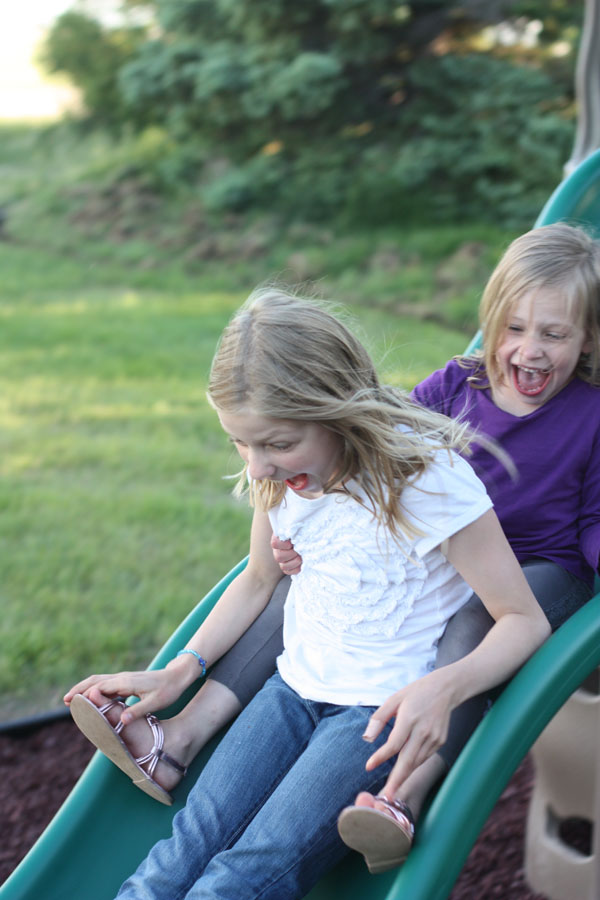
And the expression on their faces says it all.

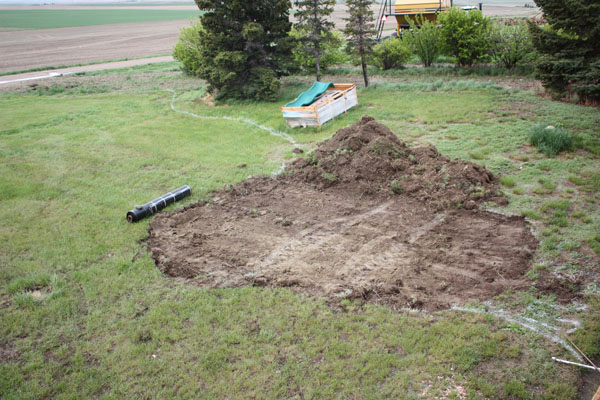
Here is another look from above:

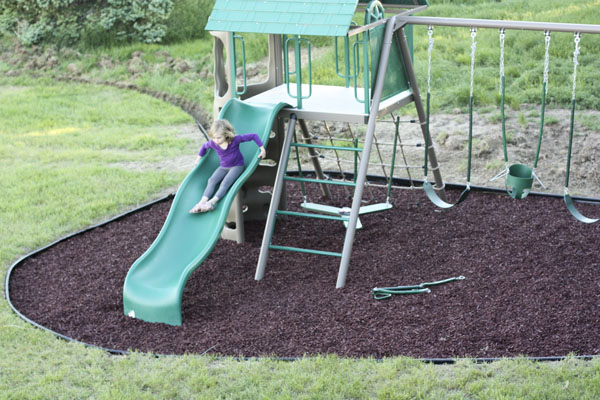
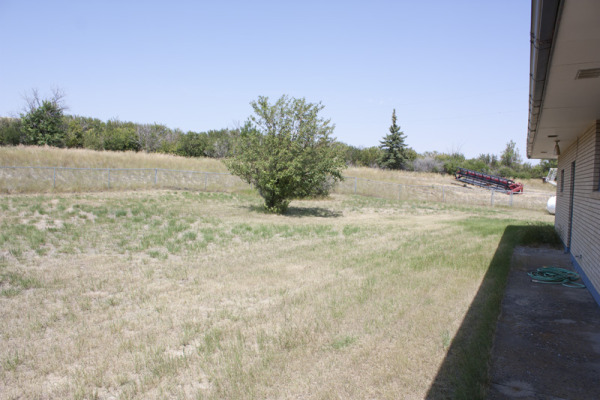
The piece laying on the ground is the trapeze bar that can swap out for the baby bucket swing. You can see the area beyond the swing set where I have started digging and installing more edging. (I have 300 feet to do!) The area behind the swing set will be gravel, rocks, and plantings.

The rubber mulch is awesome. It doesn't attract bugs like cedar mulch will do, won't cause slivers, stays put better, and lasts much longer. It provides a cushier landing for the kids, too. It is more expensive to begin with, but when you consider replacement costs of other kinds of mulch, it would not cost any more in the long run. It took 81 (1.5 cubic feet) bags to fill our area to the desired depth (3-4 inches)! That was 3 trips to Sam's Club, but I go there every week to get groceries anyway so it wasn't a special trip. (It was actually cheaper to buy it by the bag than to buy it in bulk and have it delivered.)

So, I understand that is a lot of to-do about a swing set, but it is bringing my kids a lot of joy right now, so there you have it! I'll keep you posted as we make progress with other yard projects . . .

yard progress

We have been tackling some yard projects in our spare time, and between rain storms. The first area of focus has been the lower front/side yard. It is off the daylight basement, but very visible from our driveway. Here is a photo of what it looked like before we started any work:

This is a layout I drew on floorplanner.com. It's pretty rough, but it gives you an idea of the layout I am planning.

1)  The deck: This drawing shows that it juts out in front, but we have ruled out changing the shape. We were originally planning to redeck it with TREX, but at something over $35/board, we are really intrigued with a new option—a paint product called Restore. Has anyone used it?

2) The concrete planters were totally overgrown. So we completely dug them out. 

We still need to add some better soil and amend what is there, and then I intend to have some fun with planting a variety of bulb flowers and perennials. It is a contained area that shouldn't be too hard to water and weed regularly. 

3) The voles (like a large mouse) attacked our liliacs through the winter and chewed around all the stems, rendering what last year was lush green bushes to lifeless twigs. I couldn't believe the damage the could do in one year. I've heard it is because we had so much snow cover for so long over the winter. We mowed the bushes completely down to the ground this year, in hopes that they will grow back completely. They won't flower for about 3 years now. 


4) On the hillside below the lilacs and also on the other side of the yard, we will be edging and laying gravel to ease mowing. I am going to do some good dry-weather hardy plants and rock landscaping also. I have over 300 feet of edging to install before I can start planting though. Wish me luck.

5) And last but most definitely not least, the swing set. 

We purchased it quite awhile ago (from Costco) and had it delivered, where it sat in a crate in our yard for several weeks.

I marked out the area for the swing set with a hose (and then marking spray paint), and finally on a rainy afternoon Tom had a chance to dig out the sod with the backhoe.

The actual construction of the swing set drug out over a few more weeks, as we only had a chance to work on it for a few minutes here and there. We had it about half done before we left on our trip to Western Montana last weekend. When we returned and woke up the next morning, we discovered that the swing set fairies had paid us a visit while we were away and had finished it up! It wasn't too hard to figure out that the swing set fairies wore boots and Wranglers instead of wings (OK, maybe not Wranglers) and were none other than my cousins Rob and Brian. (Rob is working for us for the summer and Brian just moved in down the road.) They absolutely made our week. The girl's eyes lit up when they saw it and they have clocked a ton of playing hours on it this week.

With some muscle help from my Uncle Lloyd and babysitting help from my Mom, we have been making even more progress with the edging, weed fabric, and rubber mulch. The reveal is coming soon!

In the shadow of the Mission Mountains

On our recent trip to Ronan, Montana, we had to stop and take a photo of the most photographed barn in Montana, nestled in the shadow of the Mission Mountains. Can you see the white-tail deer standing near it?

Now can you?

It was so fun to go back to this part of the state where Tom and I first met 20 years ago. My Mom grew up here and met my Dad here also.

We also enjoyed the scenery as we drove through Glacier Park and along the Flathead Lake. We really live in the most beautiful state, I think. Dare to disagree?


celebrating one

We were away last weekend, so I was only able to sneak off one little post from my phone. But away or not, we couldn't miss at least a simple celebration of Miss Eva's first ever birthday. Who would want to miss an opportunity to watch a little cake smashing?

Not Eva. She enjoyed smearing that chocolate all over her white sweater. Before we got smart and put on a bib.

I'm afraid I can't claim this cute little cupcake cake. But we are planning another little celebration now that we are back home, and of course I won't miss the opportunity to make one this time.

The weekend prior we met up with Tom's parents and watched her open her first birthday gifts. So fun!

I know I say this every month, but we just treasure our baby and could not imagine life without her. She has such a sweet little personality (even if it is a bit hard to uncover when she doesn't know you very well). I love the skeptical stares she gives people as she sizes them up, and then the little grin that follows as she shyly buries her head in my shoulder.

No walking yet, although she crawls like a champ and cruises around furniture on her feet. She loves to climb up to the piano while I am playing and reach the keys. She loves it even more if I'll pick her up and let her play, especially if I play along with a song that has a really good beat. 

No talking yet either, at least nothing discernable, but she babbles like crazy with great inflections in her voice and just loves to tell her sisters off or shush them. (SSSssssss!)

Still only 2 teeth, but I think the top ones are coming soon. (Didn't I say that last month?)

1 year stats:  weight: 22 lb 10 oz (75%)  length: 29.5 in (64%)


upstairs plans—landscaping

Last but not least, I would like to share with your are plans for landscaping the yard. We don't have a very firm plan for timing on this, but we have started on the lower front yard already (more later)!

This is the lower front yard I am referring to. It is lower because the daylight basement opens out onto it.

1. We have purchased a swing set and are slowing working on putting it together in our limited spare time. We are going to edge it and lay rubber mulch under it. 

2. The slopes to each side will be edged and covered with gravel. They are difficult to mow and the grass is unhealthy there anyway. I will plant low water plants there and add some decorative rocks. 

3. The bird bath is going to have to find a new home.

4. Eventually, we want to replant all the grass. It is Kentucky Blue Grass, which eventually grows into clumps when not watered regularly. When we do that (down the road) we may consider irrigation as well. 

5. On the right slope (which you can barely see) there are terraced concrete flower beds that were massively overgrown. We have dug out all the old bushes and plan to amend the soil and start fresh. 

6. The desk needs TLC. We were considering TREX, but at $35+ a board, we may look elsewhere. We have a new idea up our sleeve that I'll cover another time. We also thought about expanding the desk size, but I think we have ruled that idea out also. Once we repair the decking, we need to install a new rail. For now I pretty much have to forbid my kids to play on it.

In the upper front yard, to the left of the front entrance, we have another small area of grass.

7. I would like to tear out this wedge of grass and install a paver patio (and have patio doors installed from the dining area). I also want to built a pergola over the patio. When I say I want to build a pergola I mean I want my dad and husband to build me a pergola. In their spare time. I might be waiting awhile.

To the right of the entry and garage we have another patch of yard between the house and the shop.

Right now you can't see much beyond the overgrown shrubbery. What you can't see is an outdoor fireplace built by my uncle Raymond and a tall wooden fence separating the front from the back yard.

8. Cut back pine tree so you can see fireplace and gate. (Will a pine tree look funny if all the lower branches are pruned off? I don't really want to have to cut this tree down.)

9. Remove the overgrown juniper bushes.

10. Paint the fence.

11. Fix the fireplace??? From what I understand, the chimney is too short to work properly so the smoke all spews out the front. I don't know if it can be fixed, but it would be cool to try someday.

12. Reduce grass and add gravel, concrete pavers, and low water plantings.

13. New adjustable basketball hoop? My girls just can't shoot that high yet.

14. In the back yard its more of the same: reduce grass by adding edging and gravel areas with low water plants. 

15. Prune back the one bush and tree in the yard.

15. Build raised beds for gardening. (It's hard to tell in the bright photo, but there is a chain link fence around the back yard which may help in keeping some garden pests out. (i.e. bunnies, deer)

16. Maybe a sand pit for volleyball? It is a big yard. Why not?


That wraps up the tour of our house projects upstairs and outside. I'm sure we will add more to it as we go, but I think for now we have enough to keep us busy for the next 5 or 20 years.


upstairs plans—bedrooms

Are you overwhelmed with our project list yet? I am. And I'm not finished. Next up, the girls' bedrooms. They are highlighted in yellow:

Since I made this layout we've made a few changes to our plan. When we upgraded to a king bed, we swapped out the guest mattresses and were planning to get rid of the oldest of the queen mattresses we owned. Instead, we decided to keep them all and use one in Eva's room. We moved the other twin bed back in Sarah's room (so she has two beds in her room. Great for sleepovers, right?) Sarah's room below:


1. With two twin beds the flow is a little tight around her closet, so I am considering removing the doors and just putting curtains up. I would dress the two windows with the same curtains. I neglected to catch the window in my photos, but there is a large one on the left, making this such a great light and bright bedroom. (You can see other views from before we moved in here.)

2. The old original blue carpet will go and I want to put in white stained pine floors.

3. We will scrape popcorn off the ceiling, paint, and update the trim.

4. Looking back toward the door you can see the sink. I want to take this out. I'm not really a fan of having water in the bedroom, and I could use this space for a desk later. 

This is Eva's room:

5. Same routine: new flooring (also white pine), new paint, scraped ceiling, and new trim.

6. Must have a new light fixture for this room. The ceiling fan must go. Its low enough to bump your head on.

7. And I NEED to get window treatments sooner rather than later. The morning sun wakes Eva up much too early for this momma.

8. I removed the doors on the lower part of the built-ins, but after living with it, I think I might put them back on again for a cleaner look. (More images here).

I already mentioned that we put a queen bed in this room. I purchased a quilt for it that will be the basis for her entire room design. I can't wait to show you—someday! The brown chair won't stay. Tom has laid claim on it (though I'm not sure where it will go?) once I am done using it to rock the baby. 

upstairs plans—laundry room and bathroom

Our laundry room and main bathroom are highlighted in the layout below:


I love the laundry room and how conveniently located it is, but there are a few things that will improve its functionality. 

1. First, we need to repair the ceiling and walls that were damaged from leaks before our roof was replaced.

2. As in the kitchen, I want to remove the soffit in here too. Then I can move the cupboard over above the sink, and move the hanging bar over the washer/dryer. Currently when I hang clothes to dry (mostly jeans), they hang too low and get in the way of the sink. 

3. I will reuse the cabinets in here, but I want to give them a clean coat of white paint and dress them with new hardware.

4. We purchased a new front load washer/dryer when we moved in, so I want to build a new counter over them, mostly to prevent things from falling down between or behind the appliances.

5. Having a sink here is great, but this one is covered in years of hard water scum. I want to replace both the sink and faucet.

6. The other side of the room has great storage, but I would like to make some small adjustments. My Grandma had a sewing table here, but I would rather sew elsewhere and fill this space in with some open shelves to store laundry baskets. 


The main bathroom is another high priority project, but it might not be high enough to trump the Master bath and kitchen.


1. Flooring. The red shag carpet is already gone, and now it looks like this:

But we did buy the cheapest piece of vinyl we could find as a temporary solution because the long term plan is to lay tile on the floor in this room.

2. We also removed the shower doors. I would love love LOVE to have a claw foot tub in here. Since they are a teensy weensy bit over budget, I must search high and low for a vintage one I can have resurfaced. Please, please help me?

3. For the vanity I want to find a vintage dresser or credenza to convert.

4. And, of course, painting, trimming, and popcorn ceiling scraping. 

5. New vanity light fixture and mirror. I think I will actually keep the ceiling fixtures in here and just paint the metal black. Or reuse them in the hallway and buy a new fixtures in here.

If only because I need lots of time to scout for things for this bathroom, its a good thing it is further down on the priority list. It can't be too far down, however, because tile has started to fall off the counter top. And the toilet leaks. 


upstairs plans—living room

The kitchen and Master bath projects I've already outlined will make the rest seem like a cake walk. In this post I will share what we plan to do in our living room, which is mostly just cosmetic.

First, the living room area is highlighted in yellow:


You have seen the living room before, but these photos are of what it looks like currently with our own furniture:

This room presents some layout challenges. Maybe I'll share that another day and get some feedback.

For now, first on the list:

1. Flooring. This wool carpet is in the best shape of all the carpet in the house (except the bit that is patched under the piano leg), but it is also original to the house and I think it is ready to retire. I would like to put hardwood in this room—the same hardwood that we would lay in the den and master bedroom.


2. Window treatments. What does a person do on windows this big? Obviously the treatments that are there were quite pricey to install. There is lighting behind the cornice piece even. I am leaning toward simple roller solar blinds—something that won't impede the view—and going without curtains.

3. Strip wallpaper and paint. And this is the hard kind of wallpaper to remove. It will be a job. We also intend to scrape the popcorn off the ceiling in every room and replace the trim. (Much of the trim needs replaced or patched anyway because the heat registers were removed and left gaps.)

4. On the back wall in the photo above I would absolutely love to have a whole wall of built in bookcases, with cupboards on the bottom to store games.

5. Leading back into the bedrooms, we already removed a bookcase that was sticking out (before, left) to open up the traffic flow so it could go behind the seating area rather than through it.

6. I would like to replace the sconces you see above. The lighting on the other side behind the cornice will have to be removed. It isn't pretty enough to be exposed, and there isn't enough room for sconces above the window. Therefore, I will have to have another light source in this room. Lamps on switches, perhaps? Can lights? I know they say overhead lighting in a living room is not ideal . . .

I should mention that I haven't done much in the way of decorating yet, aside from hanging a few random things on hooks that already existed.


7. The fireplace would look (and be) fabulous with a new gas insert. It isn't operable at the moment. It has a gas (or propane) log in it currently, but there is a leak that makes it unsafe to use. 

Wow. Listing it all out like that makes it sound a little more complex than I thought. One thing at a time, right? 


upstairs plans—master bedroom

I mentioned yesterday that the kitchen project is my top priority upstairs (because we use it so heavily, and because I can't stand the carpet), but this project would be a close second—the master bedroom.

It is highlighted in yellow on the floor plan:


As you can see in the before plan, you can look right in to the Master bedroom from the front door of the house. I don't know about you, but I don't make my bed first thing every day, and I really don't need the UPS knowing that. So that leads us to our first project:

1. Relocate the door to the Master bedroom. Actually, there is already a second door to the room from the den, but it too narrow for a main door so it will need to be widened.

Here is a closer look at the layout:

There is nothing final about this floor plan. This is just my first attempt at a possible layout. But it illustrates the changes I would like to make:

2. Instead of just sealing off the main Master door, I would like to incorporate a powder room in that area. Currently guests have to travel through the living room to the back of the house where the main bathroom is located. It would be lovely to have a place inside the front door for guests to use the bathroom without having to walk through the whole house and for the guys to wash up before dinner.

This photo shows the bedroom before we moved in:

These built-in his and her closets and drawers are cool, but much smaller than the walk-in we had in Utah. We have been storing off-season clothes in another closet—something that requires work every season to change out. I'm not very good at keeping up with that.

This next photo shows the double entrances into the room—one from the front hallway and one from the den.


And this is what it looks like currently. We upgraded to a king-size bed shortly after moving, which we had wanted to do for a long time but didn't quite have the space for. That left us without a bed, however, so we have mattresses on the floor. 

3. Buy (or build) a bed.


4. The carpet is original and really worn. I would like to replace it with hardwood.

Here is the Master bath in all its glory.

As you can see from the layout, it is a very awkward shape. The storage is shy around the sink and there is no electrical outlet right next to the sink.

There is only room for a very small corner shower, and the toilet is an old wall-mounted water hog.


So . . .

5. Peel wallpaper and repaint. Or just knock down some walls. Ahem.

6. Move the back wall of the den forward and annex the old dark room into the Master bath space.

7. Somehow squeeze one beautifully tiled shower, toilet room (I'd love to have a separate door for the toilet—the best way to share a bathroom with your spouse), double sink vanity, and walk-in closet into the newly expanded space. Do you think we can do it? 

upstairs plans—kitchen/dining room

Next on my upstairs house tour (along with my plans/hopes for renovations) is the kitchen and dining room.

Here it is on the layout, highlighted in yellow:


Here is what we want to tackle, and not necessarily in this order:

Project #1. Replace cabinetry. The cabinets aren't in the best shape (slightly askew in some places) and are quite outdated, so I think keeping them is our least favorite option. Especially when I have a dad who is talented at building. I would just do new doors except we are planning a bit of a layout change.

The windows you see here I will probably leave bare. I like to keep them as wide open as possible and not impede the view or sunlight. After living here nearly a year I haven't lowered the pink blinds on these windows one time. (I did finally remove the floral valances though.)


2. Remove the peninsula and overhanging cabinets and add an island. There is maybe barely enough room for this, but this layout change is critical to fixing one major problem—the corner sink. When you are standing at the sink, you can't open the dishwasher very well. To get the dish soap out from under the sink, you have to close the dishwasher, grab the soap, and open the dishwasher again. It is almost impossible to have 2 people work at the sink at the same time. The sink and dishwasher would go in the island.

3. The overheads between the stove and window would be replaced with open shelves to house everyday dishes. That spot would be right across from the dishwasher and closest to the table.

4. Remove the overhead soffits. My Grandma was much shorter than I am and probably loved the low hanging cabinets. But they drive me crazy. (Oh, and the floral wallpaper border will have to come down with it. Bummer.)

P.S. If floral wallpaper is your taste, I apologize for the sarcasm. By now you probably know my tastes are slightly more modern, but I have nothing against floral wallpaper in your house.

5. No more carpet! Enough said.

6. Remove the overhead florescent fixture and add more can lights.

7. Include 2 ovens, either with double wall ovens and a separate cook top or a range with 2 ovens. Any tips on that? Who wouldn't love an extra wide commercial range—but whoa. Have you seen the prices on those?

8. Someday I would like to replace the windows on the other side of the peninsula and put patio doors there for access to a future patio. It would be perfect for harvest dinners and dining alfresco.

9. Remove the secretary in this corner (above) and use this space either for a pantry cupboard or refrigerator (depending on what I do with the ovens). Having a desk in the kitchen can be awesome, but this one is a clutter magnet and we never actually sit at it or use it as a desk.

10. The fireplace will pretty much stay as is, but I would love to get a gas insert on both sides. (It also opens to the living room on the other side.)

11. This odd little nook off the kitchen is where I would like to relocate the kitchen desk to. It isn't as useful as it could be right now, and being just off the kitchen it would allow a desk without taking precious kitchen real estate. I would have upper and lower cabinets to match the kitchen and a counter for my computer. We will need to wire power to this area for that but also because I would like to store the farm radios here (behind closed doors. Sorry, but they aren't the prettiest decor) and other various chargeables. The cabinets would house my cookbooks, phone books, school schedules, calendars, etc.

This is another view of the kitchen. This one was taken after we moved in with our Stainless Steel fridge.

12. I know a lot of people are over stainless appliances now, but I still think they are sleek and polished. I plan to replace the oven and microwave (the old ones will go in the basement kitchenette) with stainless. The dishwasher won't show so much behind the island and it works pretty well, so I may just keep it for now, or see if I can replace the front panel with a stainless panel.

This next photo is looking from the kitchen into the dining area.

And this is what it looks like now with our table in it.

The swing is long gone. The baby stays. Although that baby is almost a toddler now!

13. These sliding glass doors will have to be replaced because they don't seal well, despite the layers of weather stripping we've added.

14. The light fixtures are pretty swanky, but we will replace them with something more modern, of course. The fixture above the table needs to be centered.

And another view:

15. The built in china hutch is going to stay. It was built by my Grandma's father and given to them as a wedding gift. I think it looks great as is, but I am contemplating refinishing it to a slightly darker color* to better match everything else. And I may put new hardware on it. Thoughts? It would probably make sense to finish everything else and then evaluate.

16. New window treatments. I did finally take the lace curtains down because there was a shade under them, but the floral curtains remain because I haven't decided what to replace them with.

*Overall, I am going through what I call a "de-yellowing" process. Everything from the woodwork to the walls and trim has yellow undertones that was so popular in the seventies. I tend to like things more neutral/gray or with green undertones (like the fireplace). The yellow/orange woodwork might not look quite right when I get walls painted and introduce new kitchen cabinets and flooring.

That's it for the kitchen and dining room. Lofty plans, yes. I'd like to start here this coming winter because it impacts the flooring and that carpet has. to. go.

upstairs plans—entry/den

Although we aren't finished with our punch list in the basement yet, and we are in the thick of doing yard projects, I still can't help daydreaming about tackling the upstairs. I've made lots of plans and formed lots of ideas, so I've decided its time to share them with you.

I used the handy free floorplanner.com tool to create a before and after layout to show you. The entry area that I am going to show you first is highlighted in yellow.

First, lets enter through the front door.

Project #1: Replace this (and every) exterior door. The windows also need replaced in the entry area. I'm thinking a black or very dark brown door with lots of glass. Either one door with sidelights or perhaps a double door.

2. Paint all exterior trim dark brown.

3. Replace exterior soffit lights. (You can't see them here but believe me—they need it. Some of them are even held together with electrical tape!) However, these by the door I think I'll keep. I want to paint the metal black, or oil-rubbed bronze.

Next, we will step inside the door. (The next few photos were taken before we moved in.)

4. I want to tile the entry, down the hall into the laundry room, and the kitchen/dining room.

5. The planter is going away—sorry. It is a crucial part of my plan to move the back wall of the den and expand the master bath area. We need the real estate for the den area. That, and having a giant planter in your house is so—well, seventies.

To the right, you have the hallway to the garage. (The door on the left enters the Master Bedroom).

6. Although the storage is great, I want to take these closets out and make a bench with hooks above to store all the paraphernalia that lands inside the front door as we come and go. The refrigerator will stay. Having two refrigerators around here is mandatory when the only hit the grocery store once a week and often feed a whole crew.

Looking back the other way toward the den/office:

7. You will see that it is covered in paneling. If I were bent on preserving the midcentury appeal of this house I would keep it, but I'm not so it will go. I would like to have a desk and built in bookcases along the back wall.

8. I'd like to keep the light fixture, however, and the sconces in the hall. I also want to paint the metal black on these.

9. The floor will be hardwood, which will continue on into the bedroom.

10. As I mentioned before, the door to the darkroom (left on the back wall) will be sealed off and the that entire wall will probably move forward (see layout). My Grandma was a photographer, so the dark room has a sink and shelves in it. I think it is really awesome that they had a dark room, but it is obviously unnecessary now in the digital era.

11. There will likely be a pillar or two to define the space (and support?) and the flooring will be different, but the half-walls will be gone.

Here is another look at the den with our own stuff in it.

12. This furniture is now downstairs in my craft room, so in addition to the built-in desk and bookcases along the wall, I would like to find or build a desk/conference table and buy a couple of slipper chairs to use here for our farm meetings.

This photo looks down the hall toward the basement stairs and laundry room.

13. I would like to find a different solution for those closet doors. I would love a sliding barn type door, but if I do sliding doors they will need to overlap because there isn't enough wall on either side of the closet for them to slide out. Any ideas?

***Edit: I forgot to mention peeling wallpaper and painting—but maybe that's a given?

And finally, just for reference, this is looking from the back of the den toward the front door. The door to the left enters into the Master bedroom.

Up next, the kitchen and dining room.

Feng Shui Friday

To find out how you can join the Feng Shui Friday challenge, click here.

Well, its been over a month since my last Feng Shui Friday post. I think its because I haven't felt very inspired to get rid of my just-in-case items. Let's face it. I live over an hour from the nearest warehouse store and stocking up "just-in-case" is just a way of life for us.

So, moving on. I need to remember my own advice to Feng Shui "my way", as in make Feng Shui work for me rather than the other way around.

What I need the most and why I started this in the first place is ORGANIZATION. I have lots of organizing projects on my to-do list, so I will just share a little one with you today.

I have a cabinet in our living room that houses my piano, guitar, and flute music, as well as a few photo albums. It was looking a lot messy before (left) and it was hard to find anything when I wanted to play.


The solution was simple (After, right.) During our last visit to Utah I picked up some magazine files at IKEA. I organized my music by category and added labels. (Sorry about the glass glare. Not the best photos. And don't the curtains and carpet add so much??)


I also have several binders that house copies of my favorite songs. Every time I wanted to play from one I had to open each one to find the genre I was looking for.  I can't believe I lived without labels this long. I simply used Hodgepodge Hardware from Stampin' Up! that I had on hand, and glued them to the spine of each one.

I also had some linen albums in my stash, so I switched out a few miscellaneous photo albums for a more uniform look and added labels to these as well.

Simple things like this make me happy. Now it is so easy to find what I am looking for and the shelf looks much more put together in my living room. I have a few more magazine files on my shopping list as I was a little short—and I like to have room for overflow. I hope to raise 3 little musicians so I know there will be lots of additions to our music library!

If you have tackled any organization projects of your own lately, do share and leave a comment below. Happy Friday!

wet spring

Around here we are used to measuring rain fall in tenths, not in inches.

It has been a very wet spring, and since we (barely) finished seeding a week ago we have accumulated over 2 inches of rain. This is great for the crops, as long as it is followed by lots of warm sunshine and continued even moisture (as in, no long dry spells and no hail!)

The not-so-great impacts of all this rain were apparent on our drive through Eastern Montana last weekend. In particular along the Musselshell River, which followed our preferred road to Wyoming. We had to constantly check the road reports and make some adjustments to our route. On the way home we were able to take a shorter route, and found out that the road we took was again closed the next day. Not surprising since it rained. all. the. way. home.

This is a stretch of the Musselshell river. I'm not really familiar with the area, but I'm pretty sure this river is usually not much more than a meandering stream.

The water crossed the road in several places along our trip, but we were still able to go through it.

This poor old picturesque farm (that has probably been there for nearly 100 years) in Harlowtown, MT is quite a ways away from where the the river normally flows. There was also tall railroad bed between it and the river that should have been a great barrier. Nevertheless, it had water up to the red line when we traveled through on our way down. (I wish I had taken a picture of it then!) By the time we came back through the water had receded to this point.

This is another home that had water above their front door. There were many homes like this impacted by the flood, and it barely scratches the surface when you think about the floods along the Mississippi this year. And then you start thinking about the tornado and earthquake damage this year . . . and we have so so so many reasons to count our blessings.

Brian & Roxie's wedding

As I mentioned earlier, we had the privilege of attending my cousin's wedding at the Little America Hotel in Cheyenne, Wyoming. It was a happy and gorgeous occasion, and despite the long miles, we were so happy we made the trip to be there. Brian and Roxie will be our new neighbors on the farm here, you know, so we wanted to start them off by showing our support.

These are a few of my favorite photos from the occasion, but I mostly just sat back and enjoyed myelf and didn't take very many pictures. The location (indoors, low light) really made me painfully aware of the limitations of my out-of-date camera equipment (= blurry, grainy photos). That's okay. It's giving me further motivation to save funds for the new camera I crave. And I'm sure they got some gorgeous photos of their gorgeous wedding (from real photographers).

Congratulations, Brian and Roxie!

Memory Lane Monday—Memorial Day

Oh, hello! It's been awhile, hasn't it? We've been so busy focusing on "doing" that its hard to stop and talk about what we've been doing. We just returned from a lovely weekend in Wyoming attending the wedding of my cousin and soon-to-be neighbors. (More on that later.) The guys finally finished their spring seeding just before these uncharacteristically long spring rains hit. In the short breaks between rain storms we've been tackling some yard projects. (More on that later, too.)

In the meantime, it seemed appropriate to do a Memory Lane Monday post on Memorial Day.

From This Front Porch

This is one of my favorite pictures of my Grandma B., and we have it framed in our kitchen. They were so young (just married or just about to be?) before my Grandpa was deployed again in the Air Force during World War II. After he returned they raised 9 (NINE!) kids together, and I'm constantly amazed at that feat, considering how frazzled I sometimes feel with just 3 kids.

My grandma passed away the year I was married (1997) and even though I had the privilege of growing up down the road from her, I feel like I never got to know her as well as I'd have liked. You appreciate things differently when you are an adult than when you are a child, and when I got to that point in my life she was gone. Lately, living in the house they built together in 1971, I often find myself wondering about her experiences here. I think we would have had a lot in common. She did photography and had a studio set up in the basement. (There is also a dark room in house!) She also painted and did many other crafts, and I have can remember her painting in the dining room when we would drop by for a visit. Even though the decor in this house is dated and run down now, its clear that she was tuned into modern 70's decor and had fun decorating this house, just as I am now.

We visited her grave last night and dropped off flowers that we brought home from my cousin's wedding. I know she would have loved being at that wedding. The venue (Little America in Cheyenne) was right up her alley with its beautiful chandeliers and elegant decor. Miss you, Grandma!

Eva is 11 months old!

Today marks Eva's 11 month birthday. I just looked back at her 10 month update (which seems like was just yesterday—how time flies!) and I realize that a lot happens in just one quick month.

At her last update, she wasn't yet pulling herself up to stand, and now she pulls herself up on everything. (The little scratch you see below her eye was from a kitty—not ours, thankfully—and we were lucky it wasn't any closer to her little eye.)


Also, last month she didn't have any teeth. This month she is sporting two new bottom teeth, and probably soon to get more! Teething makes her a little cranky, but in general it doesn't affect her too much.


She has been having the most fun playing with her magnets at the fridge and can usually be seen toting one or two around the house.

She is now sleeping through the night (most of the time—I don't want to jinx our progress), except when we are away from home. Last weekend when we were out of town for my brother's wedding we spent the first torturous night with her having nothing to do with her Pack n' Play. Instead she spent most of the night in the crowded double bed with us, causing us all to get way too little sleep. The next night we fastened her into her stroller, paced the hotel room until she nodded off, and got a full night's sleep with her tucked snug in her stroller the whole time! She also napped in the stroller during the wedding festivities. Whatever works.

It is hard to believe that in one more quick month we will be celebrating her first birthday. I fret about her growing up to fast, but surprisingly not as much as I remember fretting with Abby. Now I know how much fun they are as they progress (and how much easier things are when they are more independent) so I just embrace every milestone!