the ultimate before picture

Aerial photographers periodically come by to sell their photographs to area farmers. We have a few photos of this house through the years and it is fun to look back and see how it has changed.

Last summer we were approached by one such photographer with some new photos for sale. The date the photographs were taken was June 28, 2010. Which happened to be our very first day in this house here on the farm.

If we were to have a new picture taken one year later, we would already see a few changes. For one, we parked some of the equipment away. (Who am I kidding? On busy summer days like this there is still a miscellany of equipment scattered around.) For another, we have a new roof. And a new swing set.

Some day it will be so fun to look back on this ultimate before photo of the very first day we lived in this house, and see how much it has changed. 

upstairs plans—landscaping

Last but not least, I would like to share with your are plans for landscaping the yard. We don't have a very firm plan for timing on this, but we have started on the lower front yard already (more later)!

This is the lower front yard I am referring to. It is lower because the daylight basement opens out onto it.

1. We have purchased a swing set and are slowing working on putting it together in our limited spare time. We are going to edge it and lay rubber mulch under it. 

2. The slopes to each side will be edged and covered with gravel. They are difficult to mow and the grass is unhealthy there anyway. I will plant low water plants there and add some decorative rocks. 

3. The bird bath is going to have to find a new home.

4. Eventually, we want to replant all the grass. It is Kentucky Blue Grass, which eventually grows into clumps when not watered regularly. When we do that (down the road) we may consider irrigation as well. 

5. On the right slope (which you can barely see) there are terraced concrete flower beds that were massively overgrown. We have dug out all the old bushes and plan to amend the soil and start fresh. 

6. The desk needs TLC. We were considering TREX, but at $35+ a board, we may look elsewhere. We have a new idea up our sleeve that I'll cover another time. We also thought about expanding the desk size, but I think we have ruled that idea out also. Once we repair the decking, we need to install a new rail. For now I pretty much have to forbid my kids to play on it.

In the upper front yard, to the left of the front entrance, we have another small area of grass.

7. I would like to tear out this wedge of grass and install a paver patio (and have patio doors installed from the dining area). I also want to built a pergola over the patio. When I say I want to build a pergola I mean I want my dad and husband to build me a pergola. In their spare time. I might be waiting awhile.

To the right of the entry and garage we have another patch of yard between the house and the shop.

Right now you can't see much beyond the overgrown shrubbery. What you can't see is an outdoor fireplace built by my uncle Raymond and a tall wooden fence separating the front from the back yard.

8. Cut back pine tree so you can see fireplace and gate. (Will a pine tree look funny if all the lower branches are pruned off? I don't really want to have to cut this tree down.)

9. Remove the overgrown juniper bushes.

10. Paint the fence.

11. Fix the fireplace??? From what I understand, the chimney is too short to work properly so the smoke all spews out the front. I don't know if it can be fixed, but it would be cool to try someday.

12. Reduce grass and add gravel, concrete pavers, and low water plantings.

13. New adjustable basketball hoop? My girls just can't shoot that high yet.

14. In the back yard its more of the same: reduce grass by adding edging and gravel areas with low water plants. 

15. Prune back the one bush and tree in the yard.

15. Build raised beds for gardening. (It's hard to tell in the bright photo, but there is a chain link fence around the back yard which may help in keeping some garden pests out. (i.e. bunnies, deer)

16. Maybe a sand pit for volleyball? It is a big yard. Why not?


That wraps up the tour of our house projects upstairs and outside. I'm sure we will add more to it as we go, but I think for now we have enough to keep us busy for the next 5 or 20 years.


upstairs plans—bedrooms

Are you overwhelmed with our project list yet? I am. And I'm not finished. Next up, the girls' bedrooms. They are highlighted in yellow:

Since I made this layout we've made a few changes to our plan. When we upgraded to a king bed, we swapped out the guest mattresses and were planning to get rid of the oldest of the queen mattresses we owned. Instead, we decided to keep them all and use one in Eva's room. We moved the other twin bed back in Sarah's room (so she has two beds in her room. Great for sleepovers, right?) Sarah's room below:


1. With two twin beds the flow is a little tight around her closet, so I am considering removing the doors and just putting curtains up. I would dress the two windows with the same curtains. I neglected to catch the window in my photos, but there is a large one on the left, making this such a great light and bright bedroom. (You can see other views from before we moved in here.)

2. The old original blue carpet will go and I want to put in white stained pine floors.

3. We will scrape popcorn off the ceiling, paint, and update the trim.

4. Looking back toward the door you can see the sink. I want to take this out. I'm not really a fan of having water in the bedroom, and I could use this space for a desk later. 

This is Eva's room:

5. Same routine: new flooring (also white pine), new paint, scraped ceiling, and new trim.

6. Must have a new light fixture for this room. The ceiling fan must go. Its low enough to bump your head on.

7. And I NEED to get window treatments sooner rather than later. The morning sun wakes Eva up much too early for this momma.

8. I removed the doors on the lower part of the built-ins, but after living with it, I think I might put them back on again for a cleaner look. (More images here).

I already mentioned that we put a queen bed in this room. I purchased a quilt for it that will be the basis for her entire room design. I can't wait to show you—someday! The brown chair won't stay. Tom has laid claim on it (though I'm not sure where it will go?) once I am done using it to rock the baby. 

upstairs plans—laundry room and bathroom

Our laundry room and main bathroom are highlighted in the layout below:


I love the laundry room and how conveniently located it is, but there are a few things that will improve its functionality. 

1. First, we need to repair the ceiling and walls that were damaged from leaks before our roof was replaced.

2. As in the kitchen, I want to remove the soffit in here too. Then I can move the cupboard over above the sink, and move the hanging bar over the washer/dryer. Currently when I hang clothes to dry (mostly jeans), they hang too low and get in the way of the sink. 

3. I will reuse the cabinets in here, but I want to give them a clean coat of white paint and dress them with new hardware.

4. We purchased a new front load washer/dryer when we moved in, so I want to build a new counter over them, mostly to prevent things from falling down between or behind the appliances.

5. Having a sink here is great, but this one is covered in years of hard water scum. I want to replace both the sink and faucet.

6. The other side of the room has great storage, but I would like to make some small adjustments. My Grandma had a sewing table here, but I would rather sew elsewhere and fill this space in with some open shelves to store laundry baskets. 


The main bathroom is another high priority project, but it might not be high enough to trump the Master bath and kitchen.


1. Flooring. The red shag carpet is already gone, and now it looks like this:

But we did buy the cheapest piece of vinyl we could find as a temporary solution because the long term plan is to lay tile on the floor in this room.

2. We also removed the shower doors. I would love love LOVE to have a claw foot tub in here. Since they are a teensy weensy bit over budget, I must search high and low for a vintage one I can have resurfaced. Please, please help me?

3. For the vanity I want to find a vintage dresser or credenza to convert.

4. And, of course, painting, trimming, and popcorn ceiling scraping. 

5. New vanity light fixture and mirror. I think I will actually keep the ceiling fixtures in here and just paint the metal black. Or reuse them in the hallway and buy a new fixtures in here.

If only because I need lots of time to scout for things for this bathroom, its a good thing it is further down on the priority list. It can't be too far down, however, because tile has started to fall off the counter top. And the toilet leaks. 


upstairs plans—living room

The kitchen and Master bath projects I've already outlined will make the rest seem like a cake walk. In this post I will share what we plan to do in our living room, which is mostly just cosmetic.

First, the living room area is highlighted in yellow:


You have seen the living room before, but these photos are of what it looks like currently with our own furniture:

This room presents some layout challenges. Maybe I'll share that another day and get some feedback.

For now, first on the list:

1. Flooring. This wool carpet is in the best shape of all the carpet in the house (except the bit that is patched under the piano leg), but it is also original to the house and I think it is ready to retire. I would like to put hardwood in this room—the same hardwood that we would lay in the den and master bedroom.


2. Window treatments. What does a person do on windows this big? Obviously the treatments that are there were quite pricey to install. There is lighting behind the cornice piece even. I am leaning toward simple roller solar blinds—something that won't impede the view—and going without curtains.

3. Strip wallpaper and paint. And this is the hard kind of wallpaper to remove. It will be a job. We also intend to scrape the popcorn off the ceiling in every room and replace the trim. (Much of the trim needs replaced or patched anyway because the heat registers were removed and left gaps.)

4. On the back wall in the photo above I would absolutely love to have a whole wall of built in bookcases, with cupboards on the bottom to store games.

5. Leading back into the bedrooms, we already removed a bookcase that was sticking out (before, left) to open up the traffic flow so it could go behind the seating area rather than through it.

6. I would like to replace the sconces you see above. The lighting on the other side behind the cornice will have to be removed. It isn't pretty enough to be exposed, and there isn't enough room for sconces above the window. Therefore, I will have to have another light source in this room. Lamps on switches, perhaps? Can lights? I know they say overhead lighting in a living room is not ideal . . .

I should mention that I haven't done much in the way of decorating yet, aside from hanging a few random things on hooks that already existed.


7. The fireplace would look (and be) fabulous with a new gas insert. It isn't operable at the moment. It has a gas (or propane) log in it currently, but there is a leak that makes it unsafe to use. 

Wow. Listing it all out like that makes it sound a little more complex than I thought. One thing at a time, right? 


upstairs plans—master bedroom

I mentioned yesterday that the kitchen project is my top priority upstairs (because we use it so heavily, and because I can't stand the carpet), but this project would be a close second—the master bedroom.

It is highlighted in yellow on the floor plan:


As you can see in the before plan, you can look right in to the Master bedroom from the front door of the house. I don't know about you, but I don't make my bed first thing every day, and I really don't need the UPS knowing that. So that leads us to our first project:

1. Relocate the door to the Master bedroom. Actually, there is already a second door to the room from the den, but it too narrow for a main door so it will need to be widened.

Here is a closer look at the layout:

There is nothing final about this floor plan. This is just my first attempt at a possible layout. But it illustrates the changes I would like to make:

2. Instead of just sealing off the main Master door, I would like to incorporate a powder room in that area. Currently guests have to travel through the living room to the back of the house where the main bathroom is located. It would be lovely to have a place inside the front door for guests to use the bathroom without having to walk through the whole house and for the guys to wash up before dinner.

This photo shows the bedroom before we moved in:

These built-in his and her closets and drawers are cool, but much smaller than the walk-in we had in Utah. We have been storing off-season clothes in another closet—something that requires work every season to change out. I'm not very good at keeping up with that.

This next photo shows the double entrances into the room—one from the front hallway and one from the den.


And this is what it looks like currently. We upgraded to a king-size bed shortly after moving, which we had wanted to do for a long time but didn't quite have the space for. That left us without a bed, however, so we have mattresses on the floor. 

3. Buy (or build) a bed.


4. The carpet is original and really worn. I would like to replace it with hardwood.

Here is the Master bath in all its glory.

As you can see from the layout, it is a very awkward shape. The storage is shy around the sink and there is no electrical outlet right next to the sink.

There is only room for a very small corner shower, and the toilet is an old wall-mounted water hog.


So . . .

5. Peel wallpaper and repaint. Or just knock down some walls. Ahem.

6. Move the back wall of the den forward and annex the old dark room into the Master bath space.

7. Somehow squeeze one beautifully tiled shower, toilet room (I'd love to have a separate door for the toilet—the best way to share a bathroom with your spouse), double sink vanity, and walk-in closet into the newly expanded space. Do you think we can do it? 

upstairs plans—kitchen/dining room

Next on my upstairs house tour (along with my plans/hopes for renovations) is the kitchen and dining room.

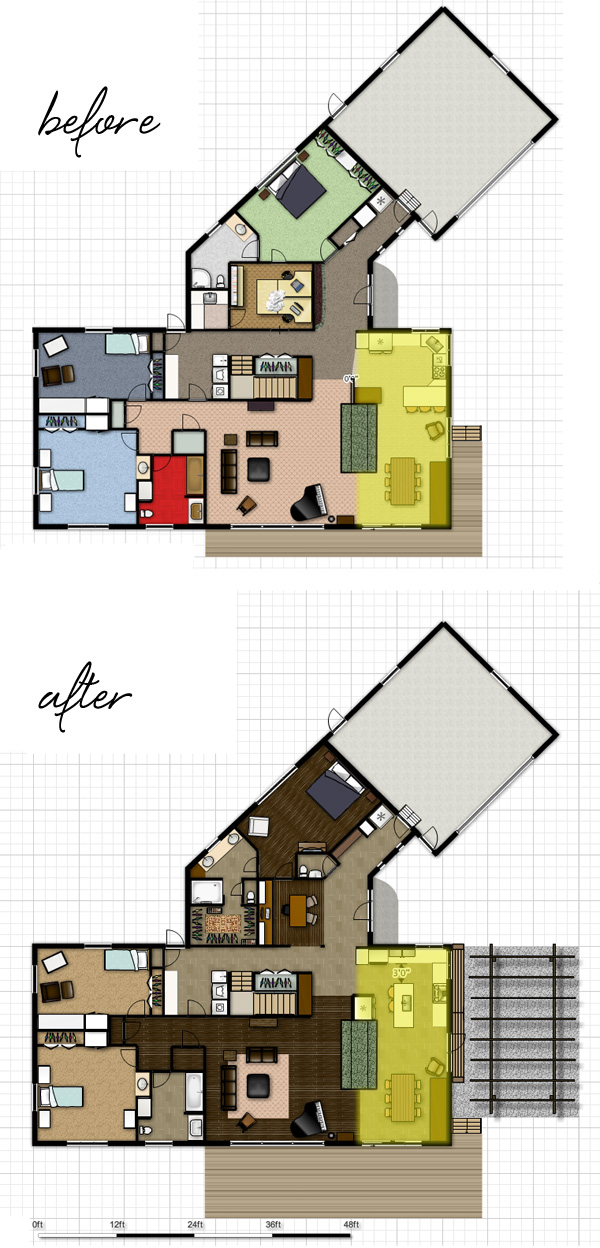
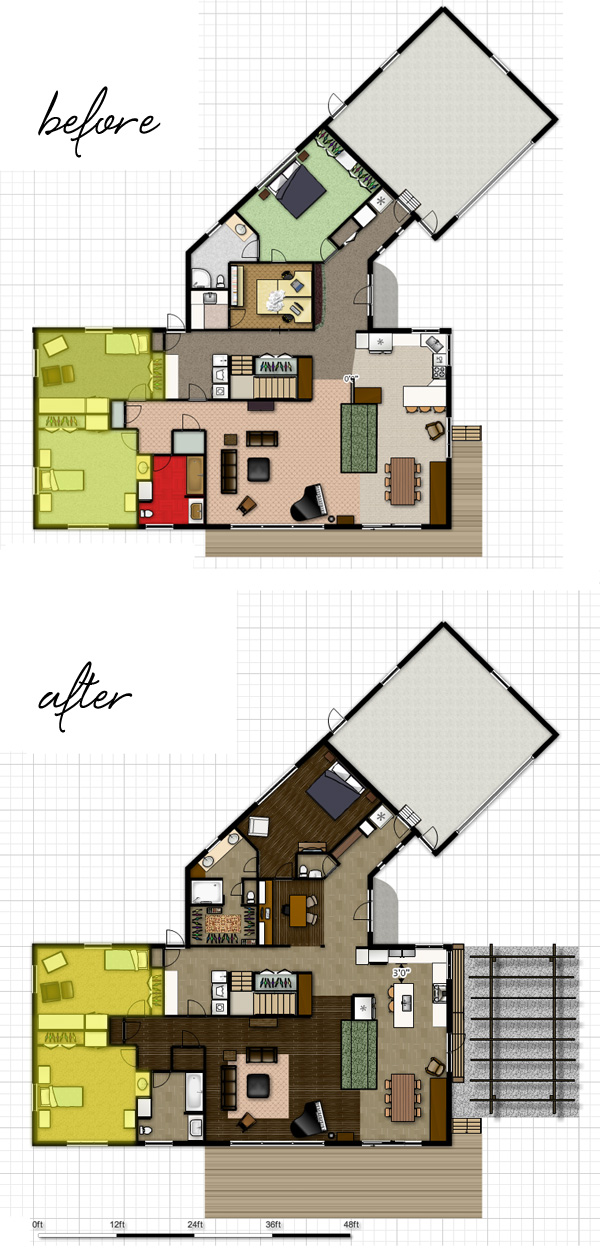
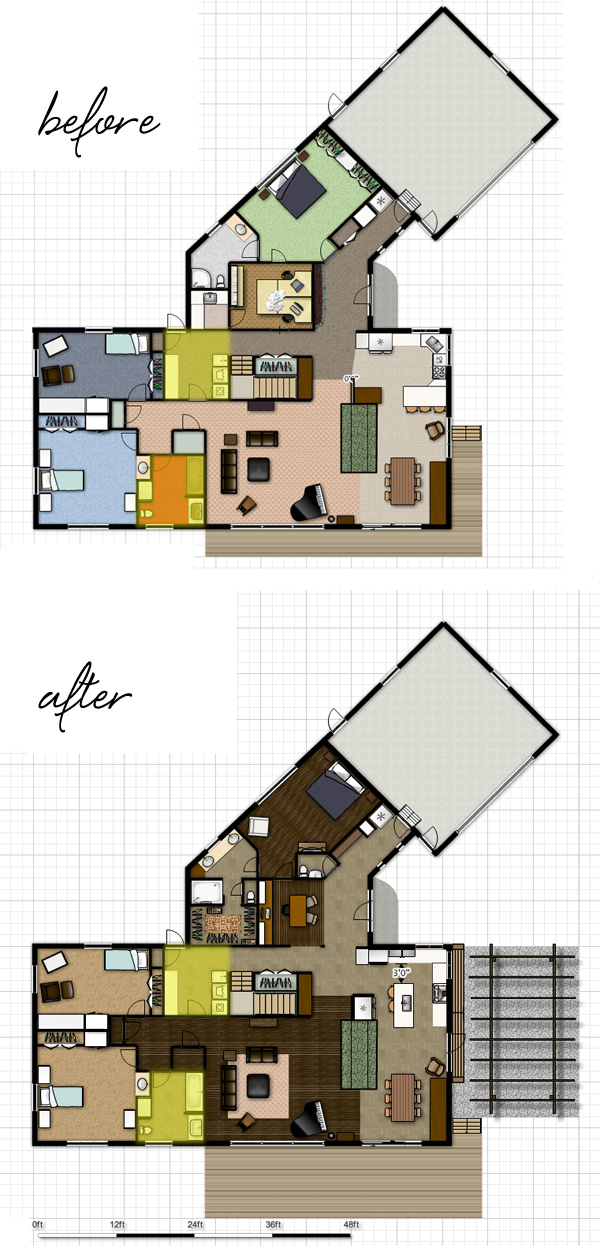
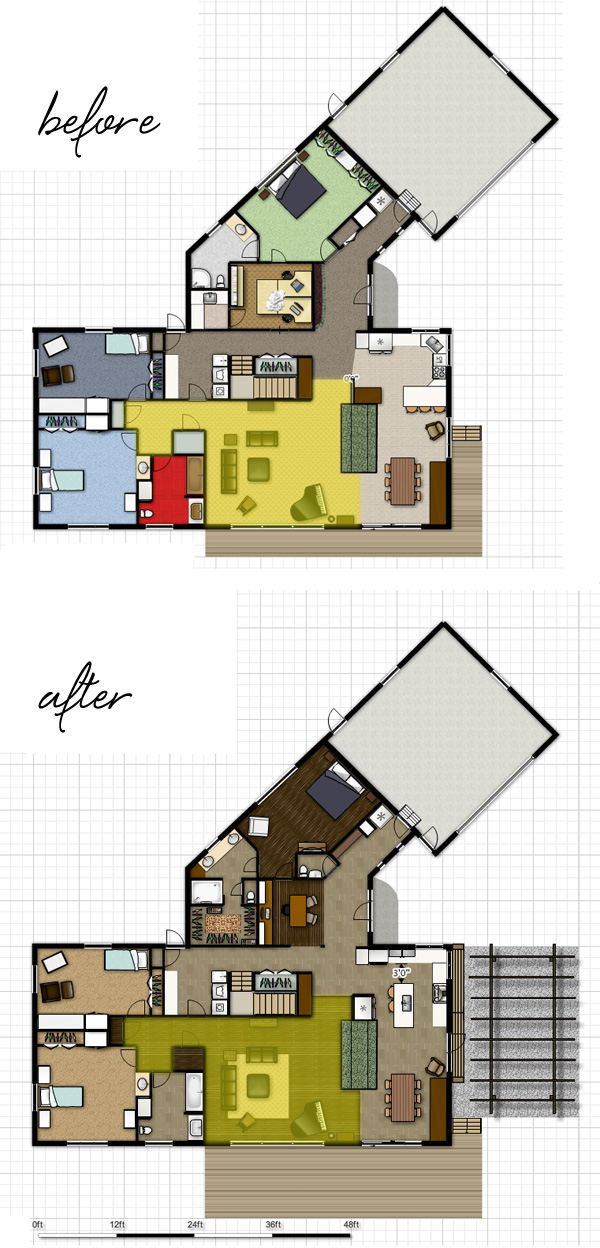
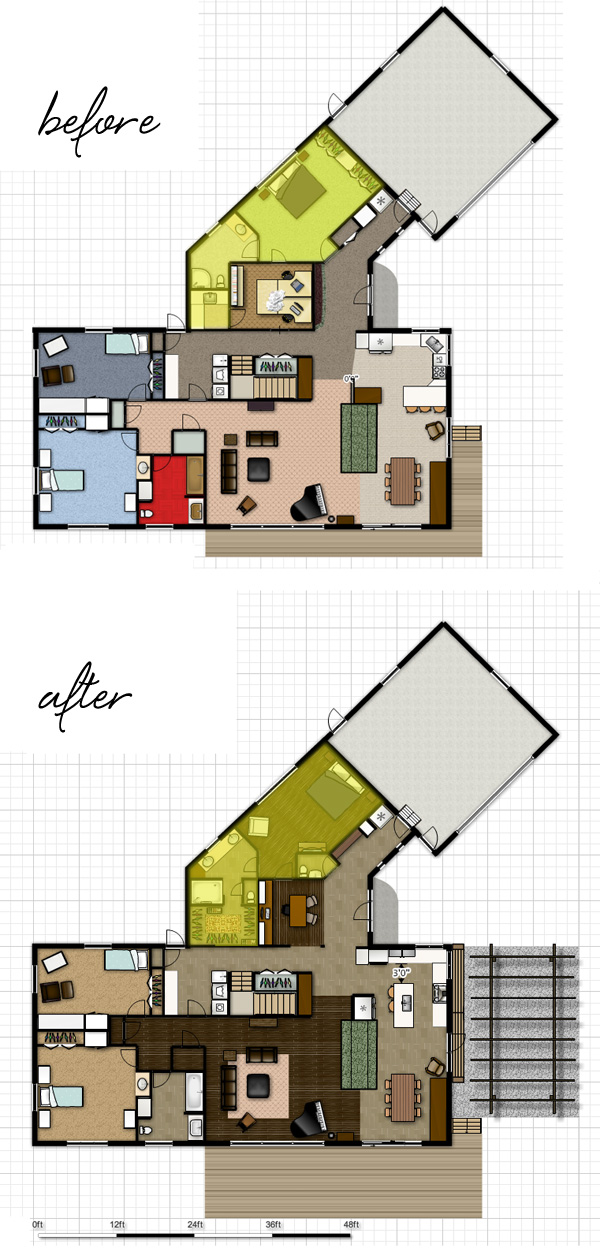
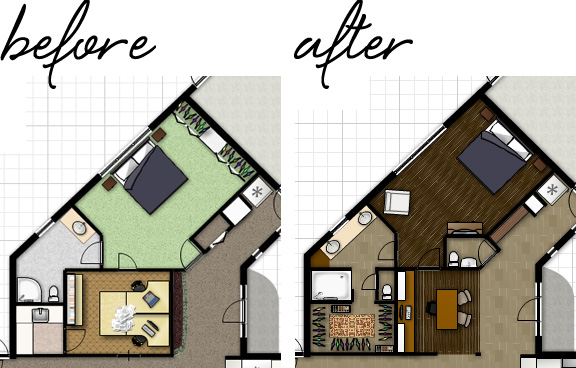
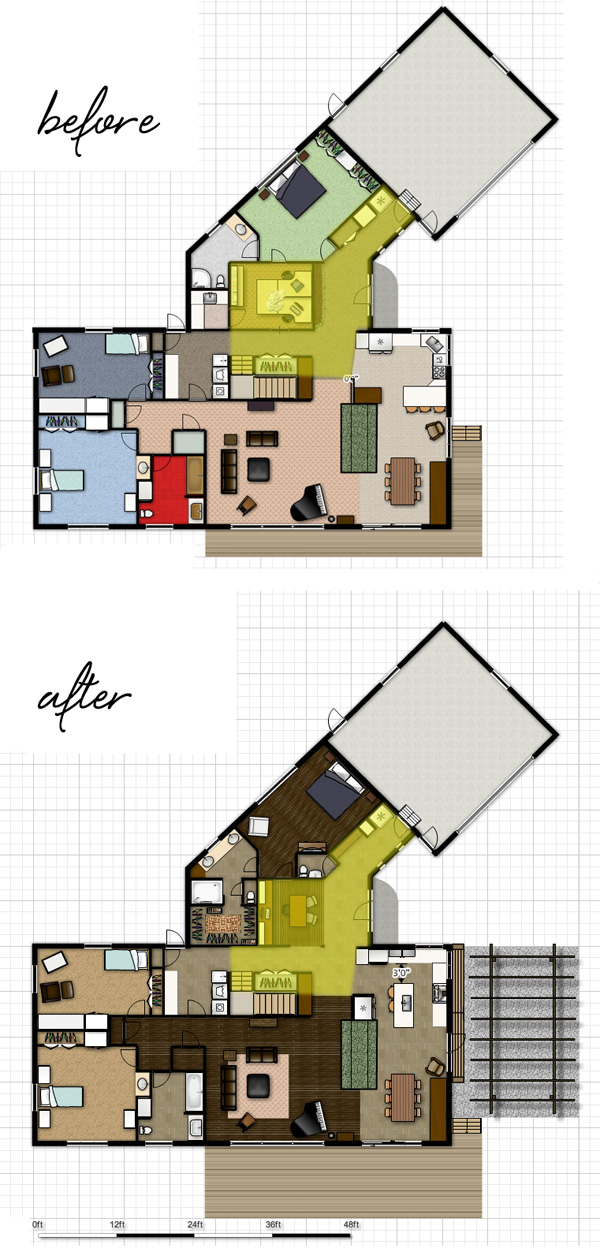
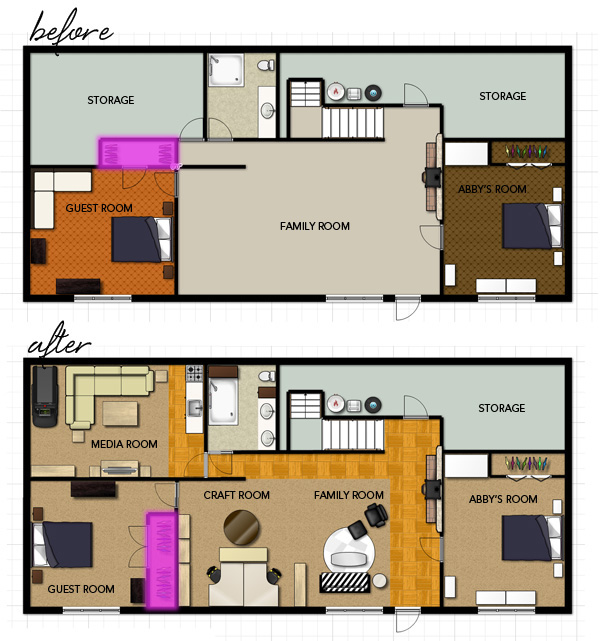
Here it is on the layout, highlighted in yellow:


Here is what we want to tackle, and not necessarily in this order:

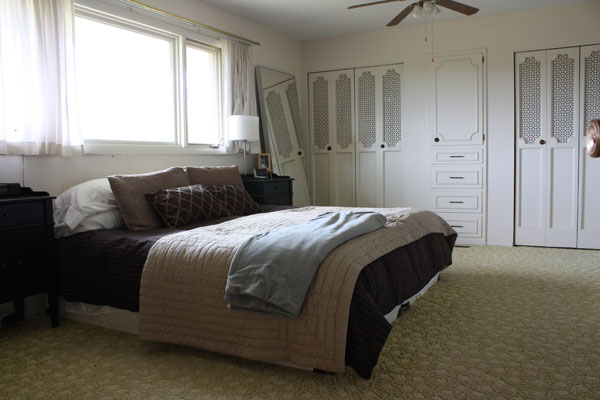
Project #1. Replace cabinetry. The cabinets aren't in the best shape (slightly askew in some places) and are quite outdated, so I think keeping them is our least favorite option. Especially when I have a dad who is talented at building. I would just do new doors except we are planning a bit of a layout change.

The windows you see here I will probably leave bare. I like to keep them as wide open as possible and not impede the view or sunlight. After living here nearly a year I haven't lowered the pink blinds on these windows one time. (I did finally remove the floral valances though.)


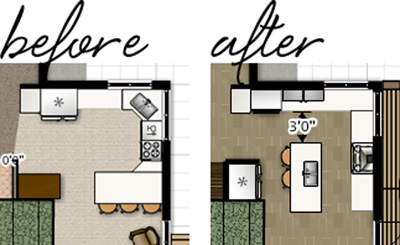
2. Remove the peninsula and overhanging cabinets and add an island. There is maybe barely enough room for this, but this layout change is critical to fixing one major problem—the corner sink. When you are standing at the sink, you can't open the dishwasher very well. To get the dish soap out from under the sink, you have to close the dishwasher, grab the soap, and open the dishwasher again. It is almost impossible to have 2 people work at the sink at the same time. The sink and dishwasher would go in the island.

3. The overheads between the stove and window would be replaced with open shelves to house everyday dishes. That spot would be right across from the dishwasher and closest to the table.

4. Remove the overhead soffits. My Grandma was much shorter than I am and probably loved the low hanging cabinets. But they drive me crazy. (Oh, and the floral wallpaper border will have to come down with it. Bummer.)

P.S. If floral wallpaper is your taste, I apologize for the sarcasm. By now you probably know my tastes are slightly more modern, but I have nothing against floral wallpaper in your house.

5. No more carpet! Enough said.

6. Remove the overhead florescent fixture and add more can lights.

7. Include 2 ovens, either with double wall ovens and a separate cook top or a range with 2 ovens. Any tips on that? Who wouldn't love an extra wide commercial range—but whoa. Have you seen the prices on those?

8. Someday I would like to replace the windows on the other side of the peninsula and put patio doors there for access to a future patio. It would be perfect for harvest dinners and dining alfresco.

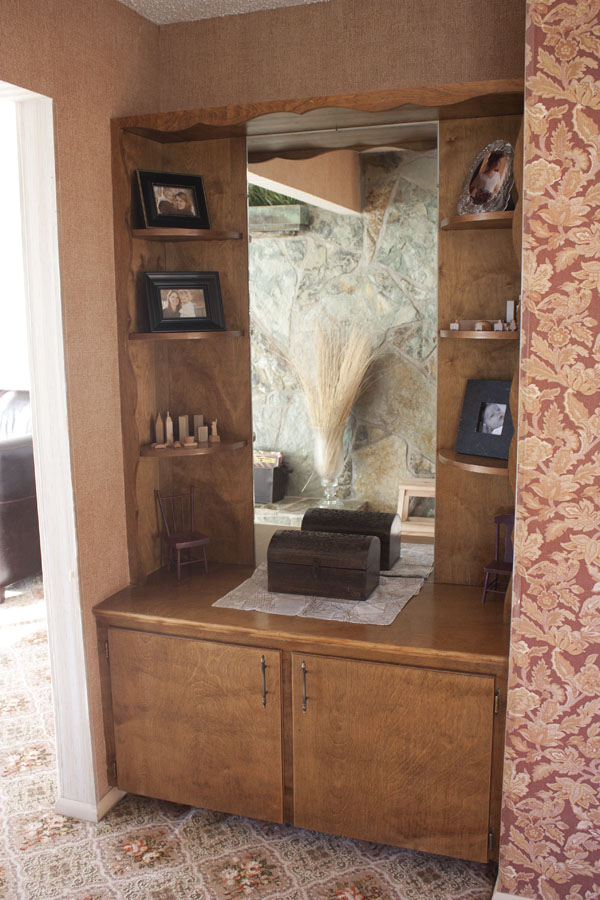
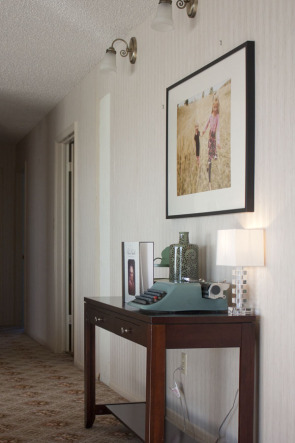
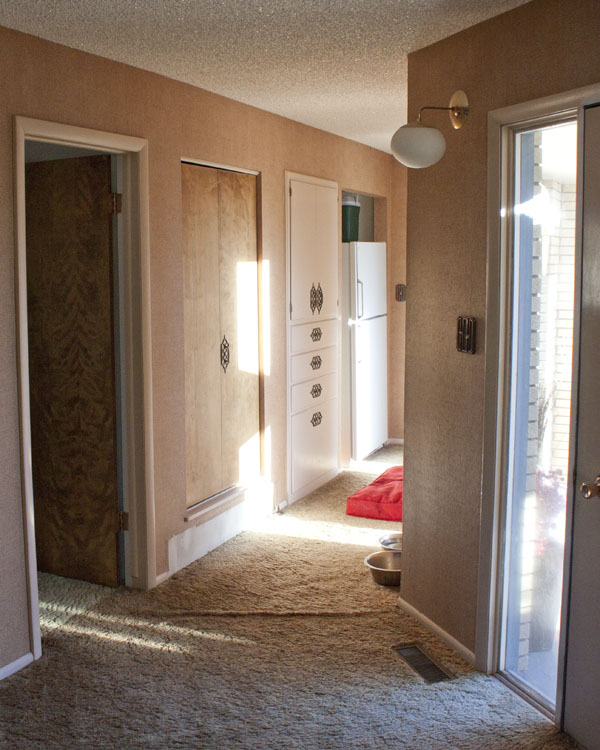
9. Remove the secretary in this corner (above) and use this space either for a pantry cupboard or refrigerator (depending on what I do with the ovens). Having a desk in the kitchen can be awesome, but this one is a clutter magnet and we never actually sit at it or use it as a desk.

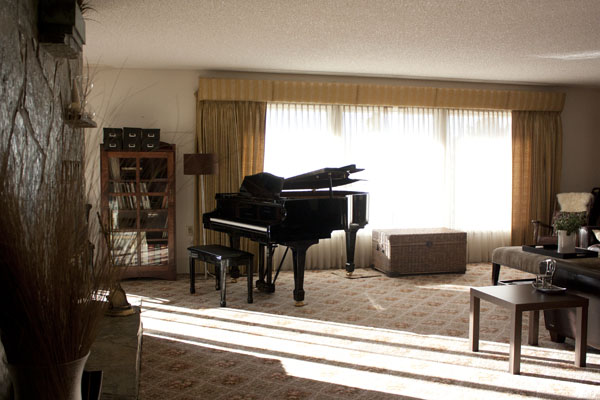
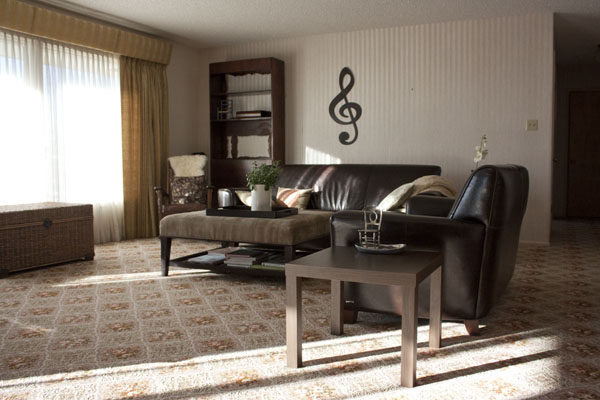
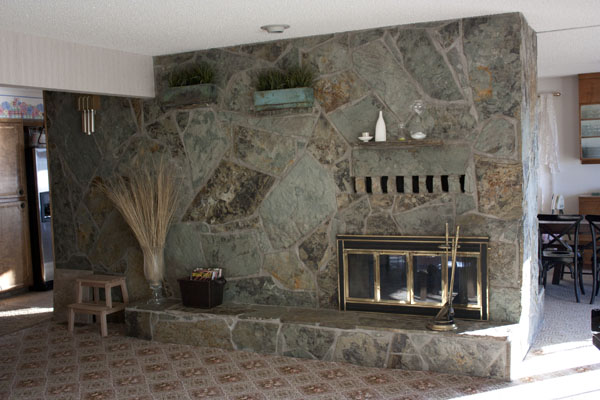
10. The fireplace will pretty much stay as is, but I would love to get a gas insert on both sides. (It also opens to the living room on the other side.)

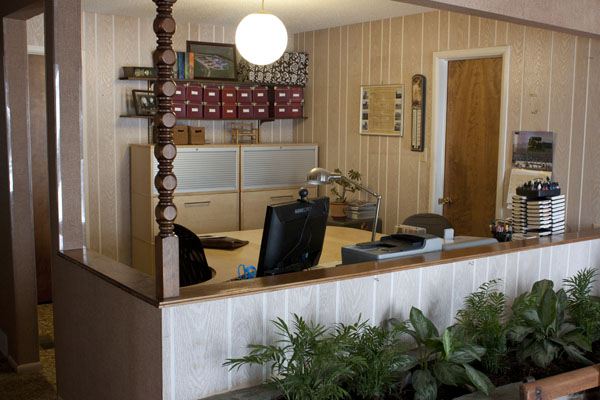
11. This odd little nook off the kitchen is where I would like to relocate the kitchen desk to. It isn't as useful as it could be right now, and being just off the kitchen it would allow a desk without taking precious kitchen real estate. I would have upper and lower cabinets to match the kitchen and a counter for my computer. We will need to wire power to this area for that but also because I would like to store the farm radios here (behind closed doors. Sorry, but they aren't the prettiest decor) and other various chargeables. The cabinets would house my cookbooks, phone books, school schedules, calendars, etc.

This is another view of the kitchen. This one was taken after we moved in with our Stainless Steel fridge.

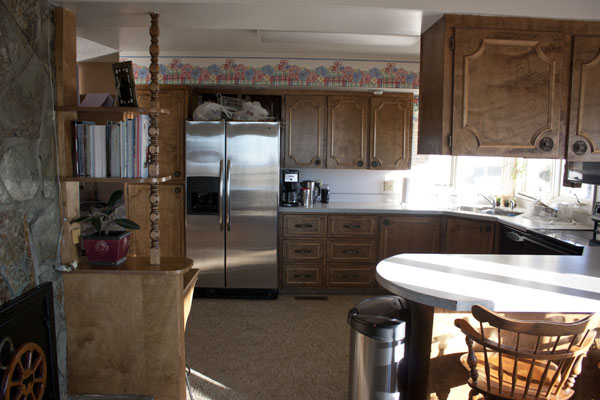
12. I know a lot of people are over stainless appliances now, but I still think they are sleek and polished. I plan to replace the oven and microwave (the old ones will go in the basement kitchenette) with stainless. The dishwasher won't show so much behind the island and it works pretty well, so I may just keep it for now, or see if I can replace the front panel with a stainless panel.

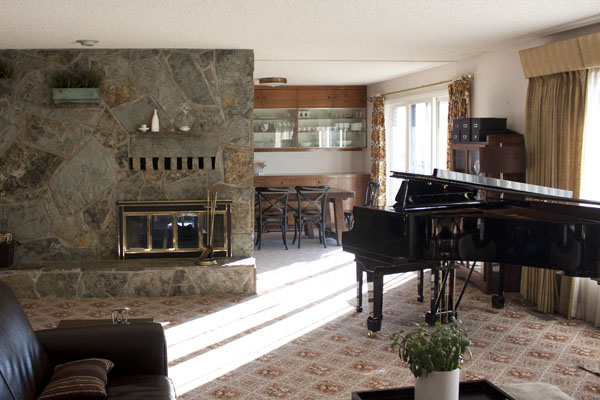
This next photo is looking from the kitchen into the dining area.

And this is what it looks like now with our table in it.

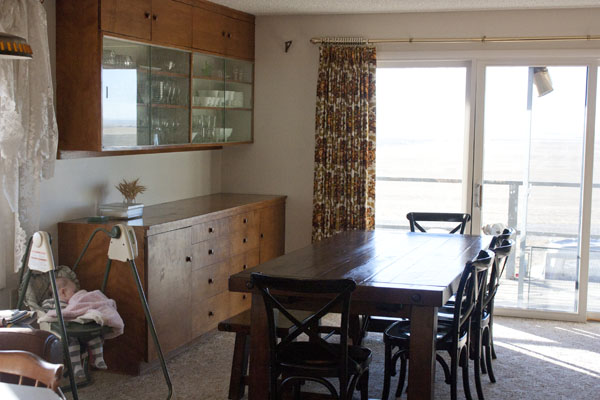
The swing is long gone. The baby stays. Although that baby is almost a toddler now!

13. These sliding glass doors will have to be replaced because they don't seal well, despite the layers of weather stripping we've added.

14. The light fixtures are pretty swanky, but we will replace them with something more modern, of course. The fixture above the table needs to be centered.

And another view:

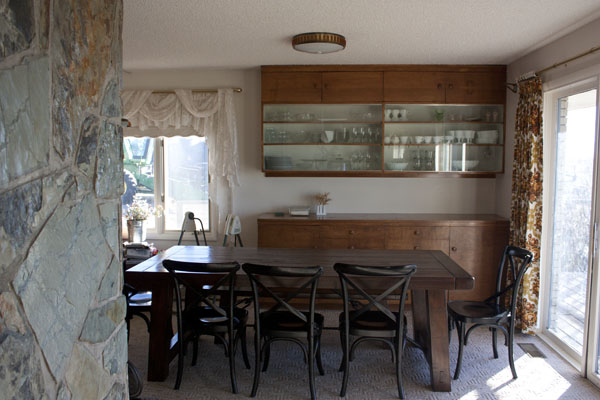
15. The built in china hutch is going to stay. It was built by my Grandma's father and given to them as a wedding gift. I think it looks great as is, but I am contemplating refinishing it to a slightly darker color* to better match everything else. And I may put new hardware on it. Thoughts? It would probably make sense to finish everything else and then evaluate.

16. New window treatments. I did finally take the lace curtains down because there was a shade under them, but the floral curtains remain because I haven't decided what to replace them with.

*Overall, I am going through what I call a "de-yellowing" process. Everything from the woodwork to the walls and trim has yellow undertones that was so popular in the seventies. I tend to like things more neutral/gray or with green undertones (like the fireplace). The yellow/orange woodwork might not look quite right when I get walls painted and introduce new kitchen cabinets and flooring.

That's it for the kitchen and dining room. Lofty plans, yes. I'd like to start here this coming winter because it impacts the flooring and that carpet has. to. go.

upstairs plans—entry/den

Although we aren't finished with our punch list in the basement yet, and we are in the thick of doing yard projects, I still can't help daydreaming about tackling the upstairs. I've made lots of plans and formed lots of ideas, so I've decided its time to share them with you.

I used the handy free floorplanner.com tool to create a before and after layout to show you. The entry area that I am going to show you first is highlighted in yellow.

First, lets enter through the front door.

Project #1: Replace this (and every) exterior door. The windows also need replaced in the entry area. I'm thinking a black or very dark brown door with lots of glass. Either one door with sidelights or perhaps a double door.

2. Paint all exterior trim dark brown.

3. Replace exterior soffit lights. (You can't see them here but believe me—they need it. Some of them are even held together with electrical tape!) However, these by the door I think I'll keep. I want to paint the metal black, or oil-rubbed bronze.

Next, we will step inside the door. (The next few photos were taken before we moved in.)

4. I want to tile the entry, down the hall into the laundry room, and the kitchen/dining room.

5. The planter is going away—sorry. It is a crucial part of my plan to move the back wall of the den and expand the master bath area. We need the real estate for the den area. That, and having a giant planter in your house is so—well, seventies.

To the right, you have the hallway to the garage. (The door on the left enters the Master Bedroom).

6. Although the storage is great, I want to take these closets out and make a bench with hooks above to store all the paraphernalia that lands inside the front door as we come and go. The refrigerator will stay. Having two refrigerators around here is mandatory when the only hit the grocery store once a week and often feed a whole crew.

Looking back the other way toward the den/office:

7. You will see that it is covered in paneling. If I were bent on preserving the midcentury appeal of this house I would keep it, but I'm not so it will go. I would like to have a desk and built in bookcases along the back wall.

8. I'd like to keep the light fixture, however, and the sconces in the hall. I also want to paint the metal black on these.

9. The floor will be hardwood, which will continue on into the bedroom.

10. As I mentioned before, the door to the darkroom (left on the back wall) will be sealed off and the that entire wall will probably move forward (see layout). My Grandma was a photographer, so the dark room has a sink and shelves in it. I think it is really awesome that they had a dark room, but it is obviously unnecessary now in the digital era.

11. There will likely be a pillar or two to define the space (and support?) and the flooring will be different, but the half-walls will be gone.

Here is another look at the den with our own stuff in it.

12. This furniture is now downstairs in my craft room, so in addition to the built-in desk and bookcases along the wall, I would like to find or build a desk/conference table and buy a couple of slipper chairs to use here for our farm meetings.

This photo looks down the hall toward the basement stairs and laundry room.

13. I would like to find a different solution for those closet doors. I would love a sliding barn type door, but if I do sliding doors they will need to overlap because there isn't enough wall on either side of the closet for them to slide out. Any ideas?

***Edit: I forgot to mention peeling wallpaper and painting—but maybe that's a given?

And finally, just for reference, this is looking from the back of the den toward the front door. The door to the left enters into the Master bedroom.

Up next, the kitchen and dining room.

basement progress—main room

I'm not sure what to call this room. Main room? Big room? Craft room? Family room? Play room? Check. Everything room? In any case, this is the final room of the basement remodel tour.

As I have said with the previous spaces, I have a lot of decorating to do as time and funds permit—window treatments, rugs, artwork, etc. The basics are in place, however.

You might recognize some of my Craig's List finds throughout the basement (the chair, lamps, side tables, and coffee tables above, and my desk chairs.) The couch belonged to my Grandpa and I bought it in our family auction. The rest of the furniture is mostly IKEA and came with us from Utah.

This is my office/art area. As you can imagine, I have a lot of plans for this space. As you can also imagine, it doesn't usually look this clean. The great thing about giving virtual tours is I can stash stuff in the neighboring room for the photo shoot.

As for the original fireplace, I usually get one of two responses—either "I love the brick!", or "What are you going to do with the fireplace?" as if we just haven't gotten that far yet. Well, it stays. Don't get me wrong, I would love to have a sleeker looking fireplace, but this wood fireplace serves as backup in case of a power outage, and that isn't unheard of around here. I think I will use artwork and accessories to work with it and make it feel like it belongs. Any ideas?

basement progress—media room and guest room

What was once a storage room (with no windows) . . .

. . . is now our media room (or Tom's man cave as we have also called it).

To make this room more useful, we opened it up by relocating the closet for the guest room next door, as highlighted in pink in the floor plan below:

The giant bedroom could afford to lose the space it took for the new closet, and it also helped us hide an exposed pipe in that room.

Since we still have a storage room in the other corner of the house, it was really cool to be able to carve out a usable space from this room.

We already had this cabinet from IKEA, so we recessed it in to the wall to showcase Tom's Nascar car collection. This is his room to display all of his sports memorabilia also. (Well, an approved, edited selection of memorabilia. Ha ha.)

In the other corner of the room (currently serving as storage for unpacked excessive memorabilia) we plan to install a kitchenette. It will have a sink, stove, microwave, and space for a small refrigerator. This space will be very helpful when we tear apart our kitchen upstairs!

The couches came with us from Utah, as well as the coffee table and media center (IKEA). The sconces are from Lowes.

This is the neighboring guest room:

You can just barely see the window in the the photo above and how we reframed all of the windows (and doors and base boards.)

This closet is waiting for doors to be painted also.

This furniture also came with us from Utah. The dresser and armour were purchased from Pier One about 10 years ago. The bed is Ethan Allen and was used in our Master until we recently upgraded to a King mattress. The quilt was purchased from Pottery Barn and the Eiffel Tower lamp from Target, both quite a few years ago. I am a fan of reusing what I have as much as possible! Oh, and yes, that is our cat Zoe who is quite good at making herself comfortable all over the house.

That leaves just one more room to show you—the large main/family room. I am still working on getting it cleaned up enough for photos, so stay tuned for pictures in the next day or two.

Tell us what you think so far! Of course I have lots of decorating to do . . .

basement progress—bathroom

I'm back this week with more photos of our basement progress.

It's hard to appreciate how far this bathroom has come without seeing the old one in person. But trust me—this is probably the room that saw the biggest improvement.

It is difficult to miss the hard-water corroded faucet and sink, formica counter top that wrapped oddly up the wall, the mirror that wasn't lined up above the sink, the vanity doors that wouldn't slide open without falling out of their track, the plastic tile shower surround, and the concrete shower floor and brick base.

Because now we have this:

The photo is labeled "in progress" because we have a couple of key things to finish: a floor to ceiling narrow cabinet that will go between the vanity and toilet (the current 2x4 wood support on the vanity will go away) and the tile backsplash that we will install after the cabinet is in place. And hanging the mirrors.

The sinks are Decolav and the faucets Glacier Bay, both from Home Depot (also both in stock items which is so much less expensive!). All the floor/shower tile and marble countertop tile is also from Home Depot. (Going with tile for the counter top was SO much less than getting a granite or marble slab). We bought the mirrors for $10 each from IKEA, and although they are a little bit narrower than ideal, they were much less than cutting custom mirrors. The light fixtures are from West Elm, and the baskets are from Target.

This is now by far the best shower in the house. It features dual shower heads (love)!

The tile is all my dad's handiwork. He also built the cabinets that I will show you once they are installed. (They are waiting for Yours Truly to apply 2 more coats of varnish.) We are so blessed to have someone with so much talent helping us doing most of the work on this remodel and otherwise probably wouldn't be able to have half as nice a result. Thanks one hundred times over, Dad!

basement progress—Abby's room

Welcome to Abby's room! (Part 2 of our basement remodel tour)

We have some artwork to create and some things to hang on the wall, but for the most part, Abby's room is complete. (Try to ignore the blue tape in the upper right corner of the door. Of course you probably didn't even notice until I pointed it out.)

We used the desk and bed from our old guest room in Utah. Her shelves were in her old room. Her bedside pendants were from CB2 and I had purchased them ages ago after our dining room light fiasco. After finding out they were not hard wired, I stuck them in a closet to use eventually. I was so happy to use them in here! The throw pillows on her bed were purchased from Target and used to be on the couch in our family room. In fact, the only thing we bought brand new for her room was her cute Land of Nod duvet and shams and a mirror from IKEA. I love how we have a completely new room with things we mostly already had!

She will have closet doors—as soon as we get them painted. And we are going to put some magnet boards up above her desk for her to hang things on.

I wish I had a picture of the old light fixture, but it wasn't pretty. The new rooms are all fitted with multiple can lights on dimmers. It is so much nicer than one central dim light in the room.

As it goes with older homes, the floors in every room of the basement were cracked and heaved in the middle. As a result, carpet was about our only flooring option (except for the traffic areas where we laid cork). Abby's room features the same carpet we chose throughout... a very subtle green. Her floors were particularly uneven, which presented quite a challenge when trying to level the shelves below her window. Oh well, with the wide-angle lens warp, you can't see the uneven flaws anyway.

The trouble with not touching a house for 40 years is that some of it is actually back in style now. And I know at least a few of you are going to say "What??? Why did you change that?" But I'm pretty sure brown shag carpet and orange bedding didn't suit my 8-year old daughter's taste.

Her new room is a bit more grown up than her old one. (Sniff, sniff.) She also had absolutely no trepidation about sleeping in the basement, even before her room was nice and new.

What do you think? More to come!

basement progress—stairs and hall

If I waited until our basement was completely finished before snapping photos I may never get it done, so I decided to give you a glimpse of where it stands today. Here is the stairway and hall as it was before:

Beautiful, isn't it? I know some of you think it was a total crime to get rid of that wallpaper. (But hey, we had no choice. Those walls were gutted at one point.) And this is what it looks like today!:

This is a slightly different angle, of course. You can see the cork flooring we laid in the traffic areas and the carpet that we laid throughout the rest of the basement. We are happy with both.

The stack of doors are for closets and are waiting to be painted, as is the door you can see at the end of the hallway.


Here is a better look at the new stairs. (When I do my final after shots I need to do a better job of capturing the same angles!) I love how this turned out. We have a few more pieces of trim to install, and then I can finish caulking and painting this area. We also plan to put up a rail of some sort.

Under the stairs we added a little playhouse for the kids. It is a hit and a much better use of that space for us. (The air intake for the new forced air heating system runs through there, so we simply built a platform over it.)


In the photo above left you can see a bit more of the trim that needs to be finished.

We reused the bookcase (seen above in the first photo in this post) that was there, chopped off the top, painted it, and installed it in the back of their play house to store toys. It fit perfectly.

The girls love the little window and use it as their drive-thru window. Hey, take-out is hard to come by out here so we'll take what we can get! (Even plastic hamburgers.)

I put legos and other small toys here because it keeps them out of Eva's reach.

More coming soon!

a red-letter day

I almost forgot to tell you—we rolled out the red carpet! Rolled it right up and out of the house to the dump.


As much as we valued this carpet for nostalgia's sake (cough, cough), it was time for it to go. For it's aesthetics, yes, but more so because it was completely unsanitary—perpetuated by a slow leak in the toilet. Yep, sorry, this post is about a bathroom, after all. It was a dirty job to remove as it was glue-down rubber-backed carpet that had to be scraped up.

So, when we ordered our carpet for the basement, we asked the floor guy if he had a cheap piece of vinyl he could sell us. He offered this piece for $100, and we agreed sight unseen. We really didn't care what it looked like, but it didn't turn out half bad.

While we were at it we also decided to remove the lace curtains and the old glass shower doors to make sitting on the edge of the tub and bathing kids easier.

It made a huge difference in opening up the bathroom. It did leave some marks on the tub (that I can't get off despite trying vinegar, lime away, etc.) and some minor holes in the tile, but it was still worth it. I put up the shower curtain from the girl's old bathroom to keep the shower functional.


I hesitate to call these "after" pictures, because really they are just temporary. There is still a lot of work to do to improve this bathroom. It badly needs a paint job, for example (as you can see from the marks left by the old register). Tom lightly tacked up some baseboard to hide the unsightly black stuff left by the carpet base, but we didn't even glue the vinyl down.

Eventually we hope to completely redo this bathroom; new tub and sink, vanity, and tile floors and tub surround. Even though the guys are saying "whoa, one project at a time, lady!", I can't help but dream a little about someday . . .

image from Longman & Eagle.

I lost the source for this image. If you know it, please let me know. Thanks!

I especially love this bottom image. I am inspired by black and white tiled floors, lovely wood vanities (maybe even an old dresser), and unique mirrors. Does anyone miss the red carpet treatment now?